CSS basics: change the size, font and line-spacing of text on your website
This tutorial will cover some of the ways you can style the text on your website using CSS. If you have not done so already, then be sure to create a 'main.css' stylesheet to store your CSS code.
Font size
The font size of headings and paragraphs are pre-determined but can be altered manually. To style a heading or paragraph, type into your 'main.css' stylesheet the value of the element you wish to style (e.g. 'h1') followed by curly braces { }. The curly braces will contain the style instructions. For example, the font size of all h1 elements can be modified by typing the following code:
h1 {
    font-size: 4em;
}
There are a couple of things to note about the above code. First, each CSS attribute must end with a semi-colon. Second, the font size is set to 4em. The unit 'em' adjusts the size of the font relative to its default value. The default font size for most web browsers is 16px (pixels) and so 4em is equivalent to 64px. We could of course alter the font size in the stylesheet using the 'px' unit (e.g. h1 { font-size: 64px; }); however, many developers recommend using 'em' instead 'px' because 'em' ensures the text size scales appropriately on different web browsers.
Font family
There are many different font styles to choose from. If you are looking for inspiration then see this website for a comprehensive list of available fonts. To modify the font of an element then use the font-family CSS property. For example, you could modify the font of all h1 elements by adding the following code to your 'main.css' stylesheet:
h1 {
    font-family: Helvetica;
}
Helvetica can be replaced with the font of your choosing. It is often also beneficial to include a couple of 'back-up' fonts in case a web browser does not support your first choice font. Simply order your desired fonts in order of descending preference e.g. font-family: Helvetica, Times New Roman, sans-serif;
Putting this all together, if you wished to edit the size and font of all h1 elements on a webpage then you should have an entry in your CSS stylesheet that looks like this:
h1 {
    font-size: 4em;
    font-family: Helvetica, Times New Roman, sans-serif;
}
Font style
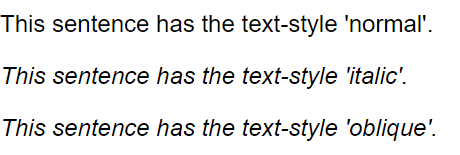
The font-style property allows you to modify the appearance of text without changing the font itself. Acceptable values include normal, italic and oblique (slanted slightly to the right).
.text {
    font-style: italic;
}
How to style individual letters/sections of text
Sometimes you may want to style only a specific part of a larger piece of text. For example, you may wish to change the colour of a single letter, word or phrase. To do this, simply enclose the section of text inside opening <span> and closing </span> tags then assign the opening span tag a class e.g. <span class="red_text">. Next, refer to your 'main.css' stylesheet and assign a value to the color property for that class e.g. .red_text { color: red; }
Putting it all together, this is the code that goes into turning the word 'red' red in the following sentence: This is what the colour red looks like.
HTML:
<p>This is what the colour <span class="red_text">red</span> looks like.</p>CSS:
.red_text {
    color: red;
}
Line-spacing
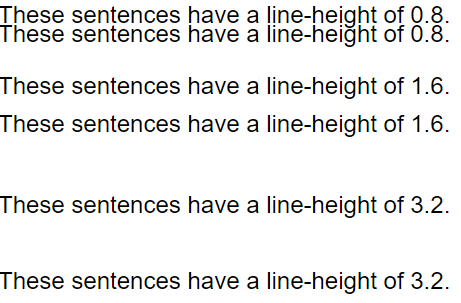
The line-height property allows you to adjust the spacing between lines of text. Line height can be measured in any of our standard size dimensions (e.g. % and px) but it can also be a number without units. If the line-height value lacks units then the line spacing will be a multiple of the font size. For example, a line-height property of '0.5' will create line spacing half the size of the font, while a line-height property of '2' will produce line spacing double the size of the font. Typically, the recommended line height is 1.6.
.text {
    line-height: 1.6;
}