How to store and manage data using an in-app Room SQLite database
Databases allow you to manage the data that will be used in your Android app. For example, your app may contain a music library full of songs. Each song's information could be stored in the database then retrieved and altered when required. In this tutorial, we will explore an SQLite-based database management system for Android apps called Room. Room databases enable your app to store data locally so it can be processed without an internet connection.
Prepare your app to use Room
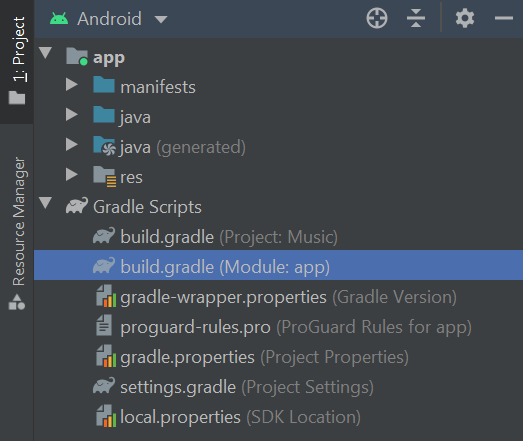
Before you can use a Room database, you first must appropriately configure your app using a toolkit called Gradle. Navigate through Project > Gradle Scripts and open build.gradle (Module: app).
Scroll down to the dependencies section. You will likely find a list of 'implementation' statements (amongst other things). Add the following code to the list to implement Room:
def room_version = "2.2.5"

implementation "androidx.room:room-runtime:$room_version"
kapt "androidx.room:room-compiler:$rootProject.roomVersion"

// optional - Kotlin Extensions and Coroutines support for Room
implementation "androidx.room:room-ktx:$room_version"

// optional - RxJava support for Room
implementation "androidx.room:room-rxjava2:$room_version"

// optional - Guava support for Room, including Optional and ListenableFuture
implementation "androidx.room:room-guava:$room_version"

// Test helpers
testImplementation "androidx.room:room-testing:$room_version"
Remember to resync the project (if prompted to do so).

Once your project has synced successfully, you can begin to construct a database.
Room database entities
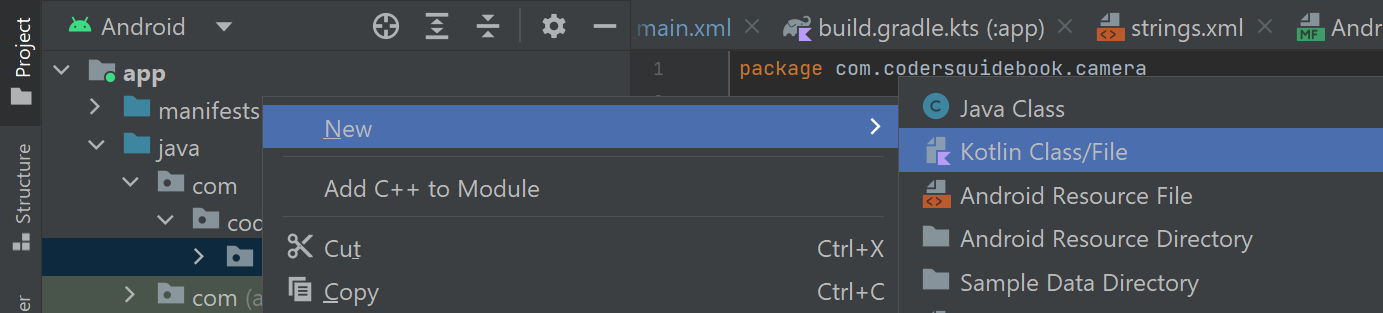
The tables in a Room database are referred to as "entities". An entity can contain multiple columns, each storing a different type of information. For example, imagine you are designing a music player app and you want to store information about the songs in the user's library. To achieve this, you would likely want to design an entity with columns for the song's ID, title and artist. Let's create that entity now. Navigate to the folder that contains your Kotlin files (Project > app > java > com > Folder with the name of the project) then right-click and select New > Class. Name the file Song.
The code to create the entity described above would look like this:
import android.os.Parcelable
import androidx.room.ColumnInfo
import androidx.room.Entity
import androidx.room.PrimaryKey

@Entity(tableName = "music_table")
data class Song(
    @PrimaryKey val songID: Int,
    @ColumnInfo(name = "song_title") val songTitle: String?,
    @ColumnInfo(name = "song_artist") val songArtist: String?
)
In the above code, the name of the database table is given inside the Entity declaration. This table name will be used when querying the Room database, so make sure it is memorable (and remember table names are case sensitive!). If you do not define a table name yourself, then the name of the data class will be used instead.
Next, the data class itself is defined. The data class represents an 'object': a collection of information that can be used by the app. For instance, the Song object created above contains the ID, title and artist of a given song. Each song in the music library will be represented by its own Song object and inserted row-by-row into the database table. The table's columns are defined within the data class itself and each column contains a different piece of information about the Song object. At least one of the columns must be a primary key: a column that contains a unique value that Room can use to distinguish different entries. In the above example, you must assign each Song object an ID yourself; however, you can instruct Room to autogenerate the primary key values. Simply amend the primary key declaration as follows:
@PrimaryKey(autoGenerate = true) val songID: Int,If you opt for autogenerated primary key values, then simply set the value of the songID to 0 whenever a Song object is made. By way of illustration, you could create a Song object like this and Room will generate a unique primary key value when the object is added to the database table:
val newSong = Song(0, "Ace of Spades", "Motorhead")All subsequent columns are defined based on the type of information they store. Give each column a name (e.g. song_title) so you can retrieve the data when required, and then declare a variable. Begin the variable with 'val' if its value will be fixed (e.g. the song title will always be "At The River") or use 'var' if the value can be changed later.
Build the database
The Room database itself is built and managed by a separate Kotlin class file. Create the file in the same way you created the Song.kt file and give it a suitable name (e.g. MusicDatabase). The contents of the file will look like this:
import android.content.Context
import androidx.room.*

// Specify the database contains a table (entity) of Song class objects
@Database(entities = [Song::class], version = 1, exportSchema = false)
abstract class MusicDatabase : RoomDatabase() {

    abstract fun musicDao(): MusicDao

    companion object {
        @Volatile
        private var database: MusicDatabase? = null

        fun getDatabase(context: Context): MusicDatabase {
            database ?: kotlin.run {
                database = Room.databaseBuilder(context, MusicDatabase::class.java, "music_database")
                    .fallbackToDestructiveMigration()
                    .build()
            }

            return database!!
        }
    }
}
The above code begins by stating that the MusicDatabase will contain the Song object entity we created earlier. Room will create a database table based on this entity. When you copy and paste the above code into your project, you may notice the musicDao function produces an error. This error is nothing to worry about and will be resolved shortly after we design the DAO interface.
Inside the companion object, there is a method called getDatabase. This method helps construct the Room database. It also contains a command called fallbackToDestructiveMigration(). This command applies when you modify the database (e.g. alter the structure of an entity) and data must be migrated to the updated version. If the migration fails, then fallbackToDestructiveMigration() will attempt to restore a previously working version of the database, thereby preventing potential IllegalStateException errors.
Add multiple entities
Room databases support multiple tables/entities. Each new entity must have a unique object class (like our Song object file above) and DAO file (more on DAO files later!). Once you have created these files, open the database file (e.g. MusicDatabase.kt) and locate the line equivalent to the following:
@Database(entities = [Song::class], version = 1, exportSchema = false)Each new entity must be added to the class array. For example, if the second entity is defined in a class file called Playlist.kt then the line in the MusicDatabase.kt file should read like this:
@Database(entities = [Song::class, Playlist::class], version = 1, exportSchema = false)Interact with the database using a data access object (DAO)
Once your database has been created, you can begin to insert, delete, update and retrieve information using queries. Room database queries are processed via a data access object (DAO). In this section, we'll walk through how to create the DAO and run a couple of example queries.
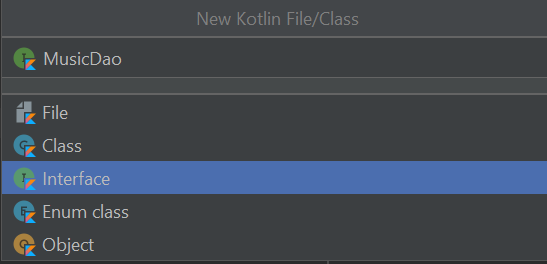
First, create a new Kotlin interface file (similar to how you would create a Class file) and name it something that indicates it is a DAO (e.g. "MusicDao").
Edit the code inside the file so it looks similar to the following:
import androidx.lifecycle.LiveData
import androidx.room.*

@Dao
interface MusicDao {

}
In the above code, we import the necessary classes required to communicate with the Room database and process its data. All database queries will be written between the curly brackets. Detailed below are a couple of common queries you may like to include:
Insert an entry
Room DAOs offer several readymade "convenience" methods which allow you to easily perform routine tasks. The first method we will discuss is 'insert', which adds a new entry/row to the database table. For example, you could use the following command to insert a Song object into the music table:
@Insert(onConflict = OnConflictStrategy.IGNORE)
fun insert(song: Song)
The above code references an OnConflictStrategy. An OnConflictStrategy determines how Room will handle a request where two entries have the same primary key value (remember each entry must have a unique primary key). In this instance, the OnConflictStrategy is IGNORE. This tells Room not to insert Song objects into the database unless they have a unique primary key. Alternative OnConflictStrategy approaches include REPLACE, which replaces the previous entry for that primary key with the new information and ABORT. The ABORT strategy is similar to IGNORE, in that conflicting entries will not be processed by Room; however, the ABORT strategy also reverses any other changes which were processed as part of the query. The ABORT strategy is only really applicable to complex queries.
Delete an entry
@Delete
fun delete(song: Song)
The delete method will remove the given object from the database table.
Update an entry
@Update(onConflict = OnConflictStrategy.REPLACE)
fun updateMusicInfo(song: Song)
The update method replaces an entry in the database. The outgoing and incoming object must share the same primary key value; however, all other details can be different.
Retrieve entries
Room databases also allow you to select and retrieve entries that meet certain conditions. For example, imagine you wanted to retrieve all the Song objects which share the artist name "Oasis". A query that retrieves entries based on the value in a given column would look like this:
@Query("SELECT * FROM music_table WHERE song_artist LIKE :search")
fun findSongsFromArtist(search: String): LiveData<List<Song>>
The above query uses a SELECT command to retrieve all entries (as directed by the * symbol) that have a song artist value like the "search" query variable. Results are reported as a live data list of Song objects (we will discuss live data shortly!). The findSongsFromArtist query can be called from elsewhere in your app. For example, you could write the following in the MainActivity.kt file:
val songList = emptyList<Song>()
val musicDatabase = MusicDatabase.getDatabase(this)
musicDatabase.musicDao().findSongsFromArtist("Oasis")
    .observe(this, Observer { songs ->
        songs?.let {
            this.songList = it
        }
    })
This method contacts the music database and uses the findSongsFromArtist function to retrieve all Song objects with a song_artist value of Oasis. The songs are stored in a list called songList that can be used elsewhere in the app.
The findSongsFromArtist function could be refined further. For example, if you wanted the list of Oasis songs to be organised in alphabetical order then add ORDER BY song_title ASC to the end of the query. Also, you could restrict the size of the list to 10 songs by adding LIMIT 10 to the end of the query. The complete query with those two modifications looks like this:
@Query("SELECT * FROM music_table WHERE song_artist LIKE :search ORDER BY song_title ASC LIMIT 10")
fun findSongsFromArtist(search: String): LiveData<List<Song>>
There are many different routes you can go down when writing Room queries. If you would like to learn more then you may find the official SQLite documentation useful.
Utilising live data and coroutines with Room queries
It is important to ensure your app's interactions with the Room database are as quick and robust as possible. To that end, this section will discuss how to utilise live data and view models to make the contents of your database readily available to the different components of your app. We will also explore how to use coroutines to run queries behind the scenes.
Continuously monitor query output by using live data
Ideally, the contents of your database should be easily accessible from anywhere in the app. For instance, continuing with the music app example, it is likely that multiple classes may need to refer to the list of songs in the user's music library. The optimum way to handle this is to create a dedicated data handler that continuously monitors the contents of the Room database. Database output can then be made available as live data: a type of data holder that can be dynamically updated.
To achieve this, the first step is to write a DAO query that finds the information you are after. For example, if you want to retrieve every entry in the database table then you should write something like this:
@Query("SELECT * FROM music_table")
fun retrieveMusicLibrary(): LiveData<List<Song>>
Next, create a new Kotlin class file and give it a name that shows it is a repository (e.g. MusicRepository). The repository will act as an interface that processes Room DAO queries while keeping the underlying workings of the database separate from the rest of the app. Copy and paste the following code into the repository (adjusting the names of classes, functions and variables as required):
import androidx.lifecycle.LiveData

class MusicRepository(private val musicDao: MusicDao) {

    val allSongs: LiveData<List<Song>> = musicDao.retrieveMusicLibrary()
}
The above code establishes a connection with the music DAO and uses the DAO's retrieveMusicLibrary function to retrieve all the songs from the database table. These songs are stored in a live data variable called allSongs.
To make the songs available to the different components of the app (e.g. activities and fragments), you will need to create a view model. A view model manages data and helps your app to coordinate tasks. Create a new Kotlin class file, assign it a suitable name (e.g. MusicViewModel) and copy and paste the following code (adjusting the names of items as required):
import android.app.Application
import androidx.lifecycle.AndroidViewModel
import androidx.lifecycle.LiveData

class MusicViewModel(application: Application) : AndroidViewModel(application) {

    private val repository: MusicRepository
    val allSongs: LiveData<List<Song>>

    init {
        val musicDao = MusicDatabase.getDatabase(application).musicDao()
        repository = MusicRepository(musicDao, playlistDao)
        allSongs = repository.allSongs
    }
}
The above code directs the view model to the music repository and stores the contents of the repository's allSongs variable in a view model variable of the same name. The view model's allSongs variable is accessible to the different components of your app and will be automatically updated whenever the underlying data in the database table is changed.
For the final step, we will connect an activity with the view model and retrieve the list of songs. As previously mentioned, the list of songs in the allSongs variable will be dynamically updated whenever the underlying data in the database is changed. This is made possible through the use of the live data helper class. For your app's components (e.g. activities and fragments) to receive updates in real-time, they must use an observer to continuously monitor the view model's allSongs variable. The code for achieving this and enabling an activity (such as MainActivity.kt) to continuously monitor the list of songs is as follows:
private var completeLibrary = emptyList()
private lateinit var musicViewModel: MusicViewModel

override fun onCreate(savedInstanceState: Bundle?) {
    super.onCreate(savedInstanceState)
    setContentView(R.layout.activity_main)

    musicViewModel = ViewModelProvider(this).get(MusicViewModel::class.java)
    musicViewModel.allSongs.observe(this, Observer { songs ->
        songs?.let {
            this.completeLibrary = it
        }
    })
}
The above code establishes a connection with the view model and sets up an observer on the view model's allSongs variable. Its contents are transferred to an activity variable called completeLibrary, which can be used elsewhere in the app. The completeLibrary variable will be updated dynamically by the observer to ensure it always matches the contents of the view model's allSongs variable.
Note, you will need to use the following import statements at the top of the file:
import androidx.lifecycle.Observer
import androidx.lifecycle.ViewModelProvider
Also, if you wish to access the view model from a fragment then you should replace this line:
musicViewModel.allSongs.observe(this, Observer { songs ->With this:
musicViewModel.allSongs.observe(viewLifecycleOwner, Observer { songs ->Using coroutines to run DAO queries
When complex or time-consuming tasks are run there is a chance your app will become overwhelmed and the user interface will freeze until the task is complete. As such, it is recommended you implement measures to ensure intensive tasks are performed in a non-blocking manner. This is where coroutines come in. Coroutines are a method for running complex tasks behind the scenes. They enable apps to utilise device resources more effectively, so the task can be completed with minimal disruption.
Earlier in the tutorial, we discussed how to use Room convenience methods such as Insert to add data to the database. To run this query in a non-blocking manner, add the following method to your repository file:
suspend fun insertSong(song: Song) {
    musicDao.insert(song)
}
The insertSong method is a suspending function which can be paused/resumed on command and must be run from within a coroutine. In this instance, the coroutine will be initiated by the view model. So, open the view model file and add the following method:
fun insertSong(song: Song) = viewModelScope.launch(Dispatchers.IO) {
    repository.insertSong(song)
}
This function initiates a coroutine and inserts a song into the music database table in a non-blocking manner. For example, you could call the function from an activity or fragment as follows and add the song Born Under A Bad Sign by Richard Hawley:
val song = Song(0, "Born Under A Bad Sign", "Richard Hawley")
musicViewModel.insertSong(song)
Pre-populate the database
There are instances where you may want pre-defined entries to be added to a database table the moment it is made. To achieve this, you must make a couple of modifications to the MusicDatabase.kt Kotlin file. First, add the following class below the companion object:
private class MusicDatabaseCallback(
    private val scope: CoroutineScope
) : RoomDatabase.Callback() {

    override fun onCreate(db: SupportSQLiteDatabase) {
        super.onOpen(db)
        database?.let { database ->
            scope.launch {
                populatePlaylistTable(database.musicDao())
            }
        }
    }

    suspend fun populateMusicTable(musicDao: MusicDao) {
        val song = Song(0, "A Place In The Sun", "Stevie Wonder")
        musicDao.insert(song)
    }
}
The above code uses a coroutine to run the populateMusicTable command when the database is first created. As it stands, the populateMusicTable method will add one song to the database via the DAO and this song will be available through the database from the outset. To make the above code operational you must modify the getDatabase function so it looks like the following:
fun getDatabase(
    context: Context,
    scope: CoroutineScope
): MusicDatabase {
    database ?: kotlin.run {
        database = Room.databaseBuilder(context, MusicDatabase::class.java, "music_database")
            .fallbackToDestructiveMigration()
            .addCallback(MusicDatabaseCallback(scope)
            .build()
    }

    return database!!
}
The getDatabase function has been modified so it accepts a CoroutineScope as an argument and incorporates the MusicDatabaseCallback when the app is database is being built. This essentially triggers the populateMusicTable method and pre-populates the music table with the data supplied.
Remember to add the following import statements to the database file for the extra code to work:
import androidx.sqlite.db.SupportSQLiteDatabase
import kotlinx.coroutines.CoroutineScope
import kotlinx.coroutines.launch
Also, note that any calls to getDatabase will now need to include a CoroutineScope as well as a context. Unless you have a custom coroutine scope in mind, then lifecycleScope is often sufficient for activities and fragments and viewModelScope sufficient for view models. To illustrate what I mean, the musicDao variable in the MusicViewModel.kt file should be changed from this:
val musicDao = MusicDatabase.getDatabase(application).musicDao()To this:
val musicDao = MusicDatabase.getDatabase(application, viewModelScope).musicDao()