The Android Activity and Fragment lifecycles
Activities and fragments are core Android application components. An activity describes a unit of the application that is dedicated to a task, such as drafting an email. Meanwhile, a fragment is a module within an activity. For example, if you are designing a Music Player app, you might use an activity to coordinate the music library and have separate fragments within the activity for the Albums view, Artists view and Playlists view. A fragment must be tied to an activity, but an activity can exist without fragments. Activities and fragments also have lifecycles, which describe a sequence of state changes the components progress through from their creation until they are destroyed. An awareness of the lifecycle states for activities and fragments is critical for designing robust Android applications that perform effectively. In this tutorial, we will explore the purpose of each lifecycle stage, discuss how you can provide custom instructions for a given stage, and compare the relationship between the activity and fragment lifecycles.
The Android activity lifecycle
An Android activity progresses through various states from the moment it is opened until it is closed. The collection of states is called the activity lifecycle, and each state is associated with a different level of readiness for the activity and its components. Also, the lifecycle states are related to how much computational resources the device will allocate to the app, and hence the activity. For example, if the user switches to another app but leaves your app running in the background, then the activity from your app will enter the onPause and onStop stages of its lifecycle. In which case, the activity from your app will no longer be visible but could be resumed if the user returns to your app. However, imagine the user does not return for a while and other apps are required to perform more complex and urgent tasks. The device may determine that it does not have sufficient computational resources to keep idle apps running in the background. In which case, it may forcibly shut down apps such as yours and any activities that are in the onStop stage of their lifecycle. To better understand the Android activity lifecycle, a diagram and explanation of the different stages are included below:
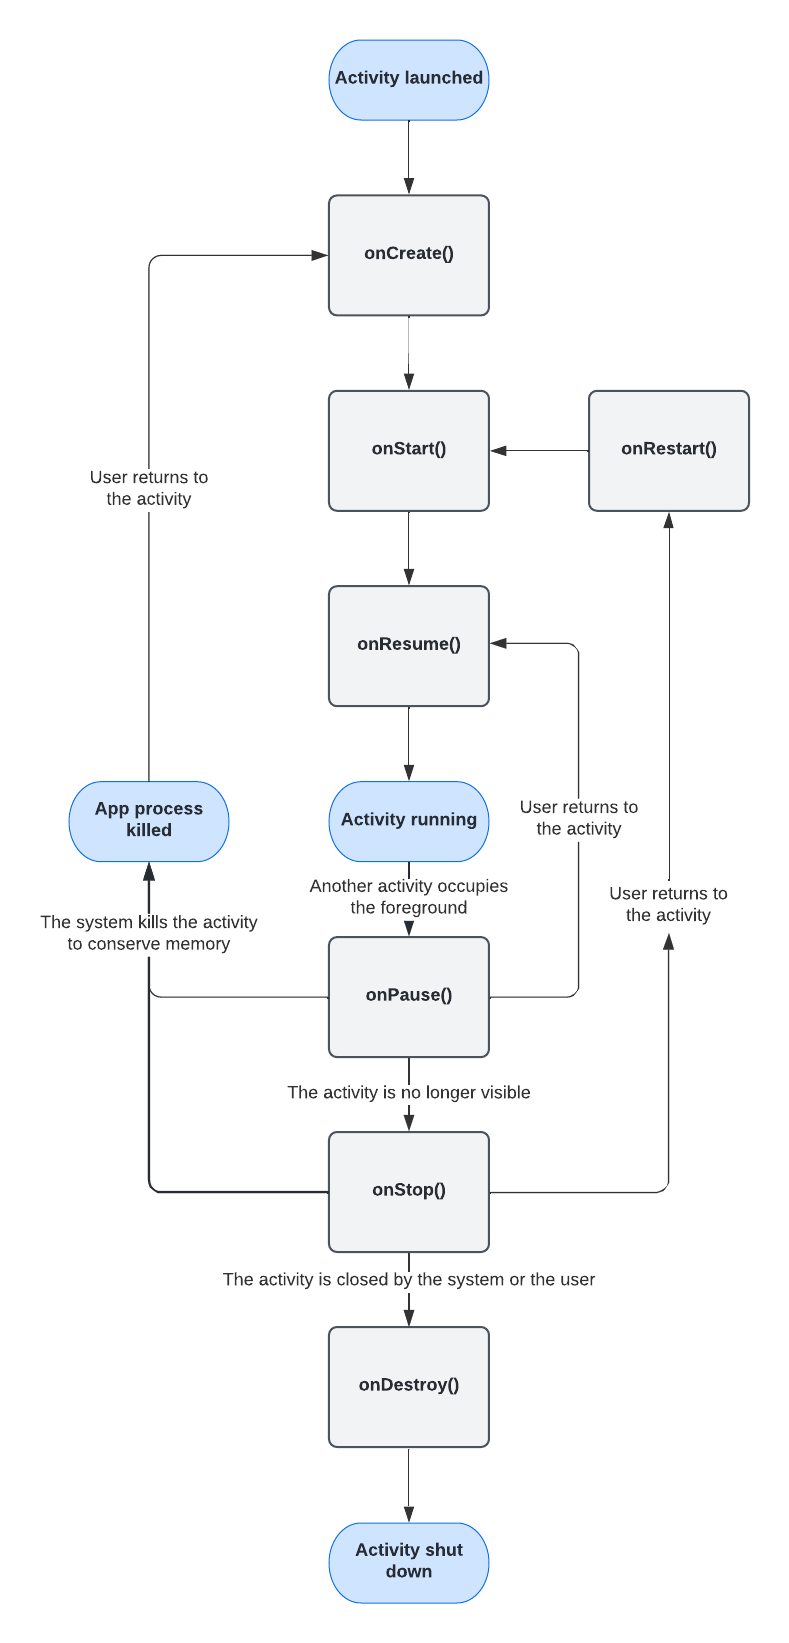
- onCreate - The first stage in the Android activity lifecycle is onCreate. In the onCreate stage, the activity enters the Created state. At which point, you should define any processes that should persist throughout the lifetime of the activity. For example, you should initialise the activity's user interface layout and supporting components such as view models. Also, the onCreate stage is when you would retrieve any state information that is stored if that the activity is temporarily destroyed and restarted such as when the user rotates the device.
- onStart - In the onStart stage, the activity enters the Started state and prepares to enter the device's foreground, which means the activity will be prioritised when the device allocates system resources. You could use the onStart stage to handle processes related to displaying the user interface to the user.
- onResume - Activities in the onResume stage are visible to the user and are prioritised for system resources. An activity remains in the onResume stage until it loses its foreground status.
- onPause - The onPause stage occurs when the activity is no longer the foreground activity. The loss of foreground status usually means the activity is no longer visible, but not always. For example, the activity may be one of multiple activities being displayed simultaneously on devices that support multi-window mode. Typically, the onPause stage is used to stop processes that may be expected to resume again shortly if the activity returns to the foreground. For example, the onPause stage can be used to disconnect from cameras and sensors or stop processes that might otherwise cause an unnecessary drain on the device's processing power and battery life.
- onStop - An activity enters the onStop stage when it is no longer visible to the user. The onStop stage is where you should perform the most intensive shutdown processes such as saving data. It is recommended to perform intensive operations in the onStop stage rather than the onPause stage because the onPause stage can often finish quickly when the app is shutting down.
- onRestart - If the user returns to the app before the activity has fully shut down, then the activity can be restarted via the onRestart stage. The restarted activity will then become the foreground activity again.
- onDestroy - The onDestroy stage is the final stage before the activity is shut down. In the onDestroy stage, you should release any resources that had not already been addressed by a previous stage.
Interacting with the Android activity lifecycle stages
In Android programming, you can interact with each stage of an activity's lifecycle and define additional instructions that should be carried out. To interact with a lifecycle stage, you simply need to override the Activity class method associated with the stage. Method overriding is a principle of object-oriented programming languages such as Kotlin and Java. In brief, method overriding allows you to customise the behaviour of a method that is inherited from another class or interface. You may notice the activities in your application often inherit data from an Activity subclass such as AppCompatActivity. The Activity class and its subclasses contain fundamental instructions that should be carried out at each activity lifecycle stage, but we can override these instructions using polymorphism. For example, you could override the onCreate stage for an activity by writing the following code:
private lateinit var binding: ActivityMainBinding

override fun onCreate(savedInstanceState: Bundle?) {
    super.onCreate(savedInstanceState)

    binding = ActivityMainBinding.inflate(layoutInflater)
    setContentView(binding.root)
}
In the above code, we use a super.onCreate call to run any processes that were defined in the superclass's onCreate method. In this way, we ensure that any critical lifecycle tasks that are defined in the Activity or AppCompatActivity classes continue to run as normal. Next, the above code initialises a variable called binding, which will hold a reference of a layout resource file's binding class. The layout is then set as the main content view for the activity, which is a common feature you will see when an activity class overrides the onCreate method because setting a content view is required for displaying the user interface.
You might also like to override other stages of the activity lifecycle to best fulfil the user's needs. For example, information about the application's state could be saved in the onPause stage. In the onPause stage, the activity is no longer in the foreground but the user could return shortly. For instance, imagine you were designing a music streaming app that allowed the user to toggle the repeat mode. You could store the user's repeat mode preference in the onPause stage as shown below so it can be retrieved when the user returns to the activity:
companion object {
    const val REPEAT_MODE_ALL = 1
    const val REPEAT_MODE_NONE = 0
    const val REPEAT_MODE_ONE = 2
}

private var activeRepeatMode = REPEAT_MODE_NONE

override fun onPause() {
    super.onPause()

    getSharedPreferences(localClassName, MODE_PRIVATE).edit().apply {
        putInt("repeat_mode", activeRepeatMode)
        apply()
    }
}
The Android fragment lifecycle
Activities can be divided into fragments. Each fragment represents a module within the activity, and each fragment can have a distinct lifecycle and user interface; however, the fragment's lifecycle is dependent on the parent activity's lifecycle. For example, if the parent activity enters the onDestroy stage and shuts down then the fragment will shut down also. A summary of the key fragment lifecycle stages is provided below. Some stages are similar to the activity lifecycle, while others are dedicated to the initialisation and destruction of the fragment's user interface view.
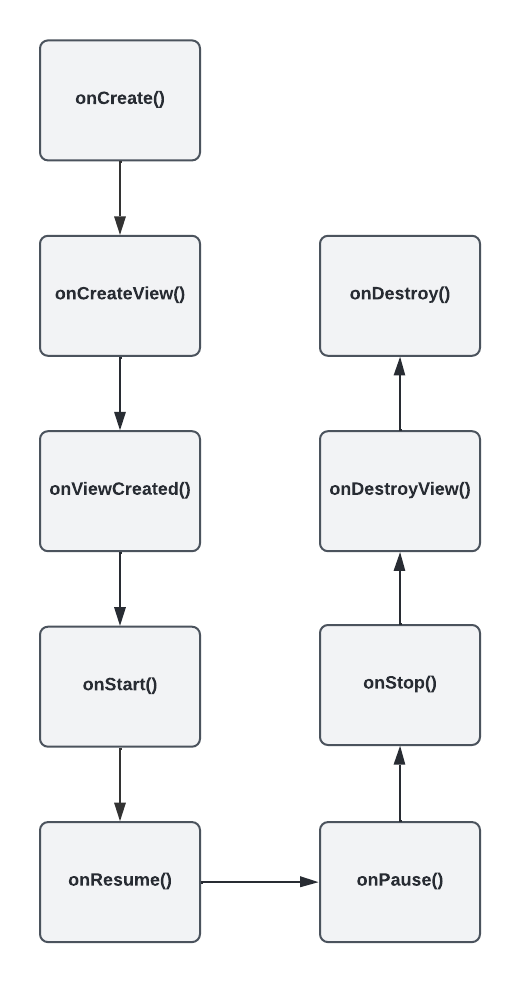
- onCreate - The onCreate stage runs once the fragment has been attached to the parent activity's fragment manager. In this stage, the fragment can retrieve any saved instance state data from the last time the fragment was active.
- onCreateView - In the onCreateView stage, you can inflate the user interface layout that you would like the fragment to use. Interactions with the user interface should be handled in the onViewCreated stage.
- onViewCreated - Once the layout resource specified in the onCreateView stage has been inflated, you can interact with the layout's components and respond to user actions in the onViewCreated stage.
- onStart - The fragment enters the onStart stage when the user interface is visible to the user.
- onResume - The onResume stage signals that the fragment is ready to handle user interactions.
- onPause - The onPause stage occurs when the user begins to leave the fragment but the fragment's user interface is still visible.
- onStop - The onStop stage occurs when the fragment's user interface is no longer visible. In applications running on API 28 or higher, the instance state of the fragment is saved after onStop, while applications running on API 27 and lower save their instance state data before the onStop stage.
- onDestroyView - In the onDestroyView stage, the fragment's user interface view is removed from the fragment and destroyed.
- onDestroy - In the final stage of the fragment lifecycle, the fragment is completely removed from the parent activity's fragment manager.
Interacting with the Android fragment lifecycle stages
The process for interacting with a stage in the fragment lifecycle is very similar to interacting with activity lifecycle stages. Simply override the method of the target lifecycle stage then add your custom code. For example, in a fragment, you could override the onCreateView stage to specify what layout resource you would like the fragment to use for its user interface:
private var _binding: FragmentFirstBinding? = null
private val binding get() = _binding!!

override fun onCreateView(
    inflater: LayoutInflater, container: ViewGroup?,
    savedInstanceState: Bundle?
): View {
    _binding = FragmentFirstBinding.inflate(inflater, container, false)
    return binding.root
}
In the above code, the onCreateView method initialises the binding class for a layout resource called fragment_first.xml. Next, the root element of the layout is set as the main View for the fragment, thereby rending the layout as the fragment's user interface.
User interactions with the layout should be handled in the onViewCreated stage. For example, if the fragment_first layout contained a button with the ID firstButton, then you could assign an onClick listener to the button using the following code:
override fun onViewCreated(view: View, savedInstanceState: Bundle?) {
    super.onViewCreated(view, savedInstanceState)

    binding.firstButton.setOnClickListener {
        findNavController().navigate(R.id.action_FirstFragment_to_SecondFragment)
    }
}
Finally, when the fragment's user interface is being destroyed, you should reset the binding variable to prevent interactions with a user interface that no longer exists. To handle this, you could override the onDestroyView stage as shown below:
override fun onDestroyView() {
    super.onDestroyView()
    _binding = null
}