How to create a Google Maps-based application using Kotlin
For this project, we will create an app that sends the user on a treasure hunt! Besides being a bit of fun, the treasure hunt app will be a great opportunity to build a maps-based application and learn about the features of the Google Maps API. Once the user initiates the treasure hunt, the app will select a secret nearby location and the user must find their way there. To help the user along their journey, the app will provide directional hints. The app will automatically detect when the user reaches the treasure’s location. In building the app, you will learn how to incorporate the Google Maps API, monitor the user’s location, and use geofencing to detect when the user reaches their target destination.
The example code for the Maps application can be found here. The project was built using Android Studio Giraffe and targets Android 13 (API 33/SDK 33).
Note, to complete this project and request data from the Google Maps API, you will require an active Google Cloud Billing account. At the time of writing Google provides a free trial for this service, although you are required to enter your payment information. Further guidance for setting up the Google Maps API is provided in the section Setting up the Google Maps SDK, although you should always defer to Google’s up-to-date policies and guidelines over any of the steps outlined in this tutorial.
Getting started
To begin, open Android Studio and create a new project using the Empty Activity template (Android Studio used to provide a handy Google Maps Activity template, but this has been removed in recent versions).
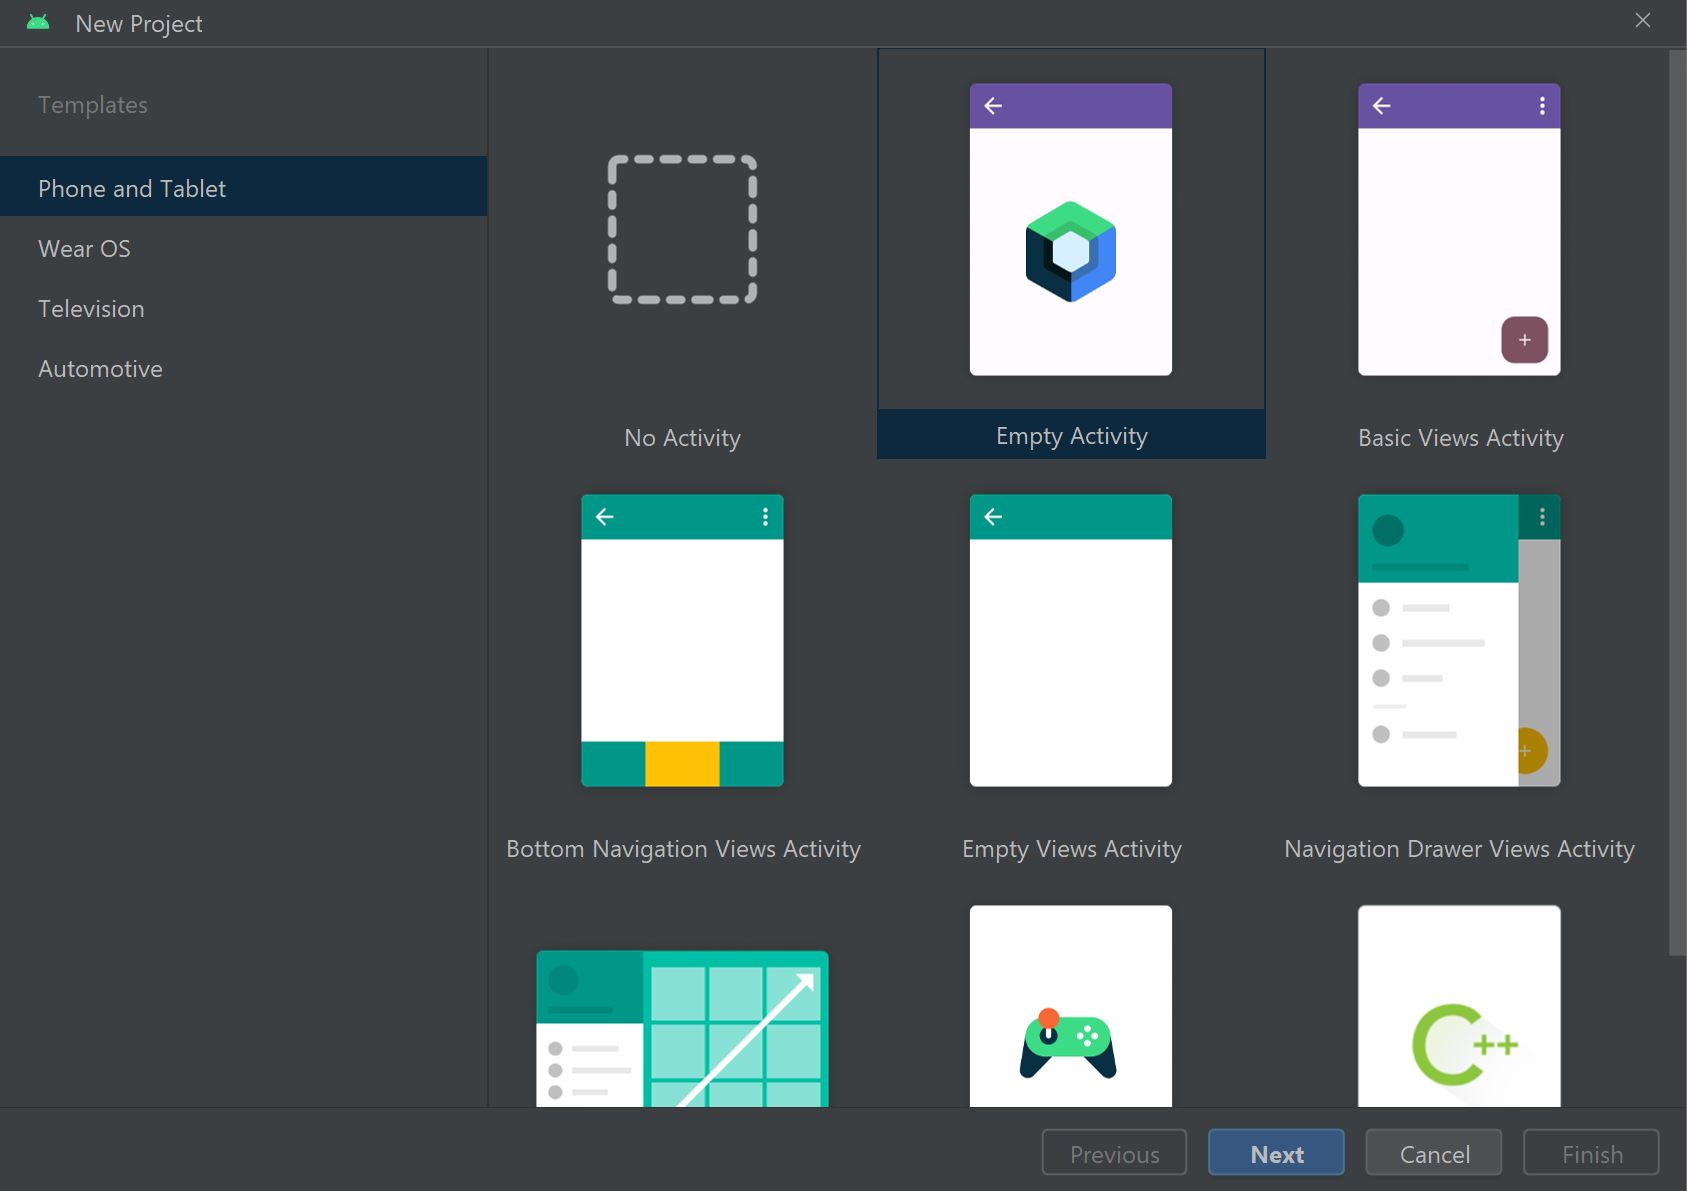
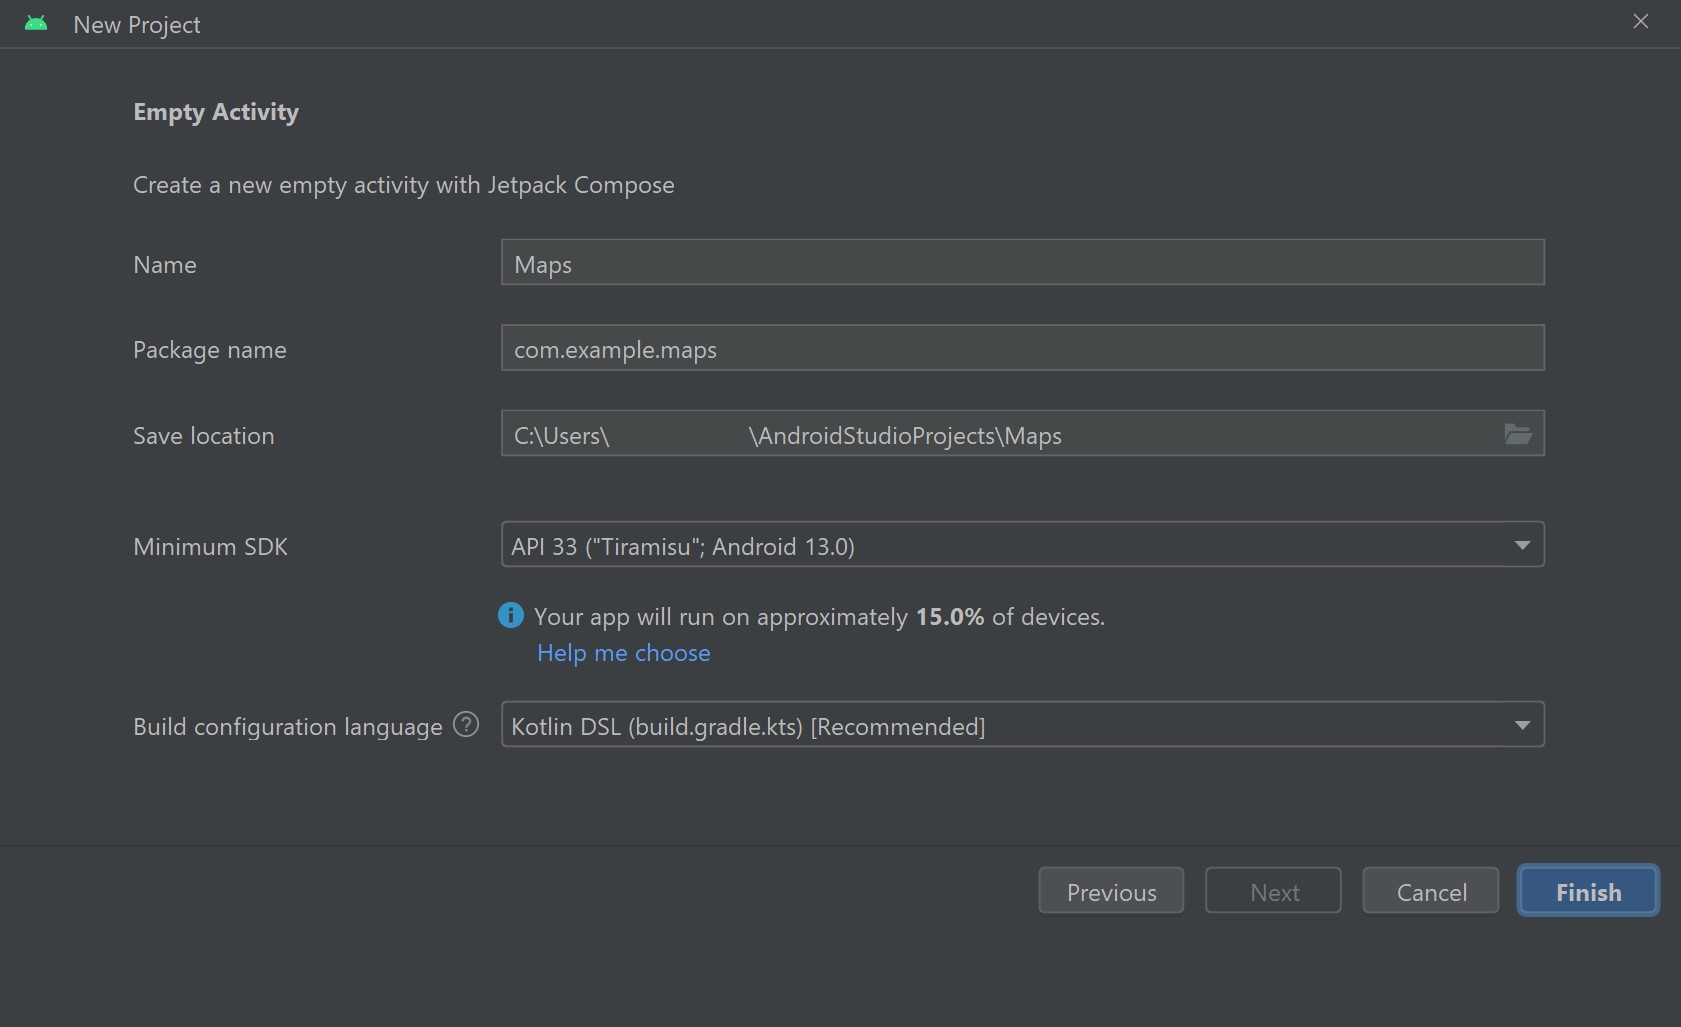
In the Create New Project window, add a name for the project (e.g. Maps), set the language to Kotlin and select Minimum SDK API level 33.
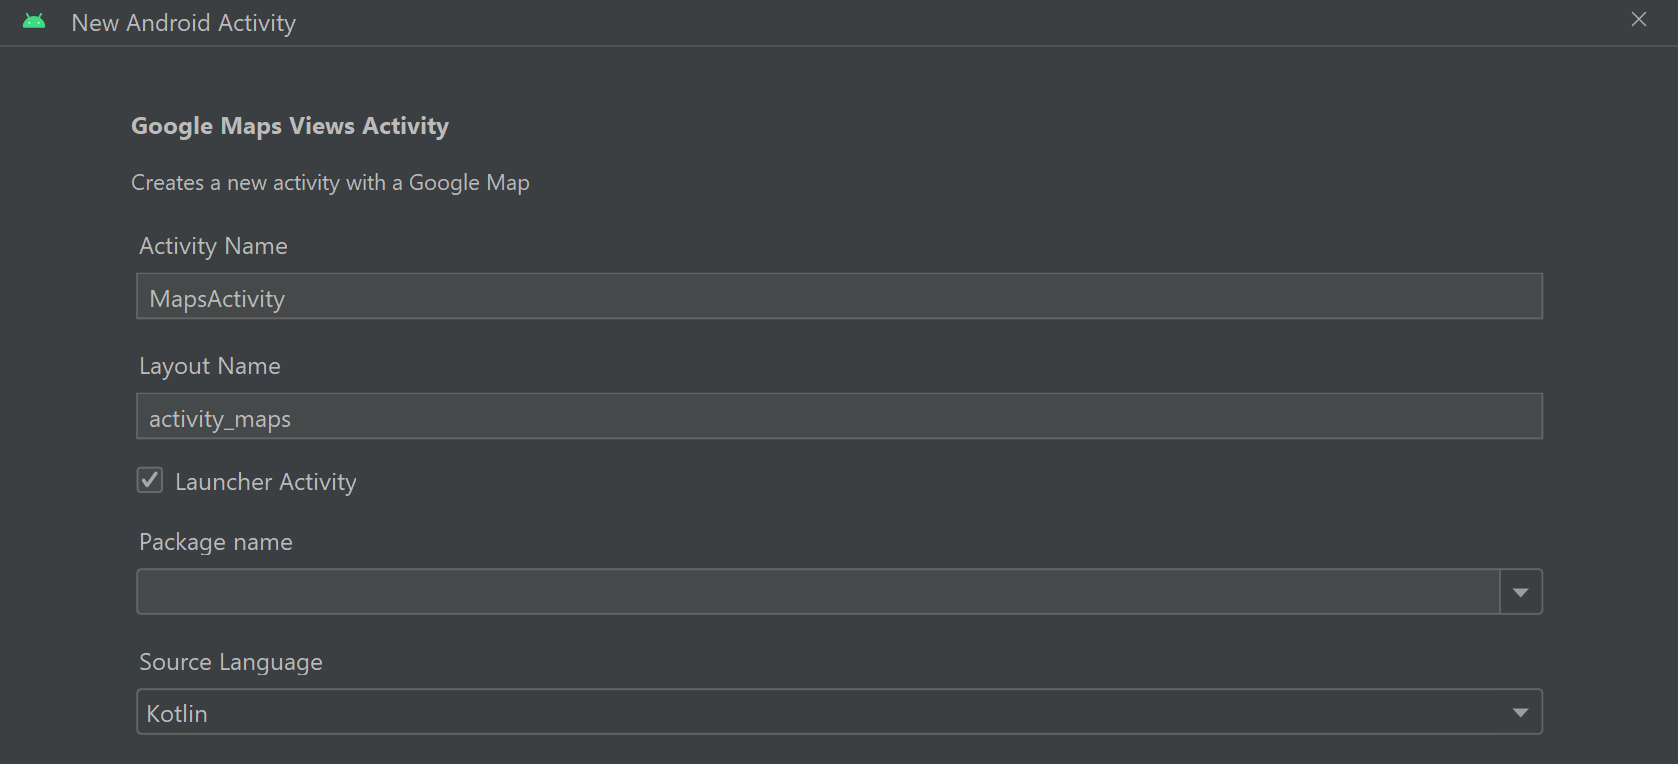
If the Google Maps Activity template is unavailable, then we will have to add the activity manually. Once the project opens in the editor, navigate through Project > app > java > name of the project and right-click the root project directory. Select New > Google > Google Maps Views Activity.
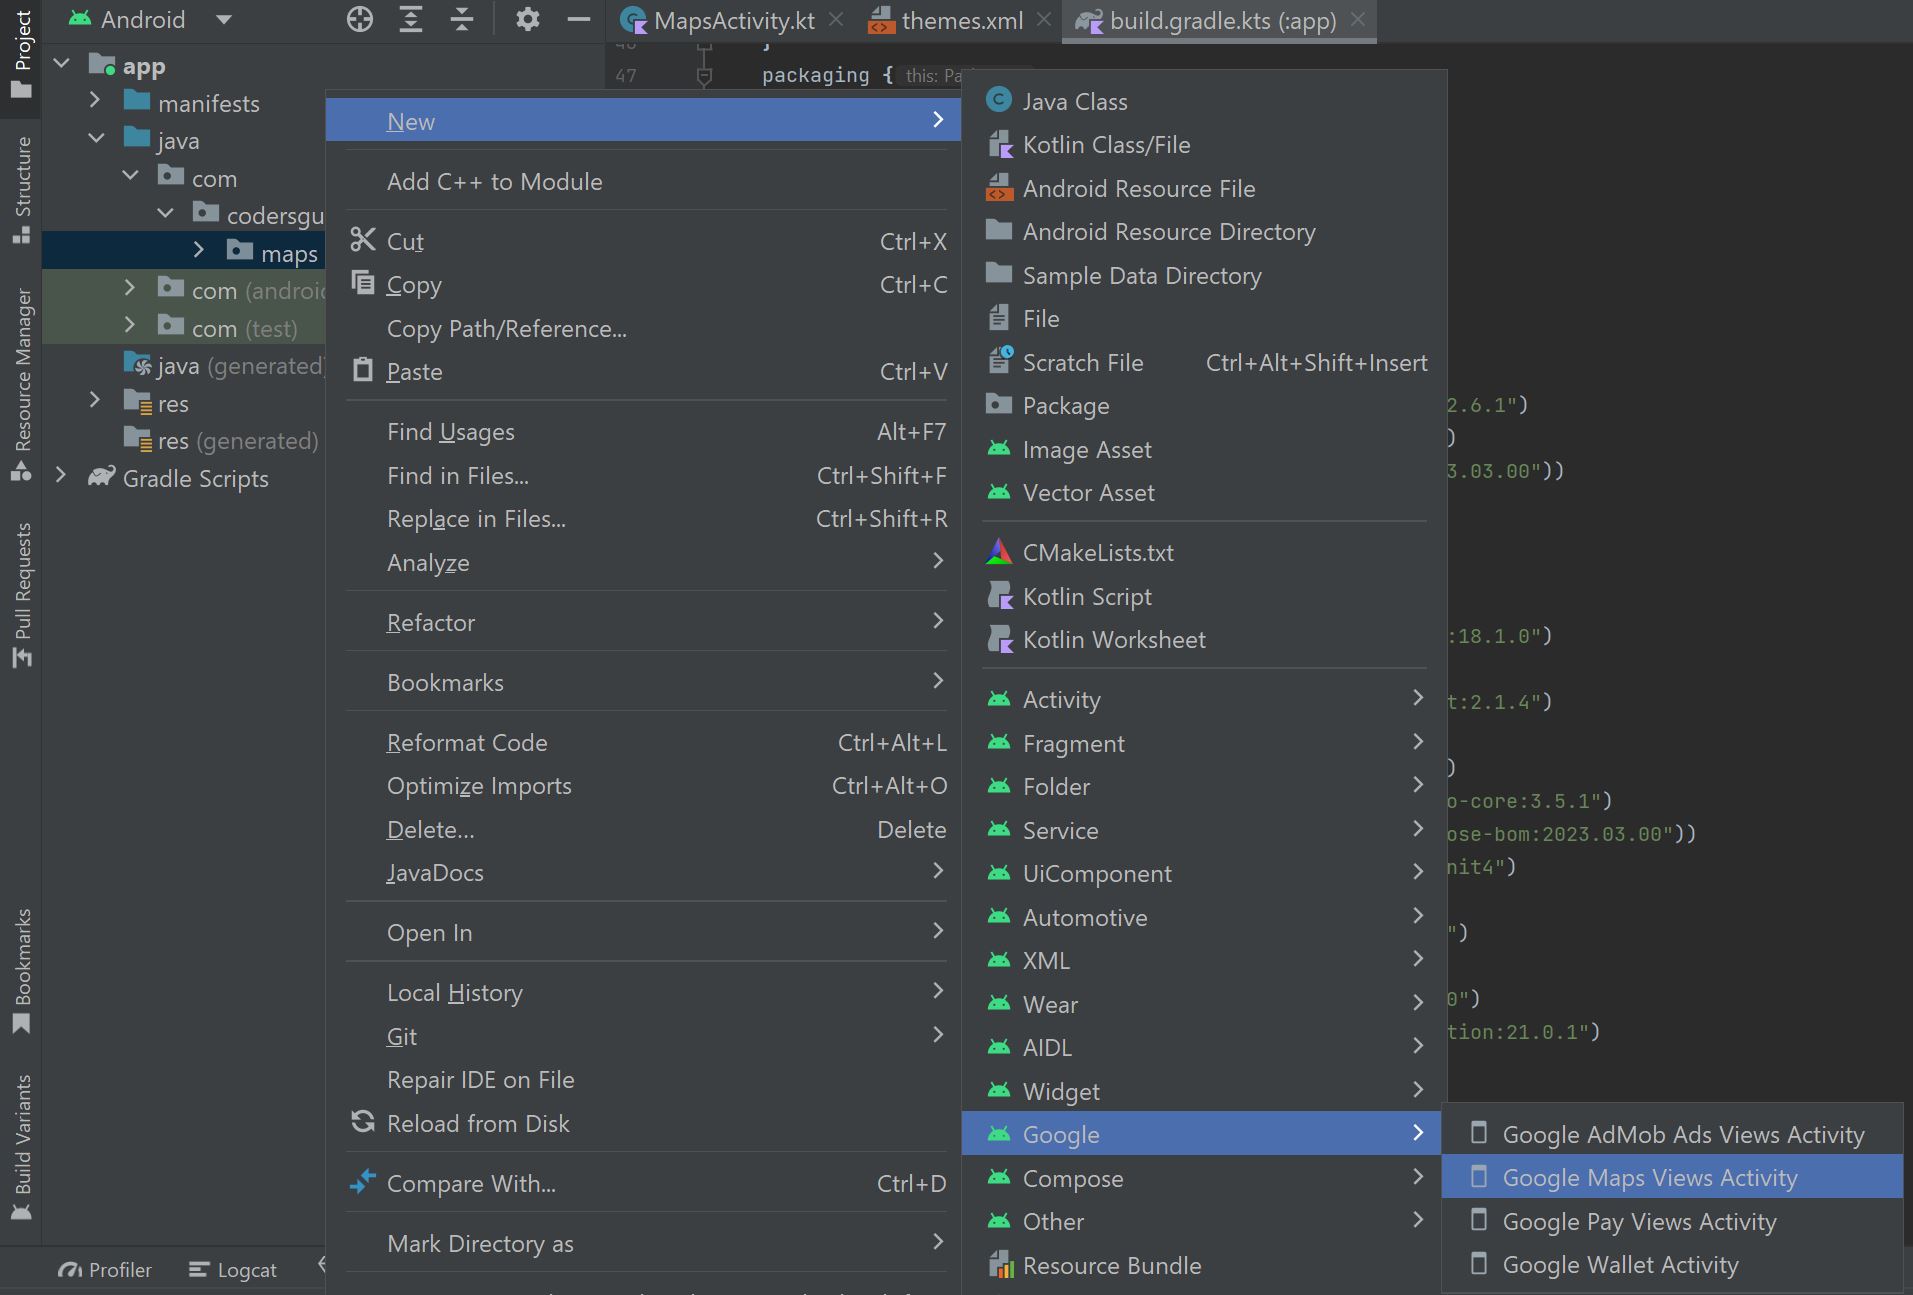
The Google Maps Views Activity template provides the app with an activity class and layout ready to display the map and communicate with the Google Maps API.
In the New Activity window that opens name the activity MapsActivity, set the layout name to activity_maps, and tick the launcher activity box. Then click Finish.
Android Studio will then create a Google Maps Activity and set it as the default activity for the application. If you wish, you can delete the MainActivity.kt class file that was created as part of the Empty Activity template.
It is recommended you enable Auto Imports to direct Android Studio to add any necessary import statements to your Kotlin files as you code. These import statements are essential for incorporating the external classes and tools required for the app to run. To enable Auto Imports, open Android Studio’s Settings window by clicking File > Settings. In the Settings window, navigate through Editor > General > Auto Import then select ‘Add unambiguous imports on the fly’ and ‘Optimise imports on the fly’ for both Java and Kotlin then press Apply and OK.
Android Studio should now add most of the necessary import statements to your Kotlin class files automatically. Sometimes there are multiple classes with the same name and the Auto Import feature will not work. In these instances, the requisite import statement(s) will be specified explicitly in the example code. You can also refer to the finished project code to find the complete files including all import statements.
Defining the String resources used in the app
Like most Android applications, the Maps app will store all the strings of text used throughout the application in a resource file. To define the string resources, navigate through Project > app > res and open the file called strings.xml. Once the file opens in the editor, modify its contents so it reads as follows:
<resources>
<string name="app_name">Maps</string>
<string name="title_activity_maps">Map</string>
<string name="hint">Hint</string>
<string name="compass">Compass</string>
<string name="ok">OK</string>
<string name="timer">Seconds remaining: %1$d</string>
<string name="times_up">Time\'s up!</string>
<!-- Treasure hunt -->
<string name="begin_search">Begin your search for the treasure!</string>
<string name="start_treasure_hunt">Start treasure hunt!</string>
<string name="hunt_ended">Treasure hunt ended</string>
<string name="end_the_treasure_hunt">End treasure hunt</string>
<string name="treasure_found">You found the treasure!</string>
<!-- Errors -->
<string name="no_address">No address found</string>
<string name="geofence_error">A Geofence error has occurred: %1$s</string>
<string name="location_error">There has been an error finding your current location</string>
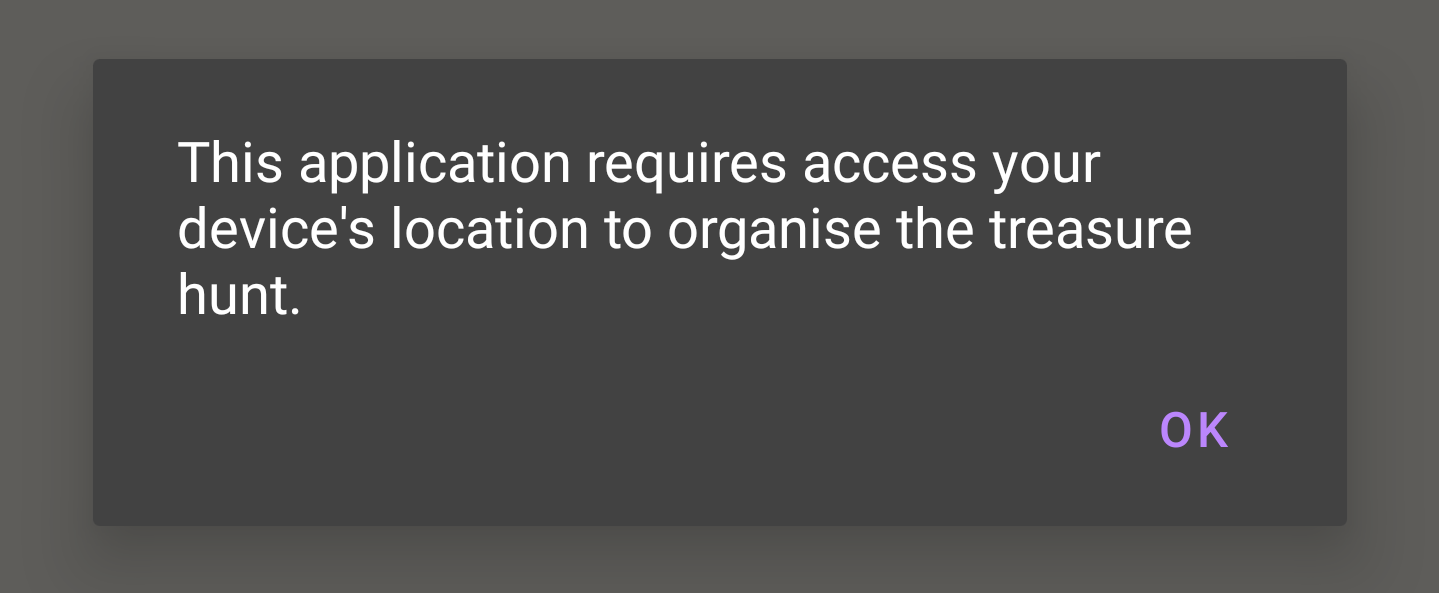
<string name="permission_required">This application requires access your device\'s location to organise the treasure hunt.</string>
<string name="treasure_error">Could not load treasure location. Error: %1$s</string>
<!-- Directions -->
<string name="north">north</string>
<string name="east">east</string>
<string name="south">south</string>
<string name="west">west</string>
<string name="direction">Head %1$s %2$s</string>
</resources>You’ll notice these String resources crop up throughout the project. They will help display messages to the user, populate TextView widgets, provide content descriptions for images and more!
Setting up the Google Maps SDK
The Maps app will request navigational and location data from the Google Maps software development kit (SDK). Google monitors the use of its SDKs via its Cloud platform. To access the Google Maps component of the platform, you will need a Google Cloud Billing account, which requires you to enter your payment information. While Google currently offers a free trial for its Google Cloud services, you should familiarise yourself with, and confirm you are happy accepting, the relevant billing and use policies before proceeding. For more information about the policies and instructions for how to access the Google Cloud platform, visit Google’s website.
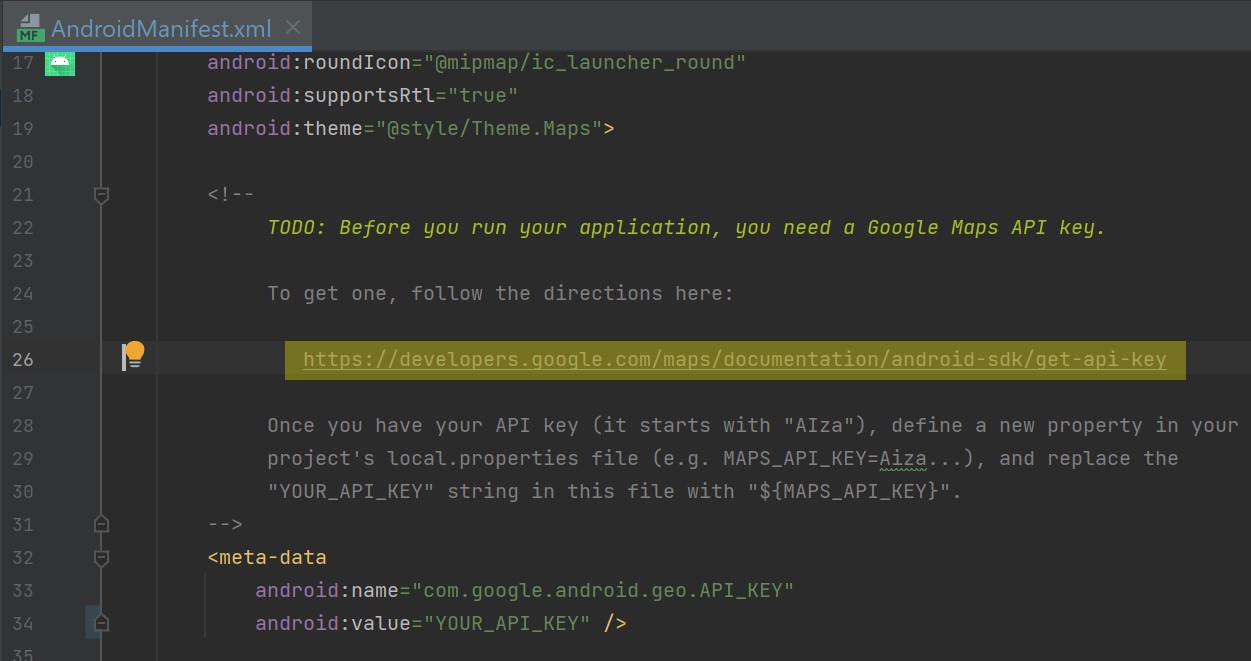
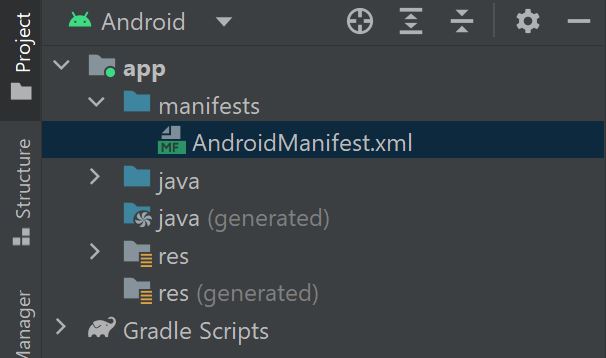
Once you have access to the Google Cloud platform, return to Android Studio. Google Maps will require you to enter an API key into the application’s Manifest file. To locate the Manifest file, navigate through Project > app > manifests and open the file called AndroidManifest.xml. In this file, Android Studio will likely have generated a TODO comment containing instructions for how to create a Google Maps API key, including a link to register your app with Google. Copy and paste the link into your web browser.
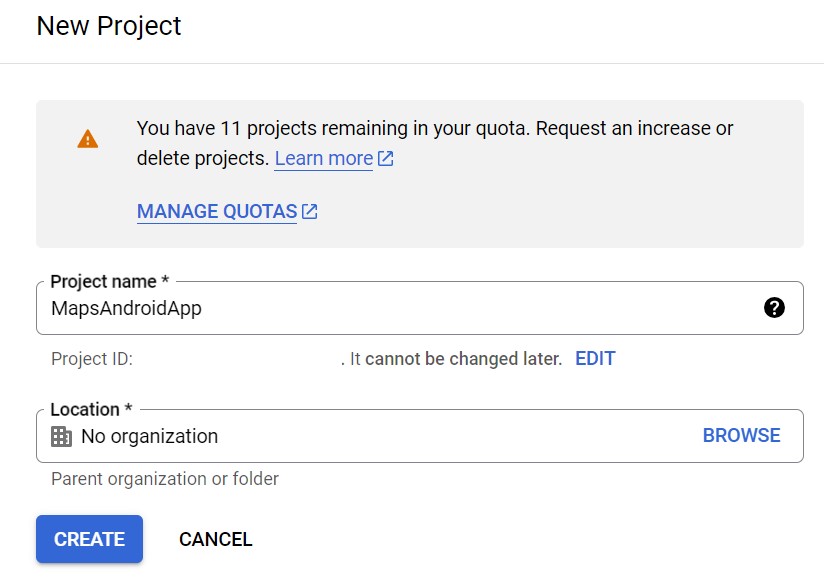
The web page will contain up-to-date instructions for creating an API key. At the time of writing, the instructions involve logging into the Google Cloud platform and heading to the Credentials page.
Next, click the Create Project button. Complete the New Project form by providing a suitable name for the project (e.g. MapsAndroidApp) and project location if you wish. Click the Create button when you are done.
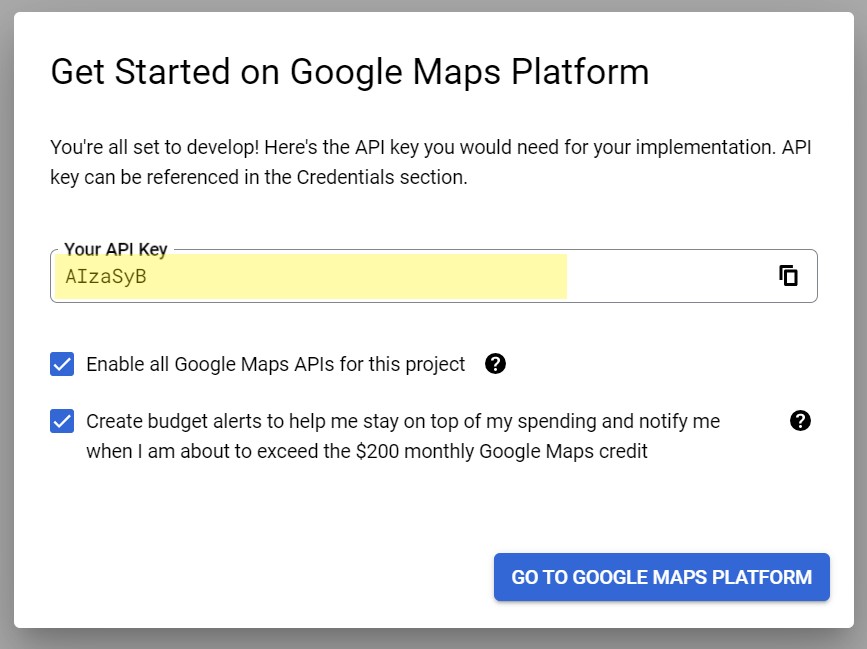
You should then see a dialog window confirming your Google Maps API key. Make a note of this API key as you will need to refer to it again in the next step.
Returning to the AndroidManifest.xml file in Android Studio, you will note the TODO comment recommends supplying the API key as a property in the local.properties file. To facilitate this, locate the meta-data element in the Manifest and set its value property to ${MAPS_API_KEY}. The dollar sign and curly brackets indicate that the value used here will be defined as a property called MAPS_API_KEY.
<meta-data
    android:name="com.google.android.geo.API_KEY"
    android:value="${MAPS_API_KEY}" />
Next, locate the local.properties file (Project > Gradle Scripts) and add a new line to the file that reads like the following, replacing AIza with your full API key, as provided by the Google Cloud platform:
MAPS_API_KEY=AIzaAnd with that, your app can now begin requesting data from the Google Maps SDK!
Designing the activity_maps layout
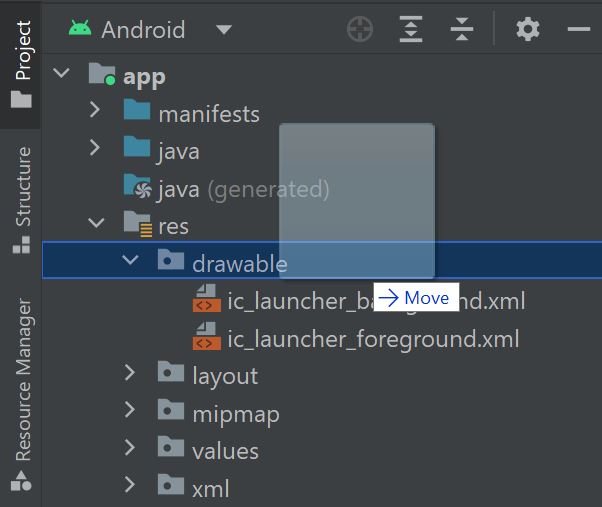
The Maps app will require only one layout. The layout will display an interactive map, several widgets to allow the user to start and end the treasure hunt and display hints, and an image of a compass that will rotate depending on the device’s orientation. The compass image will be stored as a drawable resource. The easiest way to add the drawable to your project would be to copy the compass.xml file from the drawable folder of the example code.
Locate the compass.xml file and drag and drop it into the drawable directory (Project > app > res) for your project in Android Studio.
Next, let’s design the main app layout. Navigate through Project > app > res > layout and open the file called activity_maps.xml. Switch the layout to Code view and edit the file so it reads as follows:
<?xml version="1.0" encoding="utf-8"?>
<androidx.constraintlayout.widget.ConstraintLayout xmlns:android="http://schemas.android.com/apk/res/android"
    xmlns:app="http://schemas.android.com/apk/res-auto"
    android:layout_width="match_parent"
    android:layout_height="match_parent">
 <androidx.fragment.app.FragmentContainerView
        android:id="@+id/map"
        android:layout_width="match_parent"
        android:layout_height="0dp"
        android:name="com.google.android.gms.maps.SupportMapFragment"
        app:layout_constraintTop_toTopOf="parent"
        app:layout_constraintBottom_toTopOf="@id/controls" />
 <RelativeLayout
        android:id="@+id/controls"
        android:layout_width="wrap_content"
        android:layout_height="wrap_content"
        android:paddingVertical="12dp"
        app:layout_constraintStart_toStartOf="parent"
        app:layout_constraintEnd_toStartOf="@id/compass"
        app:layout_constraintBottom_toBottomOf="parent" >
 <Button
            android:id="@+id/treasureHuntButton"
            android:layout_width="wrap_content"
            android:layout_height="wrap_content"
            android:layout_marginBottom="12dp"
            android:padding="4dp"
            android:text="@string/start_treasure_hunt"
            style="?attr/materialButtonOutlinedStyle" />
 <TextView
            android:id="@+id/timer"
            android:layout_width="wrap_content"
            android:layout_height="wrap_content"
            android:layout_alignStart="@id/treasureHuntButton"
            android:layout_alignEnd="@id/treasureHuntButton"
            android:layout_below="@id/treasureHuntButton" />
 <Button
            android:id="@+id/hintButton"
            android:layout_width="wrap_content"
            android:layout_height="wrap_content"
            android:layout_marginTop="6dp"
            android:layout_marginEnd="6dp"
            android:layout_alignStart="@id/treasureHuntButton"
            android:layout_alignEnd="@id/treasureHuntButton"
            android:layout_below="@id/timer"
            android:text="@string/hint"
            android:visibility="invisible"
            style="?attr/materialButtonOutlinedStyle" />
    </RelativeLayout>
 <ImageView
        android:id="@+id/compass"
        android:layout_width="130dp"
        android:layout_height="130dp"
        android:layout_marginEnd="22dp"
        android:src="@drawable/compass"
        android:contentDescription="@string/compass"
        app:layout_constraintEnd_toEndOf="parent"
        app:layout_constraintTop_toBottomOf="@id/map"
        app:layout_constraintBottom_toBottomOf="parent" />
</androidx.constraintlayout.widget.ConstraintLayout>
The contents of the activity_maps layout will be coordinated by a ConstraintLayout widget. Inside the ConstraintLayout, there is a fragment that will display an interactive map the user can navigate around. The height of the fragment is set to 0dp, which means the height will automatically adjust to reflect its constraints. This is a useful technique for designing layouts that will accommodate varying screen sizes. In this instance, the fragment is constrained to the top of the parent ConstraintLayout and a RelativeLayout at the bottom of the screen, so the fragment will occupy as much space as possible after leaving room for the RelativeLayout.
The RelativeLayout widget will contain three widgets: a button that will allow the user to start and end the treasure hunt, a timer that will display the remaining time for the treasure hunt and a hint button that will advise the user which direction to travel in to find the treasure. By default, the hint button will be invisible because it will only appear when a treasure hunt is in progress. The buttons will incorporate a readymade outlined button style from Material Design, which creates a thin border around the button for emphasis. Note the material design theme does require you to have the following dependency in your Module-level build.gradle.kts file:
implementation("com.google.android.material:material:1.9.0")The final widget in the layout is an ImageView that is constrained to the right-hand side of the RelativeLayout at the bottom of the screen. The ImageView widget will display an image of a compass and rotate as the orientation of the device changes. Also, the ImageView contains a content description attribute that describes the image being displayed for the benefit of users who require a screen reader.
The main layout for the app is now in place. In the upcoming sections, we will write the code that coordinates the treasure hunt and interacts with the Google Maps SDK to find the user’s location and monitor their progress towards the treasure.
Requesting user permissions
The application will require permission from the user to access the device’s location. All required permissions must be declared in the manifest file. The Google Play store will use the information in the manifest file to inform potential users about what permissions they will need to provide. To define the list of permissions, locate and open the AndroidManifest.xml file by navigating through Project > app > manifests.
Next, add the following code above the application element:
<uses-permission android:name="android.permission.ACCESS_COARSE_LOCATION" />
    <uses-permission android:name="android.permission.ACCESS_FINE_LOCATION" />
    <uses-permission android:name="android.permission.ACCESS_BACKGROUND_LOCATION" />
The above items define which permissions the app will require to operate. In this case, the app will need permission to access the user’s precise location and continuously monitor their location in the background. The user’s location will be monitored so the app can detect when the user reaches the location containing the treasure. New versions of Android will give the user the option to share their approximate location only; however, the app will work better if the user shares their precise location.
Let’s now implement the code which prompts the user to grant the permissions. To handle all permission-related processes, we will create an object called LocationPermissionHelper in the MainActivity class. The LocationPermissionHelper object will contain methods for initiating and handling permissions-related requests. Locate and open the MainActivity.kt file by navigating through Project > app > java > name of the project. Next, add the following code below the onMapReady method to define the LocationPermissionHelper object:
object LocationPermissionHelper {
    private const val BACKGROUND_LOCATION_PERMISSION = Manifest.permission.ACCESS_BACKGROUND_LOCATION
    private const val COARSE_LOCATION_PERMISSION = Manifest.permission.ACCESS_COARSE_LOCATION
    private const val FINE_LOCATION_PERMISSION = Manifest.permission.ACCESS_FINE_LOCATION
 fun hasLocationPermission(activity: Activity): Boolean {
        return ContextCompat.checkSelfPermission(activity, FINE_LOCATION_PERMISSION) == PackageManager.PERMISSION_GRANTED &&
                ContextCompat.checkSelfPermission(activity, BACKGROUND_LOCATION_PERMISSION) == PackageManager.PERMISSION_GRANTED
    }
 fun requestPermissions(activity: Activity) {
        if (ActivityCompat.shouldShowRequestPermissionRationale(activity, FINE_LOCATION_PERMISSION)) {
            AlertDialog.Builder(activity).apply {
                setMessage(activity.getString(R.string.permission_required))
                setPositiveButton(activity.getString(R.string.ok)) { _, _ ->
                    ActivityCompat.requestPermissions(activity, arrayOf(FINE_LOCATION_PERMISSION,
                        COARSE_LOCATION_PERMISSION, BACKGROUND_LOCATION_PERMISSION), 0)
                }
                show()
            }
        } else {
            ActivityCompat.requestPermissions(activity, arrayOf(FINE_LOCATION_PERMISSION,
                COARSE_LOCATION_PERMISSION, BACKGROUND_LOCATION_PERMISSION), 0)
        }
    }
}
Note you may need to add the following import statements to the top of the file:
import android.app.AlertDialog
import android.Manifest
The first method in the LocationPermissionHelper object is called hasLocationPermission and will check whether the user has granted the app permission to access the device’s fine location and continue monitoring the location in the background. The method will return a boolean (true/false value) indicating whether or not permission has been granted. Note the above code does not check if the coarse location permission is granted because the Geofence feature requires the fine location permission. If the user grants access to the coarse location but not the fine location, then the application will not work so we only check access to the fine location.
The next method is called requestPermissions and it is used to request the necessary location permissions. The user can either grant or refuse permission. If they refuse, the user might not understand why the permissions have been requested. In this case, we can use a method called shouldShowRequestPermissionRationale to check whether the user has refused a given permission. If the permission has been refused, then the shouldShowRequestPermissionRationale method returns a value of true. In this case, the above code builds an alert dialog that will display the message contained in the permission_required string resource. The alert dialog will also feature an OK button that will request the permissions again when clicked. In the above code, the rationale is only shown for the fine location permission; however, you are welcome to show the rationale for the background permission also.
Moving on, we’ll now write the code which processes the user’s response to the permissions request. Add the following code below the onCreate method:
override fun onRequestPermissionsResult(requestCode: Int, permissions: Array, grantResults: IntArray) {
    super.onRequestPermissionsResult(requestCode, permissions, grantResults)
    if (!LocationPermissionHelper.hasLocationPermission(this)) {
        LocationPermissionHelper.requestPermissions(this)
    } else prepareMap()
}
The onRequestPermissionsResult function handles the user’s response to the permissions request. In the above code, the LocationPermissionHelper object’s hasLocationPermission method checks whether all required permissions have been granted. If the hasLocationPermission method returns a value of false, then this means the user has refused to grant some or all of the required permissions. Consequently, the app will run the LocationPermissionHelper object’s requestPermissions method again and show the rationale for the permission request. If the hasLocationPermission method returns a value of true, then a method called prepareMap will load the user’s location and prepare the maps fragment found in the activity_maps layout.
The app should check whether the location permissions have been granted each time it launches. To handle this, add the following code to the bottom of the onCreate method:
if (!LocationPermissionHelper.hasLocationPermission(this)) {
	LocationPermissionHelper.requestPermissions(this)
}
Now, whenever the MapsActivity activity launches, it will validate and request (if necessary) the relevant location permissions.
Finding the user’s location
The app will use Google Play’s location service to find the user’s current or last known location. To use the location service, we must import the necessary packages using a toolkit called Gradle. To import packages using Gradle, navigate through Project > Gradle Scripts and open the Module-level build.gradle.kts file:
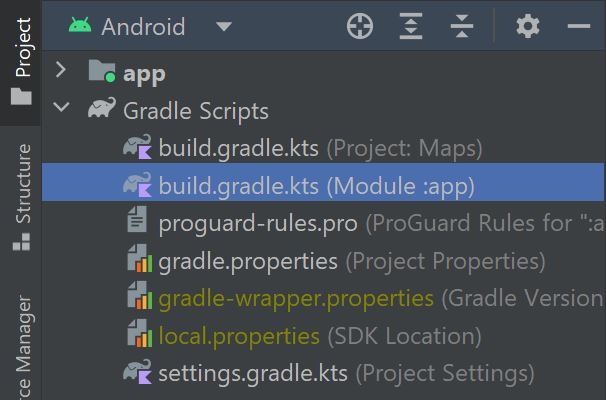
Next, add the following implementation statement to the dependencies element to allow the app to access Google Play’s location services:
implementation("com.google.android.gms:play-services-location:21.0.1")We’re now finished with the Gradle Scripts files. Don’t forget to re-sync your project when prompted!

Let’s now return to the MapsActivity class and write the code that finds the user’s location and prepares the map. First, add the following variables below the mMap variable at the top of the class:
private lateinit var fusedLocationClient: FusedLocationProviderClient
private lateinit var lastLocation: Location
Note you may need to add the following import statement to the top of the file:
import android.location.LocationThe above code defines a variable that incorporates Google’s Fused Location Provider API, which is a battery-efficient tool for finding the user’s location, and a variable called lastLocation, which will store a Location object detailing the coordinates of the user’s last known position. The Fused Location Provider API uses a variety of data sources to determine the user’s location, including GPS and WiFi, and it does most of this processing behind the scenes, so it is easy to implement in our applications.
Both variables feature the lateinit modifier, which means we must assign them a value elsewhere in the code before they can be used. To initialise the fusedLocationClient variable, add the following code to the bottom of the onCreate method:
fusedLocationClient = LocationServices.getFusedLocationProviderClient(this)The lastLocation variable will be initialised by a method called prepareMap, which will retrieve the user’s last known location and apply it to the map. To define the prepareMap method, add the following code below the onMapReady method:
@SuppressLint("MissingPermission")
private fun prepareMap() {
    if (LocationPermissionHelper.hasLocationPermission(this)) {
        mMap.isMyLocationEnabled = true
        // Find the user's last known location
        fusedLocationClient.lastLocation.addOnSuccessListener { location: Location? ->
            location?.apply {
                lastLocation = location
                val currentLatLng = LatLng(location.latitude, location.longitude)
                mMap.animateCamera(CameraUpdateFactory.newLatLngZoom(currentLatLng, 12f))
            }
        }
    }
}
The prepareMap method first checks whether the app has permission to access the device’s location. Providing permission has been granted, then the map’s isMyLocationEnabled attribute is set to true. This means a blue dot will appear in the map fragment to indicate the user’s current location. The isMyLocationAttribute also facilitates other features such as a button that allows the user to recenter the view to their current location and location tracking.
Next, the Fused Location Client requests the last known location of the user’s device. Once the request has been processed, the onSuccess listener will return the location as a Location object. Location objects contain a variety of details about the location, including the longitude and latitude geographical coordinates. In rare cases, the location returned by the Fused Location Client is null. For this reason, the remainder of the code is wrapped in an apply block that will only run if the location is non-null.
First, the location is stored in the lastLocation variable so it can be referred to elsewhere in the activity. Next, the latitude and longitude coordinates are packaged in a LatLng object. The map’s camera is positioned over the location specified in the LatLng object so the user can see their place on the map by a GoogleMaps class method called animateCamera. The CameraUpdate object that is supplied as an argument to the animateCamera method includes the LatLng object and a float value between 2.0 and 21.0, which indicates how close the map camera should zoom in.
The prepareMap method will run whenever the user launches the app and the map becomes available (provided the user has granted the necessary permissions). Once the map is available, a callback method called onMapReady will run. Android Studio should automatically add the onMapReady method to the MapsActivity class when you select the Google Maps Activity project template. The method likely contains some example code that plots a marker over Sydney on the map. Delete this code and modify the onMapReady method so it reads as follows:
override fun onMapReady(googleMap: GoogleMap) {
    mMap = googleMap
    mMap.uiSettings.isZoomControlsEnabled = true
    prepareMap()
}
Now, whenever the map fragment becomes available, the onMapReady method will run the prepareMap method and find the user’s location. The above code also sets the isZoomControlsEnabled attribute of the map’s user interface settings to true. This means zoom-in and zoom-out buttons will be added to the map so the user can control the camera view.
Create a Geofence around the treasure location
In this section, we’ll discuss how to apply a Geofence perimeter around a location on the map. The Geofence will alert the app whenever the user enters the perimeter and provides a useful mechanism for identifying when the user reaches their target destination. In this app, the Geofence will contain the treasure. To coordinate the Geofence, add the following companion object and variables to the top of the MapsActivity class:
companion object {
    const val MINIMUM_RECOMMENDED_RADIUS = 100F
    const val GEOFENCE_KEY = "TreasureLocation"
}

private val geofenceList = arrayListOf<Geofence>()
private var treasureLocation: LatLng? = null
private lateinit var geofencingClient: GeofencingClient
The companion object stores two constant values: the radius of the area covered by the Geofence (stored in Float format where 1F = 1 metre on the map), and a key that will identify the Geofence. Next, in the regular list of variables, the geofenceList variable will store an array list of all the active Geofence objects. Meanwhile, the treasureLocation variable will store the LatLng object containing the coordinates of the treasure location, and the geofencingClient variable will hold an instance of the GeofencingClient class, which we can use to interact with the Geofencing APIs. To initialise the geofencingClient variable, add the following code to the bottom of the onCreate method:
geofencingClient = LocationServices.getGeofencingClient(this)Moving on, let’s define a method called generateTreasureLocation. The generateTreasureLocation method will create a Geofence around a random nearby location that will serve as the site of the treasure. To define the method, add the following code below the prepareMap method:
@SuppressLint("MissingPermission")
private fun generateTreasureLocation() {
    val choiceList = listOf(true, false)
    var choice = choiceList.random()
    val treasureLat = if (choice) lastLocation.latitude + Random.nextFloat()
    else lastLocation.latitude - Random.nextFloat()
    choice = choiceList.random()
    val treasureLong = if (choice) lastLocation.longitude + Random.nextFloat()
    else lastLocation.longitude - Random.nextFloat()
    treasureLocation = LatLng(treasureLat, treasureLong)
}
Note you may need to add the following import statement to the top of the file:
import kotlin.random.RandomThe above code will find a random nearby location. It does this by selecting a boolean value of true or false by random. If a value of true is randomly selected, then the method will add a number to the user’s current latitude location coordinate. Meanwhile, if the value is false then the method will subtract a number from the coordinate. The number that will be added or subtracted will be a random Float number between 0 and 1. This process is then repeated for the longitude coordinate. For example, imagine the user’s current location coordinates are Lat: 45.91, Lon: 8.08. To define the latitude coordinate of the treasure, the method will select a random boolean value and random Float number between 0 and 1 such as 0.24. If the boolean is true, then this means the Float will be added to the user’s current latitude coordinate and the latitude coordinate of the treasure will be 46.15 (45.91 + 0.24). This process is repeated to determine the Longitude coordinate also. The advantage of this method of finding a random location is that the new location coordinates will be within 1 Float of the user’s current location coordinates. This means the location of the treasure will be relatively near to the user.
Moving on, to create a Geofence around the treasure, add the following code to the generateTreasureLocation method:
removeTreasureMarker()
geofenceList.add(Geofence.Builder()
    .setRequestId(GEOFENCE_KEY)
    .setCircularRegion(
        treasureLat,
        treasureLong,
        MINIMUM_RECOMMENDED_RADIUS
    )
    .setExpirationDuration(Geofence.NEVER_EXPIRE)
    .setTransitionTypes(Geofence.GEOFENCE_TRANSITION_ENTER)
    .build()
)
 try {
    geofencingClient.addGeofences(createGeofencingRequest(), createGeofencePendingIntent())
        .addOnSuccessListener(this) {
            Toast.makeText(this, getString(R.string.begin_search), Toast.LENGTH_SHORT).show()
            // TODO: Start the timer and display an initial hint
        }
        .addOnFailureListener(this) { e ->
            Toast.makeText(this, getString(R.string.treasure_error, e.message), Toast.LENGTH_SHORT).show()
        }
} catch (_: SecurityException) { }
The above code begins by running a method that we will define shortly called removeTreasureMarker, which will remove any markers on the map associated with previous treasure locations. Next, the GeofenceBuilder class is used to construct a Geofence around the location of the treasure. The Geofence builder assigns the Geofence an ID so we can reference it later if needed. The area covered by the Geofence is defined by passing the latitude and longitude coordinates of the treasure and our chosen radius (100F as defined in the companion object) as parameters to the setCircularRegion method. Next, the setExpirationDuration method allows you to define how long the Geofence will last (in milliseconds). If you would like the Geofence to never expire then the expiration duration should be set to Geofence.NEVER_EXPIRE. Finally, the setTransitionTypes command defines what type of activity you would like to receive alerts for. Acceptable activities include GEOFENCE_TRANSITION_ENTER, which will notify the app when the user enters the Geofence area; GEOFENCE_TRANSITION_EXIT, which will notify the app when the user leaves the Geofence area; and GEOFENCE_TRANSITION_DWELL, which will notify the app when the user remains in the Geofence area for a given amount of time. Once all the properties of the Geofence have been established, the above code builds an instance of the completed Geofence object and adds it to the geofenceList variable.
The Geofence is sent to the Geofencing client, which will attempt to add it to the map. If the Geofence is added successfully, then the onSuccess listener will display a toast notification informing the user that they can begin the treasure hunt. Meanwhile, if an error occurs, then the onFailure listener will display a notification advising that there was a problem plotting the location of the treasure. All the above code is wrapped in a try/catch block because the GeofencingClient class’s addGeofences method will throw a security exception if the user has not granted the app permission to access the device’s location. The app is designed such that the generateTreasureLocation method cannot run if the user has not granted permission, so we simply catch the exception as a formality to prevent code compilation errors rather than because we expect to have to deal with the exception at runtime.
How to add a visible circle around the Geofence area
In the Maps app, the Geofence will not be visible to the user; however, if you wish to display a circle around the Geofence area then add the following code to the addGeofence onSuccess listener:
val circleOptions = CircleOptions()
    .strokeColor(Color.BLACK)
    .fillColor(Color.TRANSPARENT)
    .center(treasureLocation!!)
    .radius(MINIMUM_RECOMMENDED_RADIUS.toDouble())
mMap.addCircle(circleOptions)
The circle is designed by customising the properties of a CircleOptions object: the strokeColor attribute defines the colour of the circle’s body; the fillColor attribute sets the colour inside the circle (transparent in this instance); the center attribute accepts the LatLng object that was used to define the location of the Geofence, and the radius attribute defines the radius of the circle. In this case, the radius is set to the value of the MINIMUM_RECOMMENDED_RADIUS variable from the companion object.
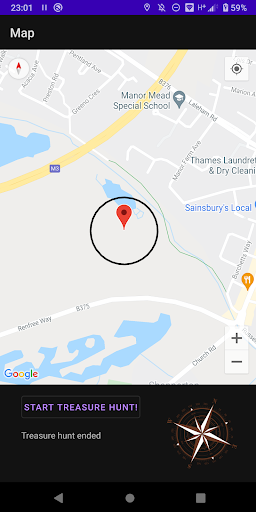
Once the CircleOptions object has been prepared, you can add it to the map by using the map fragment’s addCircle method to create an effect similar to below:
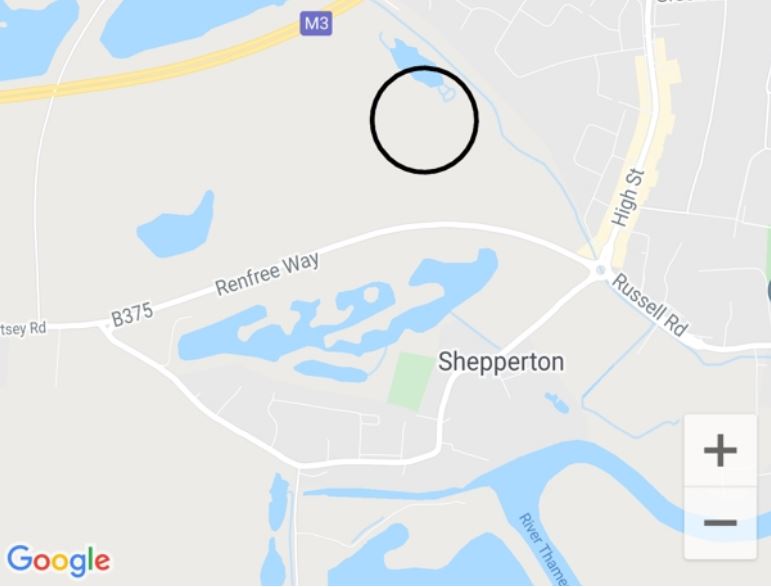
Detect Geofence alerts
In this section, we will write the code that adds a Geofence to the map and responds to alerts. First, add the following code below the generateTreasureLocation method. This code will create a GeofenceRequest object that can register Geofences with the Geofencing client:
private fun createGeofencingRequest(): GeofencingRequest {
    return GeofencingRequest.Builder().apply {
        setInitialTrigger(GeofencingRequest.INITIAL_TRIGGER_ENTER)
        addGeofences(geofenceList)
    }.build()
}
The createGeofencingRequest method sets an initial trigger, which defines what Geofence events should be reported the moment a Geofence is added to the client. In this case, the initial trigger is set to INITIAL_TRIGGER_ENTER which means a notification will appear if the user has already arrived at the Geofence area. If you wished to disable these initial notifications then you could set the InitialTrigger to 0:
setInitialTrigger(0)Next, the list of Geofences that will be monitored is added to the GeofencingRequest instance. The GeofencingRequest instance is then returned to the generateTreasureLocation method and submitted to the Geofencing client.
Moving on, add the following code below the createGeofencingRequest method to register a broadcast receiver that will monitor and respond to Geofence alerts:
private fun createGeofencePendingIntent(): PendingIntent {
    val intent = Intent(this, GeofenceBroadcastReceiver::class.java)
    return PendingIntent.getBroadcast(this, 0, intent, PendingIntent.FLAG_IMMUTABLE or PendingIntent.FLAG_UPDATE_CURRENT)
}
The createGeofencePendingIntent method generates a PendingIntent object. Typically, pending intents are used to direct another application to perform a task. The intent is considered pending because there is no guarantee the other application will act immediately. In this case, the pending intent will signal to a broadcast receiver class within our app called GeofenceBroadcastReceiver. A pending intent will launch whenever the GEOFENCE_TRANSITION_ENTER alert occurs, and the GeofenceBroadcastReceiver class will handle the alert.
Let’s now create the GeofenceBroadcastReceiver class that will process Geofence alerts. Right-click the directory that contains MapsActivity (Project > app > java > name of the project) and select New > Kotlin Class/File. Name the file GeofenceBroadcastReceiver and select Class from the list of options.
Once the GeofenceBroadcastReceiver.kt file opens in the editor, modify its code so it reads as follows:
class GeofenceBroadcastReceiver : BroadcastReceiver() {
 override fun onReceive(context: Context?, intent: Intent) {
        val geofencingEvent = GeofencingEvent.fromIntent(intent) ?: return
        if (geofencingEvent.hasError()) {
            Toast.makeText(context, context?.getString(R.string.geofence_error, geofencingEvent.errorCode.toString()), Toast.LENGTH_SHORT).show()
            return
        }
 // Get the transition type.
        val geofenceTransition = geofencingEvent.geofenceTransition
        if (geofenceTransition == Geofence.GEOFENCE_TRANSITION_ENTER) context?.sendBroadcast(Intent("GEOFENCE_ENTERED"))
    }
}
The onReceive method of the GeofenceBroadcastReceiver will run whenever an intent is sent by the Geofencing client. The onReceive method will check whether the intent contains a Geofence monitoring error. If an error has occurred, then the error code will be displayed using a toast notification. On the other hand, if no error has occurred, then the transition type that triggered the alert is assessed. If the transition type is GEOFENCE_TRANSITION_ENTER, then this means the user has entered the Geofence area. The broadcast receiver will respond to this event by sending a broadcast intent with a reference tag of “GEOFENCE_ENTERED” to the context in which the broadcast receiver is running. In this app, the broadcast receiver context will be tied to the MapsActivity activity. In the next section, we will configure MapsActivity class to respond to the broadcast intent and congratulate the user on entering the Geofence area and finding the treasure.
To receive alerts, we must also register the broadcast receiver as a service in the application’s manifest file. Locate and open the AndroidManifest.xml file by navigating through Project > app > manifests. Next, add the following line of code inside the application element to register the GeofenceBroadcastReceiver class as a broadcast receiver that belongs to the app:
<receiver android:name=".GeofenceBroadcastReceiver" />Respond to Geofence area enter transitions
So far, we have written the code that creates a Geofence around a randomly selected nearby location and registers a broadcast receiver to detect whenever the user enters the Geofence area. Upon receiving an alert that the user has entered the Geofence area, the broadcast receiver will emit a broadcast intent that the MapsActivity activity will intercept and use to congratulate the user on finding the treasure. To handle this, return to the MapsActivity class and add the following code to the list of variables at the top of the class:
private val broadcastReceiver = object : BroadcastReceiver() {
    override fun onReceive(context: Context?, intent: Intent?) {
        endTreasureHunt()
        Toast.makeText(this@MapsActivity, getString(R.string.treasure_found), Toast.LENGTH_LONG).show()
    }
}
The above variable defines a BroadcastReceiver object that will respond to broadcast intents. If an intent is received, the onReceive callback method will run a method called endTreasureHunt that will end the various processes relating to the treasure hunt and display a toast notification congratulating the user on finding the treasure. To register the BroadcastReceiver instance and direct it to intercept broadcast intents with a reference tag of “GEOFENCE_ENTERED”, add the following code to the bottom of MapsActivity class’s onCreate method:
registerReceiver(broadcastReceiver, IntentFilter("GEOFENCE_ENTERED"), RECEIVER_NOT_EXPORTED)The above registerReceiver call also includes the flag RECEIVER_NOT_EXPORTED, which means the broadcast receiver will only detect events published by our app.
The MapsActivity class must also unregister the broadcast receiver when it shuts down to prevent memory leaks and any unnecessary drains on the app resources. To unregister the broadcast receiver when the activity is being destroyed, add the following code below the onCreate method:
override fun onDestroy() {
    super.onDestroy()
    unregisterReceiver(broadcastReceiver)
}
Once the treasure hunt has ended, the app will reveal the location of the treasure by placing a marker on the map, stopping the countdown timer and updating the user interface so the user can start a new treasure hunt if they wish. To facilitate these processes, add the following variables to the list of variables at the top of the class:
private var treasureMarker: Marker? = null
private var huntStarted = false
The treasureMarker variable will store a reference to a Marker object that is placed on the map to indicate the location of the treasure. Meanwhile, the huntStarted variable will store a boolean value indicating whether or not a treasure hunt is underway. Once those two variables are in place, write the following code below the createGeofencePendingIntent method to define a method called endTreasureHunt:
private fun endTreasureHunt() {
    geofencingClient.removeGeofences(createGeofencePendingIntent()).run {
        addOnSuccessListener {
            geofenceList.clear()
        }
        addOnFailureListener { }
    }
    if (treasureMarker == null) placeAddressMarkerOnMap(treasureLocation!!)
    binding.treasureHuntButton.text = getString(R.string.start_treasure_hunt)
    binding.hintButton.visibility = View.INVISIBLE
    huntStarted = false
    // TODO: Cancel the timer here
    binding.timer.text = getString(R.string.hunt_ended)
}
The endTreasureHunt method uses the GeofencingClient class’s removeGeofences method to remove all the Geofences that we used earlier to register the GeofencesBroadcastReceiver. In this way, the method can deactivate the Geofence that is monitoring the treasure location. Once this operation is complete, the geofenceList variable is cleared because its contents are no longer valid. Next, a method called placeAddressMarkerOnMap (that we’ll define in the next section) uses the LatLng object stored in the treasureLocation variable to plot a marker on the map and reveal the location of the treasure. Finally, the user interface is updated so that the text in the treasureHuntButton widget reads ‘Start treasure hunt!’, the button that allows the user to generate hints for the treasure’s location disappears, and the text displayed in the timer TextView is set to ‘Treasure hunt ended’. Also, the value of the huntStarted variable is set to false to indicate that no treasure hunt is currently underway.
The marker placed on the map to indicate the location of the treasure should be removed if the user decides to start a new treasure hunt. The process of removing markers from the map will be handled by a method called removeTreasureMarker. To define the removeTreasureMarker method, add the following code below the endTreasureHunt method to remove the Marker stored in the treasureMarker variable ready for a new treasure hunt to begin:
private fun removeTreasureMarker() {
    treasureMarker?.remove()
    treasureMarker = null
}
Plotting markers on the map
Once the treasure hunt ends it would be useful to reveal the location of the treasure by plotting a marker on the map. This functionality will be handled by a method called placeAddressMarkerOnMap that will plot a marker at a location specified within a LatLng object. To define the placeAddressMarkerOnMap method, add the following code below the removeTreasureMarker method:
private fun placeAddressMarkerOnMap(location: LatLng) {
    val geocodeListener = object : Geocoder.GeocodeListener {
        override fun onGeocode(addresses: MutableList) {
            val address = addresses[0].getAddressLine(0) ?: getString(R.string.no_address)
            addTreasureMarker(location, address)
        }
        override fun onError(errorMessage: String?) {
            addTreasureMarker(location, errorMessage)
        }
    }
    Geocoder(this).getFromLocation(location.latitude, location.longitude, 1, geocodeListener)
}
The placeAddressMarkerOnMap method defined above constructs a GeocoderListener object to handle requests to find the street addresses associated with a given location. If found, the first of any returned street addresses will be used as the title text for a marker that will be placed on the map at the treasure location. The GeocodeListener class features two callback methods: onGeocode, which returns a list of corresponding addresses if the geocoding request is successful, and onError, which will return an error message if the geocoding request fails e.g. due to network connectivity issues.
In the above code, if an address is found, then the address data is extracted using the Address class’s getAddressLine method. There is a chance that Google may not provide any address information. In this case, the getAddressLine method will return a value of null. To handle null address data, the above code uses the Elvis operator ?:. If the value on the left-hand side of the Elvis operator is null, then the value on the right-hand side of the operator will be used instead. In this way, the Elvis operator allows you to provide a backup value if your first choice is null. On this occasion, if the address information is null, then we will use no_address String resource defined in the strings.xml file as a fallback.
The geocoding request is submitted using the Geocoder class’s getFromLocation method to find the list of addresses registered at the latitude and longitude coordinates stored in the LatLng object. The above code also sets the getFromLocation method’s maxResults parameter to 1 because we are only interested in displaying the first registered address.
Finally, to add the marker and associated text to the location of the treasure on the map, add the following method below the placeAddressMarkerOnMap method:
private fun addTreasureMarker(location: LatLng, text: String?) {
    val markerOptions = MarkerOptions()
        .position(location)
        .title(text)
    treasureMarker = mMap.addMarker(markerOptions)
}
The addTreasureMarker method generates a marker for the position defined in a given LatLng object. It then assigns a title to the marker which will be shown if the user clicks the marker. In this case, the title will display the address associated with the marker or an error message, depending on the outcome of the geocoding request. Finally, the marker is added to the map. A reference to the marker is assigned to the activity’s treasureMarker variable so the marker can be located and removed if necessary.

Initiating the treasure hunt
In this section, we will configure the user interface widgets that will allow the user to start the treasure hunt, view how much time is remaining and generate hints for which direction to travel to find the treasure. The user can start and end the treasure hunt by pressing the Button widget with the ID treasureHuntButton from the activity_maps layout. To enable this functionality, add the following code to the bottom of MapsActivity class’s onCreate method:
binding.treasureHuntButton.setOnClickListener {
    when {
        !this::lastLocation.isInitialized -> Toast.makeText(this, getString(R.string.location_error), Toast.LENGTH_LONG).show()
        huntStarted -> endTreasureHunt()
        else -> {
            generateTreasureLocation()
            binding.treasureHuntButton.text = getString(R.string.end_the_treasure_hunt)
            binding.hintButton.visibility = View.VISIBLE
            huntStarted = true
        }
    }
}
The above code attaches an onClick listener to the treasure hunt button and uses a when block to decide the appropriate course of action when the button is clicked. In the first scenario, the lastLocation variable has not been initialised, which means there has been a problem finding the user’s location and the treasure hunt cannot begin. In this case, a toast notification advises the user why the treasure hunt cannot start. If the lastLocation variable has been set, then the when block checks whether a treasure hunt is in progress. If a treasure hunt is underway, then the endTreasureHunt method will stop the treasure hunt and place a marker on the map to indicate where the treasure was located. Finally, if none of the previous conditions applies, then this means a treasure hunt is not in progress. In this case, the generateTreasureLocation method will create a Geofence around the treasure location, the hint button will become visible so the user can request directional hints, and the huntStarted variable will be set to true.
A timer will advise the user how much time remains for them to complete the treasure hunt. To incorporate the timer, add the following variable to the list of variables at the top of the MapsActivity class:
// 3600000 ms equals one hour
private val timer = object : CountDownTimer(3600000, 1000) {
    override fun onTick(millisUntilFinished: Long) {
        binding.timer.text = getString(R.string.timer, millisUntilFinished / 1000)
    }
    override fun onFinish() {
        endTreasureHunt()
        binding.timer.text = getString(R.string.times_up)
    }
}
The timer variable defines a CountDownTimer object that will count down for one hour (3600000 milliseconds). The ticker interval is set to one second (1000 milliseconds). At each interval, the CountDownTimer object’s onTick method will update the text displayed in the timer TextView widget to reflect the remaining time. Once the time has elapsed, the onFinish method will stop the treasure hunt using the endTreasureHunt method and change the text in the timer TextView widget to “Time’s up!”.
While a treasure hunt is underway, the user can request directional hints (e.g. “Head north west”) by pressing the hint button. To generate the hints, add the following code below the addTreasureMarker method:
private fun showHint() {
    if (treasureLocation != null && this::lastLocation.isInitialized) {
        val latDir = if (treasureLocation!!.latitude > lastLocation.latitude) getString(R.string.north)
        else getString(R.string.south)
        val lonDir = if (treasureLocation!!.longitude > lastLocation.longitude) getString(R.string.east)
        else getString(R.string.west)
        Toast.makeText(this, getString(R.string.direction, latDir, lonDir), Toast.LENGTH_SHORT).show()
    }
}
The showHint method will generate the hint text by calculating whether the treasure’s latitude and longitude coordinates are greater than the coordinates of the user’s current location. If the treasure’s latitude and longitude coordinates are greater than the user’s current location coordinates then they must head north and east, respectively. The bidirectional instructions are then packaged in the direction string resource and displayed in a toast notification (e.g. “Head south east”).
To run the showHint method whenever the hint button is pressed, add the following code to the bottom of the onCreate method:
binding.hintButton.setOnClickListener {
    showHint()
}
When the treasure hunt begins, the app will start the timer and display an initial directional hint to the user. To arrange this, locate the generateTreasureLocation method and replace the TODO comment with the following:
timer.start()
showHint()
Likewise, to cancel the timer if the user decides to end the treasure hunt early, locate the endTreasureHunt method and replace the TODO comment with the following:
timer.cancel()Monitoring the device’s location
During the treasure hunt, the app will continuously monitor the user’s location to assess their progress towards the treasure. To facilitate this, add the following variables to the list of variables at the top of the MapsActivity class:
private var receivingLocationUpdates = false
private lateinit var locationCallback: LocationCallback
private lateinit var locationRequest: LocationRequest
Note you may need to add the following import statement to the top of the file:
import com.google.android.gms.location.LocationRequestIn the above list of variables, the receivingLocationUpdates variable will store a boolean value indicating whether or not the app is actively receiving location updates, the locationCallback variable will handle changes in the device’s location, and the locationRequest variable will define the frequency and accuracy of location updates.
If the device’s settings do not allow the app to continuously monitor the user's location then the app will need to request authorisation from the user. To handle this, add the following code below the showHint method. The below code defines a method called createLocationRequest that will request regular location updates from Google’s Location Services:
private fun createLocationRequest() {
    locationRequest = LocationRequest.Builder(Priority.PRIORITY_HIGH_ACCURACY, 10000)
        .setMinUpdateIntervalMillis(5000)
        .build()
    val locationSettingsRequest = LocationSettingsRequest.Builder()
        .addLocationRequest(locationRequest)
        .build()
    val client = LocationServices.getSettingsClient(this)
    client.checkLocationSettings(locationSettingsRequest).apply {
        addOnSuccessListener {
            receivingLocationUpdates = true
            startLocationUpdates()
        }
        addOnFailureListener {
            if (it is ResolvableApiException) {
                registerForActivityResult(ActivityResultContracts.StartIntentSenderForResult()) { result ->
                    if (result.resultCode == RESULT_OK) {
                        receivingLocationUpdates = true
                        startLocationUpdates()
                    }
                }.launch(IntentSenderRequest.Builder(it.resolution).build())
            }
        }
    }
}
Note you may need to add the following import statement to the top of the file:
import com.google.android.gms.location.PriorityThe createLocationRequest method uses the LocationRequest class to regularly request location updates from Google’s Fused Location Provider API. When constructing the LocationRequest instance, the LocationRequest.Builder constructor allows you to set a priority and interval for location updates. It is recommended to use the PRIORITY_HIGH_ACCURACY priority when the app requires accurate location updates (often from GPS) and the PRIORITY_BALANCED_POWER_ACCURACY priority when the location accuracy can be reduced to approximately 100 metres (location data often taken from WiFi and cell tower positioning) to help preserve the device’s battery life. The builder also allows you to set additional properties such as a minimum update interval, which allows the app to receive location updates more regularly than the interval specified in the builder constructor. More frequent updates are delivered if the data is available, such as when other apps are requesting updates.
Once the LocationsRequest instance has been prepared, it is packaged in a LocationsSettingsRequest object. The LocationsSettingsRequest object is assessed by the LocationServices class to confirm that the device’s settings are configured correctly to support the location services required for the app to function. If the settings are configured correctly, then the receivingLocationUpdates variable is set to true and a method called startLocationUpdates (that we’ll define shortly) will begin monitoring the device’s location. On the other hand, if the device’s settings are not configured correctly, then the method will check whether the failure is recoverable.
If the device’s settings configuration can be resolved, then we can prompt Google Play services to display a dialog window and invite the user to fix the issue. To do this, we extract the proposed resolution from the ResolvableApiException instance and use the registerForActivityResult method to begin the resolution process. If the resolution is successful, then the result of the request will be RESULT_OK. In this case, the startLocationUpdates method will run and begin requesting location data.
To define the startLocationUpdates method, add the following code below the createLocationRequest method:
@SuppressLint("MissingPermission")
private fun startLocationUpdates() {
    try {
        locationCallback = object : LocationCallback() {
            override fun onLocationResult(p0: LocationResult) {
                super.onLocationResult(p0)
                p0.lastLocation?.let { location ->
                    lastLocation = location
                }
            }
        }
    fusedLocationClient.requestLocationUpdates(locationRequest, locationCallback, Looper.getMainLooper())
    } catch (_: SecurityException) { }
}
The startLocationUpdates method uses the LocationCallback class to respond to changes in the device’s location. If a change occurs, then the onLocationResult callback method will return a LocationResult object. The LocationResult object is then assigned to the lastLocation variable so the app can refer to the user’s last known location when generating directional hints to locate the treasure.
To initiate the above pathway and monitor the device’s location while the app is in use, add the following code below the onCreate method:
override fun onResume() {
    super.onResume()
    if (!receivingLocationUpdates) createLocationRequest()
}
The onResume method refers to a stage of the Android application lifecycle that occurs when the app is launched, or the user returns to the app after leaving it running in the background. If the user closes the app or leaves the app running in the background while doing something else on their device, location updates will no longer be required until the user returns. For this reason, it is best to use the onPause stage of the Android application lifecycle to stop the location updates. To arrange this, add the following code below the onResume method:
override fun onPause() {
    super.onPause()
    if (this::locationCallback.isInitialized) fusedLocationClient.removeLocationUpdates(locationCallback)
}
Now, whenever the app is closed (even temporarily) it will stop requesting location updates and prevent the device’s resource and battery life from being used unnecessarily. If the user later returns to the app, then the location updates will start again as defined in the onResume method.
Monitoring the device’s orientation
All the code required for the app to initiate the treasure hunt and monitor the user’s progress is now in place. For the remainder of this project, we will set up the compass image that appears in the bottom right corner of the activity_maps layout. The compass will rotate according to the device’s orientation and enable the user to determine which direction they are facing. This will help them respond to the hints provided while a treasure hunt is underway (e.g. “Head north west”). It will also be a useful opportunity to explore and interact with the sensors on an Android device.
To begin, add the following variables to the list of variables at the top of the MapsActivity class:
private val accelerometerReading = FloatArray(3)
private val magnetometerReading = FloatArray(3)
private val rotationMatrix = FloatArray(9)
private val orientationAngles = FloatArray(3)
private var isRotating = false
private lateinit var sensorManager: SensorManager
In the above code, the first four variables define Float arrays that will store data about different sensors on the device. The isRotating variable will store a boolean value indicating whether or not the compass is currently rotating, and the sensorManager variable will provide access to the sensors on the device via the system’s sensor manager. Altogether, the sensors will provide the app with the necessary information to calculate the orientation of the device and rotate the compass image accordingly.
To initialise the sensorManager variable, add the following line of code to the bottom of the onCreate method:
sensorManager = getSystemService(SENSOR_SERVICE) as SensorManagerWith regards to sensors, it is worth mentioning not all devices contain an accelerometer, which is the sensor that detects the acceleration of the device in a given direction (including the effects of gravity). If you wanted to ensure that the Google Play store will only display the app to suitable devices that include an accelerometer, you could add the following line to the AndroidManifest.xml file (Project > app > manifests) below the uses-permission elements:
<uses-feature android:name="android.hardware.sensor.accelerometer"
    android:required="true" />
Returning to the MapsActivity class, we need to configure the class to extend the SensorEventListener interface. In extending an interface, the base class can inherit that interface’s data including its variables and methods. In other words, the MapsActivity class will inherit the SensorEventListener interface’s ability to monitor and respond to the device’s sensors. To implement this, locate the MapsActivity class declaration line and edit it so it reads as follows:
class MapsActivity : AppCompatActivity(), OnMapReadyCallback, SensorEventListener {Inheriting from the SensorEventListener interface requires several mandatory methods to be implemented. An easy way to address this is to hover over the MapsActivity class declaration (that is likely highlighted in red) and click Implement members.

In the Implement Members window that opens, select both onSensorChanged and onAccuracyChanged then press OK.
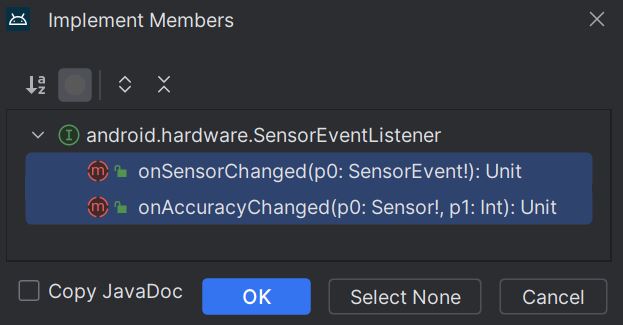
Both methods should then appear at the bottom of the MapsActivity class. The onAccuracyChanged method detects when the accuracy of the sensors changes. This method will not be used in this application; however, we still have to include it because it is a mandatory method of the SensorEventListener interface. Meanwhile, the onSensorChanged method detects whenever a sensor emits a new set of values. This app will use the onSensorChanged method to monitor the accelerometer and magnetic field sensors. To do this, modify the onSensorChanged method so it reads as follows:
override fun onSensorChanged(event: SensorEvent?) {
    if (event == null) return
    when (event.sensor.type) {
        Sensor.TYPE_ACCELEROMETER -> System.arraycopy(event.values, 0, accelerometerReading, 0, accelerometerReading.size)
        Sensor.TYPE_MAGNETIC_FIELD -> System.arraycopy(event.values, 0, magnetometerReading, 0, magnetometerReading.size)
    }
    if (!isRotating) updateOrientationAngles()
}
The above code uses a when block to determine how the onSensorChanged method should respond when a given sensor reports new data. Specifically, the when block responds to the accelerometer sensor, which monitors the device’s acceleration force, and the magnetic field sensor, which detects the geometric field acting upon the device. The onSensorChanged method copies the data output from the sensors into the relevant array variable (accelerometerReading or magnetometerReading). Once this is done, a method called updateOrientationAngles will process the data and rotate the compass image. The updateOrientationAngles method will only run if the isRotating variable is set to false because the app should not submit a new compass rotation request if a previous request has not finished. Otherwise, the compass may jolt from one direction to another. Each compass rotation request will take 500 milliseconds to complete, as specified in the updateOrientationAngles method.
To define the updateOrientationAngles method, add the following code below the startLocationUpdates method:
private fun updateOrientationAngles() {
    SensorManager.getRotationMatrix(rotationMatrix, null, accelerometerReading, magnetometerReading)
    SensorManager.getOrientation(rotationMatrix, orientationAngles)
    val degrees = (Math.toDegrees(orientationAngles[0].toDouble()))
    val newRotation = degrees.toFloat() * -1
    val rotationChange = newRotation - binding.compass.rotation
    binding.compass.animate().apply {
        isRotating = true
        rotationBy(rotationChange)
        duration = 500
        setListener(object : AnimatorListenerAdapter() {
            override fun onAnimationEnd(animation: Animator) {
                isRotating = false
            }
        })
    }.start()
}
The updateOrientation method uses the values of the magnetometerReading and accelerometerReading arrays to generate a rotation matrix and determine the device’s orientation. Some quite detailed Physics goes into calculating these values which are not necessary for your understanding of this method; however, if you are interested in learning more then you can refer to the Android documentation on the SensorEvents class.
The orientation of the device is output as a Float array. In this instance, we are only interested in the first value of this array, which represents the angle between the device’s y-axis and the north pole. The angle is then converted from radians to degrees and stored in a variable called newRotation. To determine how far to rotate the compass image, the difference between the newRotation value and the current rotation of the compass image is calculated and output to a variable called rotationChange.
Next, the above code uses the ImageView class’s animate method to construct a ViewPropertyAnimator object and create a smooth rotation animation. While the animation is underway, the isRotating variable is set to true to prevent competing animations from being initiated. Once the rotation is complete, the isRotating variable is set back to false by the onAnimationEnd callback method.
For the final step, we must register listeners to the sensors that we want the app to monitor. To do this, add the following code to the bottom of the onCreate method:
sensorManager.getDefaultSensor(Sensor.TYPE_ACCELEROMETER)?.also { accelerometer ->
    sensorManager.registerListener(
        this,
        accelerometer,
        SensorManager.SENSOR_DELAY_NORMAL,
        SensorManager.SENSOR_DELAY_UI
    )
}
sensorManager.getDefaultSensor(Sensor.TYPE_MAGNETIC_FIELD)?.also { magneticField ->
    sensorManager.registerListener(
        this,
        magneticField,
        SensorManager.SENSOR_DELAY_NORMAL,
        SensorManager.SENSOR_DELAY_UI
    )
}
The above code registers listeners to the accelerometer and magnetic field sensors. Whenever new data is available, it will be processed by the onSensorChanged callback method. For both listeners, the sampling period is set to SENSOR_DELAY_NORMAL and the reporting latency is set to SENSOR_DELAY_UI. Both values are defined in the SensorManager class and refer to predefined configurations for sensor data reporting. Together, the values help ensure the application is provided with new sensor data at a regular rate that is suitable for updating the user interface. Sensor data is stored for the duration specified by the SENSOR_DELAY_UI value and discarded if the app is too busy processing previous data. In this way, we ensure that sensor updates are processed efficiently and that power is not wasted processing surplus data.
Summary
Congratulations on completing the Maps app! In creating this app, you have covered the following skills and topics:
- Creating a new activity using the Google Maps Views Activity template.
- Incorporate the Google Maps SDK into your app.
- Use Google Play’s location services to find the device’s current location.
- Initiate location requests and continuously monitor the device’s location.
- Establish Geofences to receive alerts when the user enters, exits or dwells in a given location.
- Register a broadcast receiver to detect and respond to new broadcast events, such as Geofence alerts.
- Plot markers on the map.
- Use the CountDownTimer class to record how much time has elapsed and set a time limit for completing a task.
- Update the application Manifest file to inform the Google Play store that the app requires access to certain hardware such as the accelerometer sensor.
- Interact with sensors on the device to determine the device’s orientation and the physical forces that are being applied.
- Use a ViewPropertyAnimator object to rotate an ImageView widget.