How to create a Weather application using Kotlin
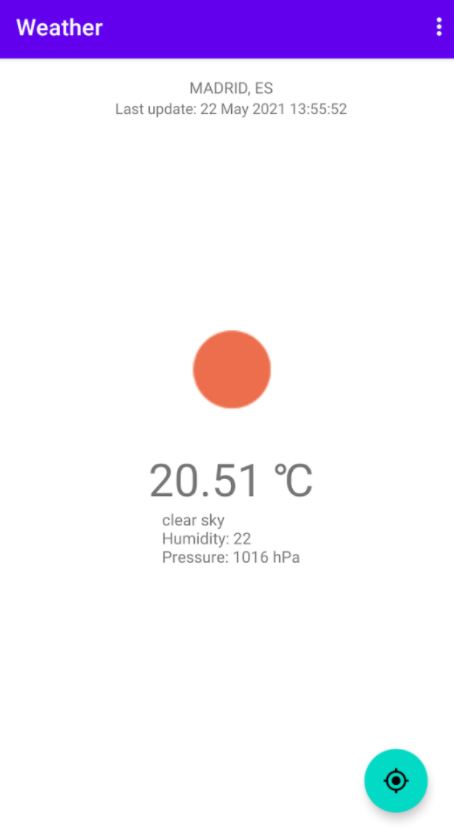
For this project, we will create an app that allows the user to view the weather for their current location or any other city on the planet. In creating this app, you will learn how to send and request data over the internet. You will also learn how to use Google’s location services, request and process data from an online weather API, and incorporate swipe-to-refresh functionality that allows the user to refresh the weather data using a touchscreen gesture. We will also cover how to add support for additional languages and per-app language preferences.
The example code for the Weather application can be found here. The project was built using Android Studio Giraffe and targets Android 13 (API 33/SDK 33).
Getting started
For this project, we will use the Empty Activity template. The Empty Activity template includes a MainActivity class but no additional features such as menus, fragments or navigation graphs. Typically, you would use the Empty Activity template for projects that do not require many ready-made features and/or you expect to build most components from scratch.
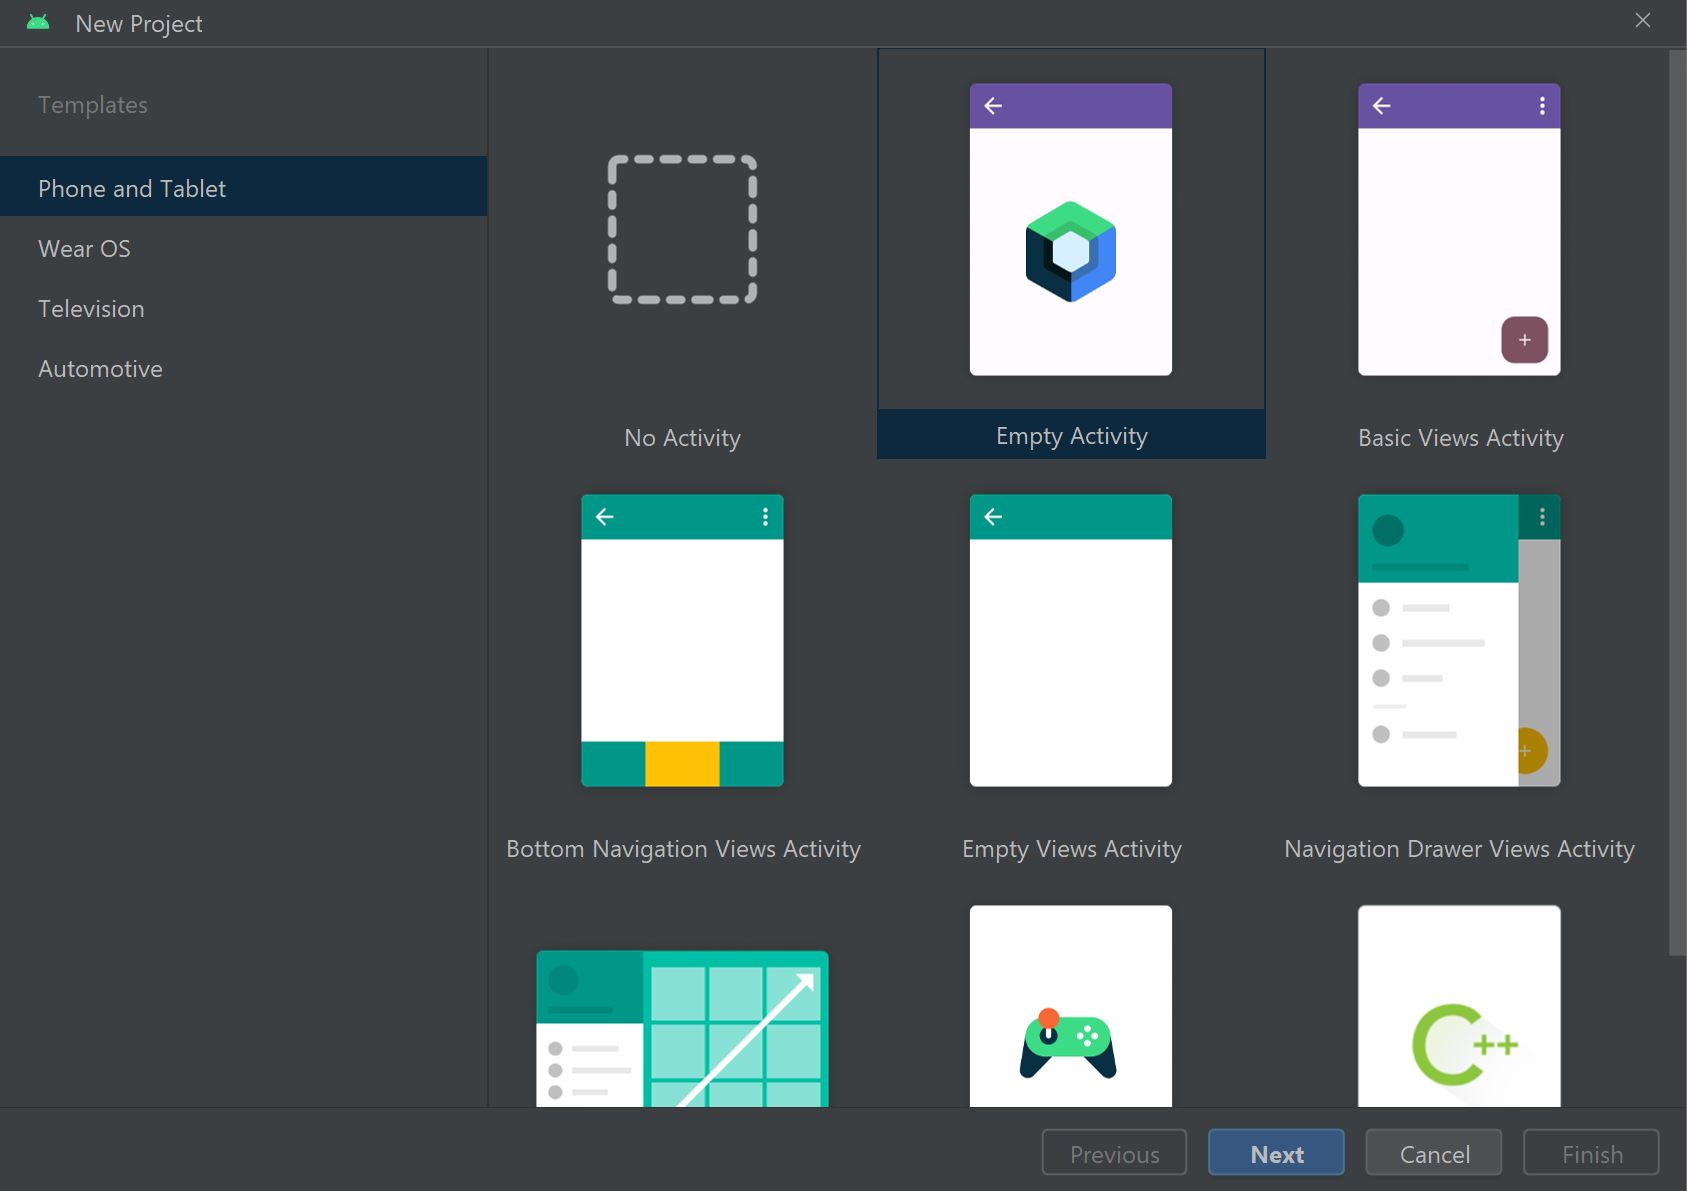
In the Create New Project window that opens following the selection of the template, name the project Weather, set the language to Kotlin and choose API 33 as the minimum SDK. Next, press Finish to create the project.

For all the projects on this website, it is recommended you enable Auto Imports to direct Android Studio to add any necessary import statements to your Kotlin files as you code. These import statements are essential for incorporating the external classes and tools required for the app to run. To enable Auto Imports, open Android Studio’s Settings window by clicking File > Settings. In the Settings window, navigate through Editor > General > Auto Import then select ‘Add unambiguous imports on the fly’ and ‘Optimise imports on the fly’ for both Java and Kotlin then press Apply and OK.
Android Studio should now add most of the necessary import statements to your Kotlin class files automatically. Sometimes there are multiple classes with the same name and the Auto Import feature will not work. In these instances, the requisite import statement(s) will be specified explicitly. You can also refer to the finished project code to find the complete files including all import statements.
Configuring the Gradle Scripts and Manifest file
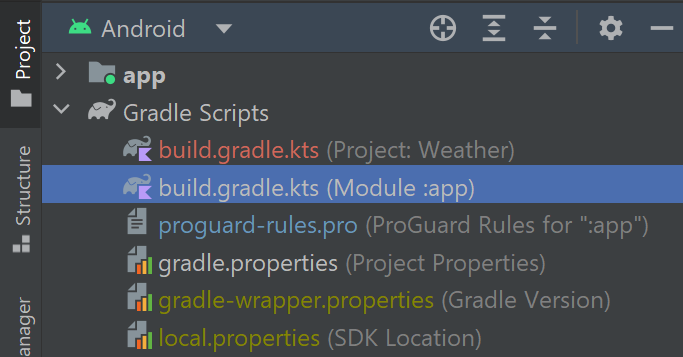
For the app to function correctly and perform all the required tasks, it must manually import several external packages using a toolkit called Gradle. To add the required packages, navigate through Project > Gradle Scripts and open the Module-level build.gradle.kts file:
Next, add the following implementation statements to the dependencies element:
implementation("com.google.android.material:material:1.10.0")
implementation("androidx.constraintlayout:constraintlayout:2.1.4")
implementation("androidx.preference:preference-ktx:1.2.1")
implementation("com.google.android.gms:play-services-location:21.0.1")
implementation("com.github.bumptech.glide:glide:4.11.0")
implementation("androidx.swiperefreshlayout:swiperefreshlayout:1.1.0")
The above implementation statements import the following tools: the material dependency that provides access to basic layout widgets and styling resources; the constraint layout widget that is used to coordinate the elements of a user interface layout resource file; a shared preferences file that can store user preferences, such as their location preference for weather reports; Google Play’s location services, which the app can use to locate the user’s device; an image loading framework called Glide, which you may remember from the Camera app; and a swipe refresh layout widget, which will allow the user to refresh the weather data by swiping down from the top of their screen.
In the build.gradle.kts file, we will also enable view binding. View binding allows our Kotlin classes to interact with any XML layout resource files we create. To enable view binding, locate the buildFeatures element (android > buildFeatures) and edit it so it reads as follows:
buildFeatures {
    compose = true
    viewBinding = true
}
After making the above changes, remember to re-sync the project when prompted!

Let’s now turn our attention to the application's manifest file, which contains an overview of the app’s activities, services and user permissions requirements. Open the AndroidManifest.xml file by navigating through Project > app > manifests then add the following code above the application element:
<uses-permission android:name="android.permission.INTERNET"/>
<uses-permission android:name="android.permission.ACCESS_COARSE_LOCATION" />
The above code tells the device (and the Google Play store) that the app will require permission from the user to connect to the internet and access the device’s location. In this app, we will request the ACCESS_COARSE_LOCATION permission, which grants access to the device’s approximate location. The approximate location is sufficient for requesting weather data; however, if you create an app that requires the user’s precise location then you should also request the ACCESS_FINE_LOCATION permission. Even if you request the fine location permission, you must still request the coarse location permission also because new versions of Android will give the user the option to share their approximate location only.
Defining the String resources used in the app
Each item of text that will be displayed to the user should be stored as a string resource. A single string can be used in multiple locations across the app, and this makes it easier to edit the text when needed because you only have to change one string resource, rather than searching for each instance of the text throughout the app. Also, string resources are helpful when it comes to releasing the app in multiple languages because you can define translations for each string.
Android Studio will automatically generate a strings.xml resource file to store your strings when you create a new project. To locate the strings.xml file, navigate through Project > app > res > values. Open the file and edit its contents so it reads as follows:
<resources>
    <string name="app_name">Weather</string>
    <string name="change_city">Change city</string>
    <string name="refresh">Refresh</string>
    <string name="data_not_found">Sorry, no weather data found.</string>
    <string name="city_field">%1$s, %2$s</string>
    <string name="go">Go</string>
    <string name="details_field">%1$s
       \nHumidity: %2$s
       \nPressure: %3$s hPa</string>
    <string name="temperature_field">%1$.2f ℃</string>
    <string name="updated_field">Last update: %1$s</string>
    <string name="use_current_location">Use my current location</string>
    <string name="weather_icon">Image of the current weather</string>
    <string name="permission_required">Permission required to retrieve the weather for your location.</string>
    <string name="language">Language</string>
    <string name="english" translatable="false">English</string>
    <string name="spanish" translatable="false">Español</string>
</resources>
Each string resource contains a name attribute that will be used to access the string from elsewhere in the project. The text that will be displayed is then input between the opening and closing string tags. You may notice that the details_field string includes the code ‘\n’. The ‘\n’ code inserts a line break, so any subsequent text in the string will occupy a new line.
Several strings contain code in the format ‘%1$s’. These sections of code represent arguments that must be supplied when the string is created. The ‘%1’ part represents the argument number, so will increase incrementally for each new argument that is added to the string e.g. ‘%1’, %2’, ‘%3’ etc. The second part of the argument indicates what data type is expected: ‘$s’ represents a string, while ‘$d’ represents a decimal integer and ‘$.nf’ represents a floating number rounded to a certain number of decimal places (replace ‘n’ with the number of decimal places e.g. ‘$.2f’). Returning to the city_field string, we can see it expects two string arguments. You can use Kotlin code to build the string and supply the argument values in the following way:
getString(R.string.city_field, "London", "England")The above line imports the city_field string and supplies “London” as argument 1 and “England” as argument 2. The city_field string separates the two arguments using a comma and space, so the final output would be “London, England”.
Adding String resources for alternative languages
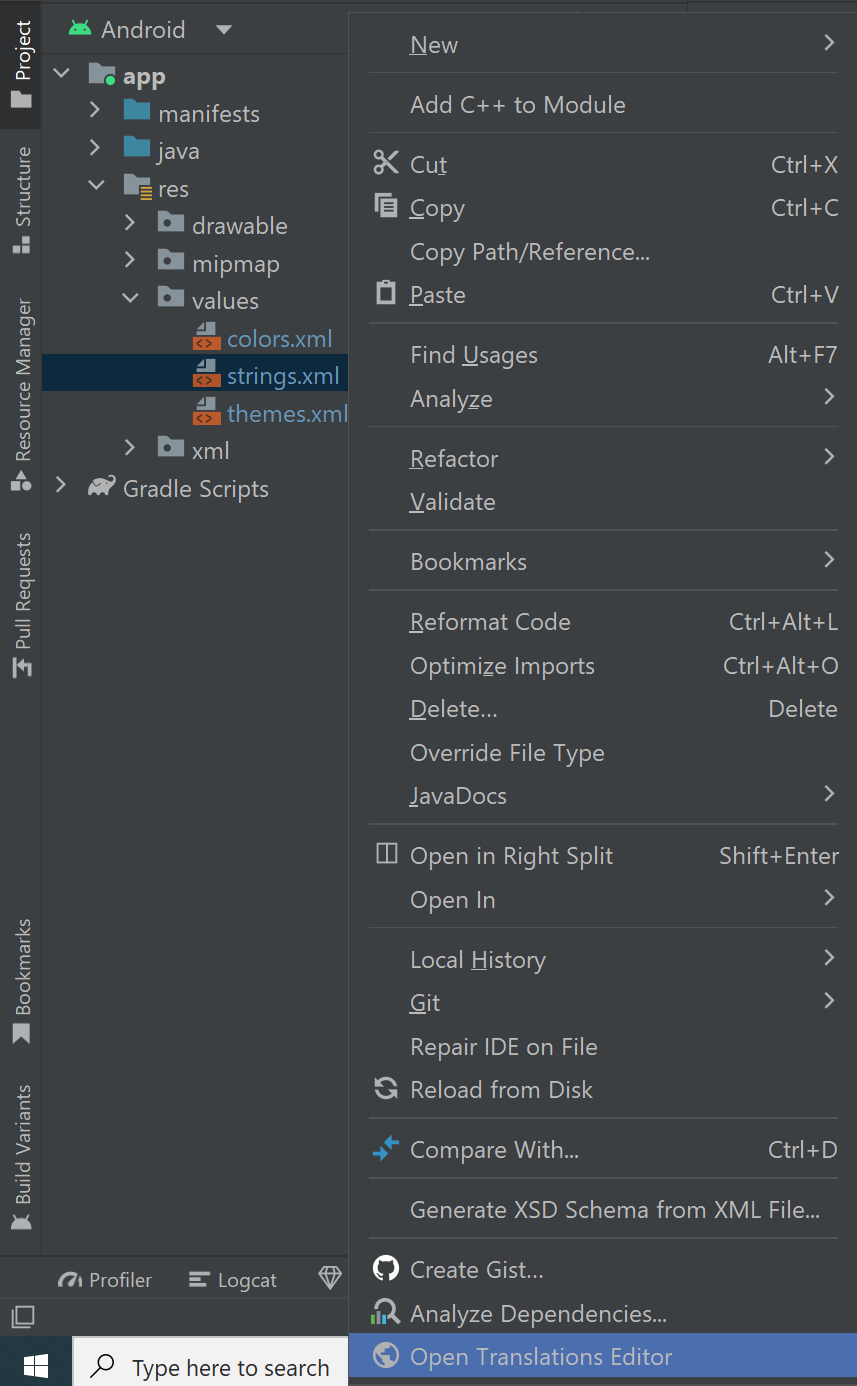
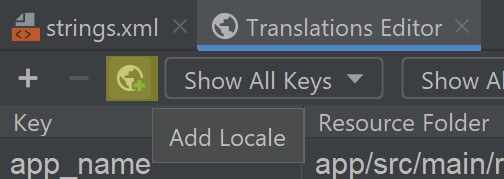
Android Studio allows you to add support for additional languages. For each additional language the app supports, you must create a separate strings.xml file that contains translations for all String resources defined in the default strings.xml file (unless a String resource is marked as non-translatable). To facilitate this, you can use Android Studio’s translations editor. Android Studio will often invite you to open the translations editor when you modify the default strings.xml file, but you can also open it manually by right-clicking the strings.xml file and selecting Open Translations Editor.

For the Weather app, we will add support for Spanish. In the translations editor, click the Add Locale button.
Next, select Spanish (es) from the locale list. The translations editor will then add a column to the editor table for Spanish translations of all the String resources we defined in the default strings.xml file. You can add a translation by selecting the relevant entry in the table and then entering the relevant text into the Translation field below. For example, the Spanish translation of the change_city String is Cambiar la ciudad.

If there is a String that cannot or should not be translated, then tick the Untranslatable checkbox for that resource. For example, in the Weather app, the city_field and temperature_field resources will not require translations as those resources do not contain English text, just parameters. Check the Untranslatable box for both resources. Checking the Untranslatable box will add a translatable="false" property to the corresponding resources in the default strings.xml file.

For the remaining resources in the translations editor, you could add translations manually; however, this will be time-consuming. Instead, open the strings.xml (es) file (Project > app > res > values) and ensure the following resources are included:
<string name="app_name">Clima</string>
<string name="change_city">Cambiar la ciudad</string>
<string name="refresh">Actualizar</string>
<string name="data_not_found">Lo sentimos, no se encontraron datos meteorológicos.</string>
<string name="go">Ir</string>
<string name="details_field">%1$s
  \nHumedad: %2$s
  \nPresión: %3$s hPa</string>
<string name="updated_field">Última actualización: %1$s</string>
<string name="use_current_location">Usar mi ubicación actual</string>
<string name="weather_icon">Imagen del tiempo actual</string>
<string name="permission_required">Se requiere permiso para recuperar el clima de su ubicación.</string>
<string name="language">Idioma</string>
Facilitating per-app locale support
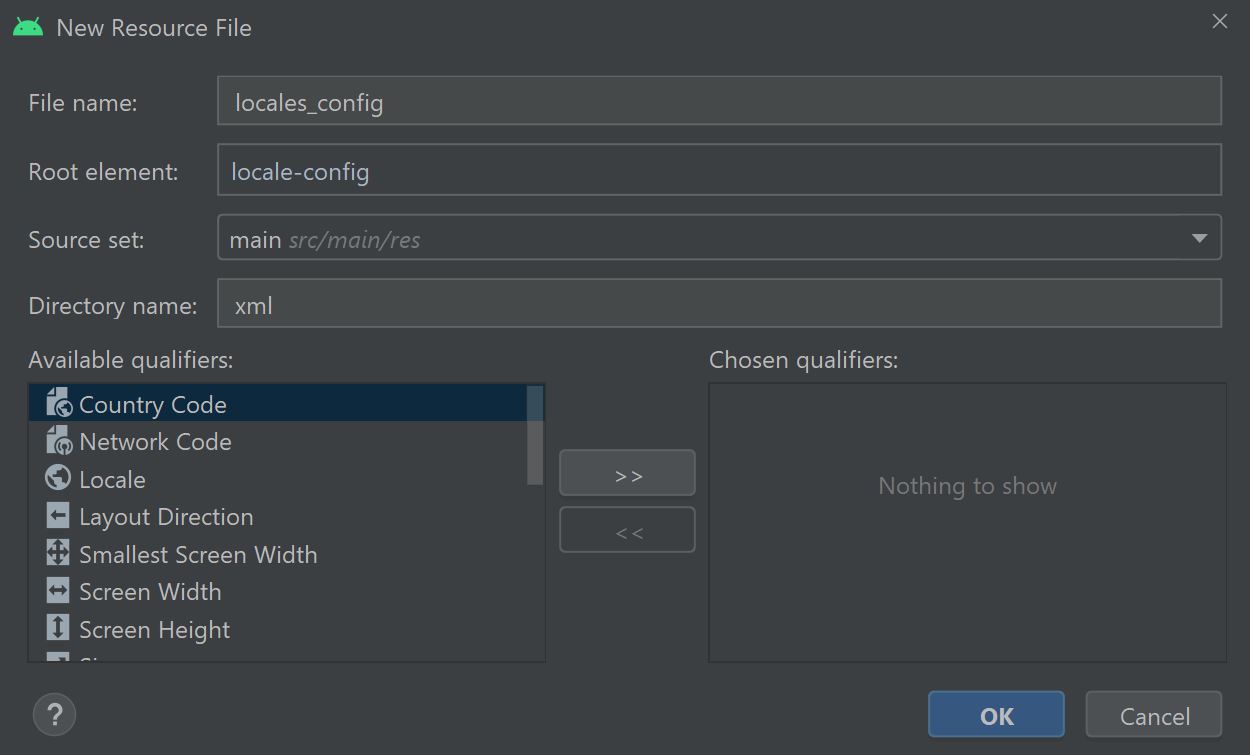
Now that we have defined translations for all the String resources used by the app, we can define our app’s supported languages. Defining the supported languages ensures the appropriate language is used based on the device’s settings. The supported languages will be defined in a resource file called locales_config.xml. To create the locales_config.xml file, right-click the xml folder (Project > app > res > xml) then select New > XML Resource File. Name the file locales_config, set the root element to locale-config, then press OK.
Next, add the following locale elements inside the opening and closing locale-config tags:
<locale android:name="en-GB" />
<locale android:name="es" />
You should add a locale element to the file for each language that your app supports. The name attribute of the locale element will contain a two- or three-letter ISO 639-1 code indicating the language and an optional two-letter ISO 3166-1-alpha2 code indicating the region. For example, the above ISO codes represent English (United Kingdom) and Spanish (Spain). A full list of ISO-639-1 language codes can be found here https://www.loc.gov/standards/iso639-2/php/code_list.php and a list of ISO 3166-1-alpha2 region codes can be found here.
Finally, we should define the supported languages in the Gradle files, to ensure that any third-party dependencies the app uses only display text in languages that our app supports. To do this, navigate through Project > Gradle Scripts and open the Module-level build.gradle.kts file. Next, add the following resourceConfigurations element to the defaultConfig element (found within the android element):
resourceConfigurations += listOf("en-rGB", "es")The resourceConfigurations element features an array of the language and region codes of the languages that the app supports. This array should feature all the languages defined in the locales_config.xml file. Note that region codes often must be prefaced by a lowercase “r”, as shown above.
As always after modifying a Gradle file, remember to re-sync the project to process the changes.
Setting up the weather API
The app will retrieve the weather for the user’s selected location from an online weather data service called OpenWeather. OpenWeather offers a free weather API (Application Programming Interface) that you can request weather data from, as well as several paid subscriptions for higher volume requests. For this project, the free version is sufficient.
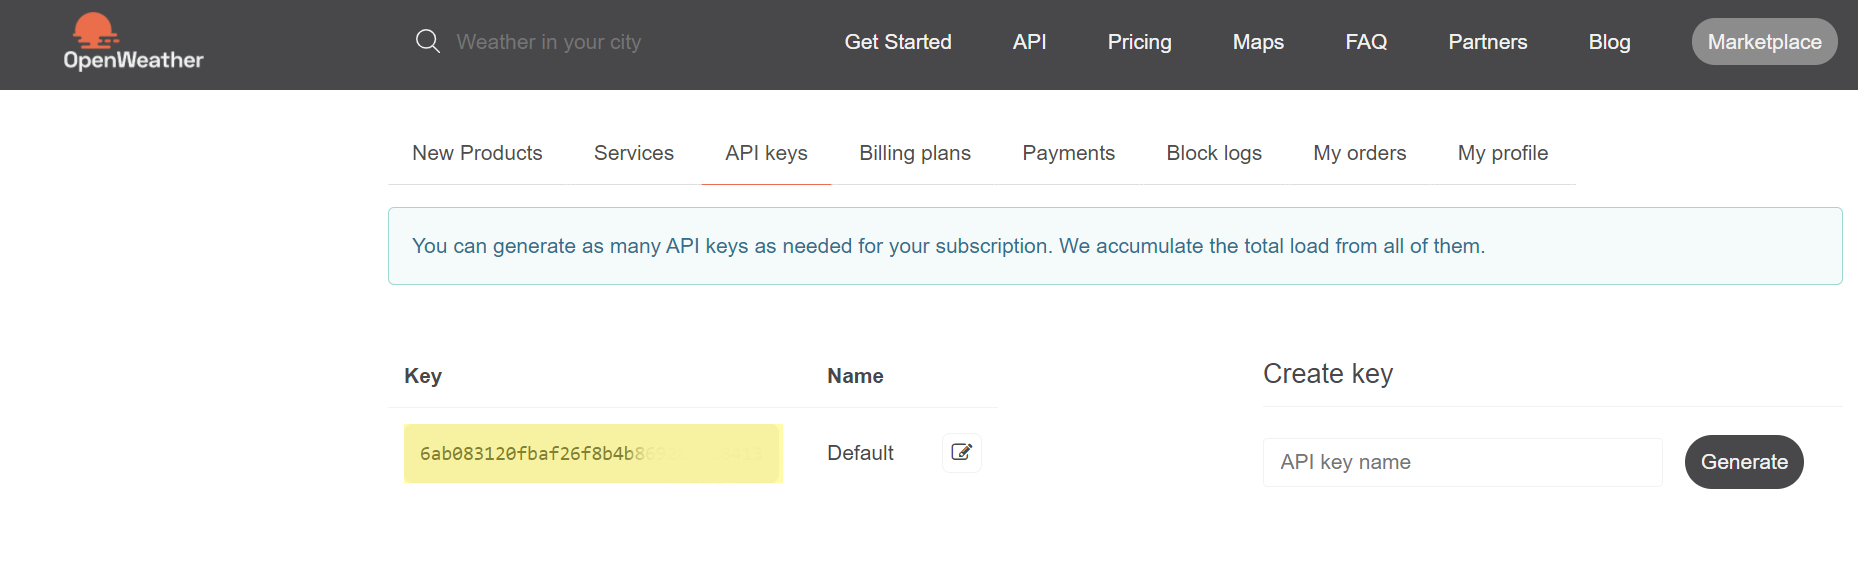
To request data from the OpenWeather API, you must create an account with them by visiting the following link. Once your account is set up, you should be provided with an API access key. Make a note of your default key because you will need to copy and paste it into your application. The key will allow your app to communicate with the OpenWeather API and request weather data.
Note: It can sometimes take several hours following the creation of your OpenWeather account for your API key to activate. You can continue with this project as normal; however, please be aware your application may not work right away and you may need to wait up to 24 hours for your API key to become operational.
Next, return to Android Studio and open the MainActivity.kt class file (Project > app > java > name of your project). Add the following code above the onCreate method:
companion object {
   // TODO: Get your API key here https://home.openweathermap.org/api_keys
   //  Note it can sometimes take a couple of hours following email confirmation for API keys to become active
   private const val API_KEY = "INSERT-API-KEY-HERE"
   private const val CITY_NAME_URL = "https://api.openweathermap.org/data/2.5/weather?q="
   private const val GEO_COORDINATES_URL = "https://api.openweathermap.org/data/2.5/weather?lat="
}
The above code defines a companion object, which contains several static variables that will be initialised when the activity is created. For the API_KEY variable, replace INSERT-API-KEY-HERE with your API key from OpenWeather. The app will use your API key to request weather data from OpenWeather. The next two variables, CITY_NAME_URL and GEO_COORDINATES_URL, define the beginning of web URLs that will be used to request weather data for a given city or geographical location, respectively. The ending of the URLs will be supplied elsewhere in the code based on the user’s input.
Designing the activity_main layout
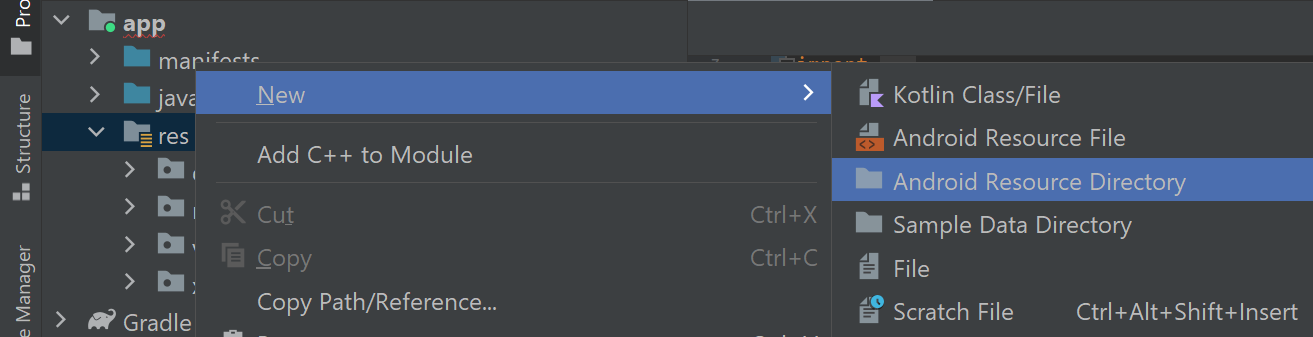
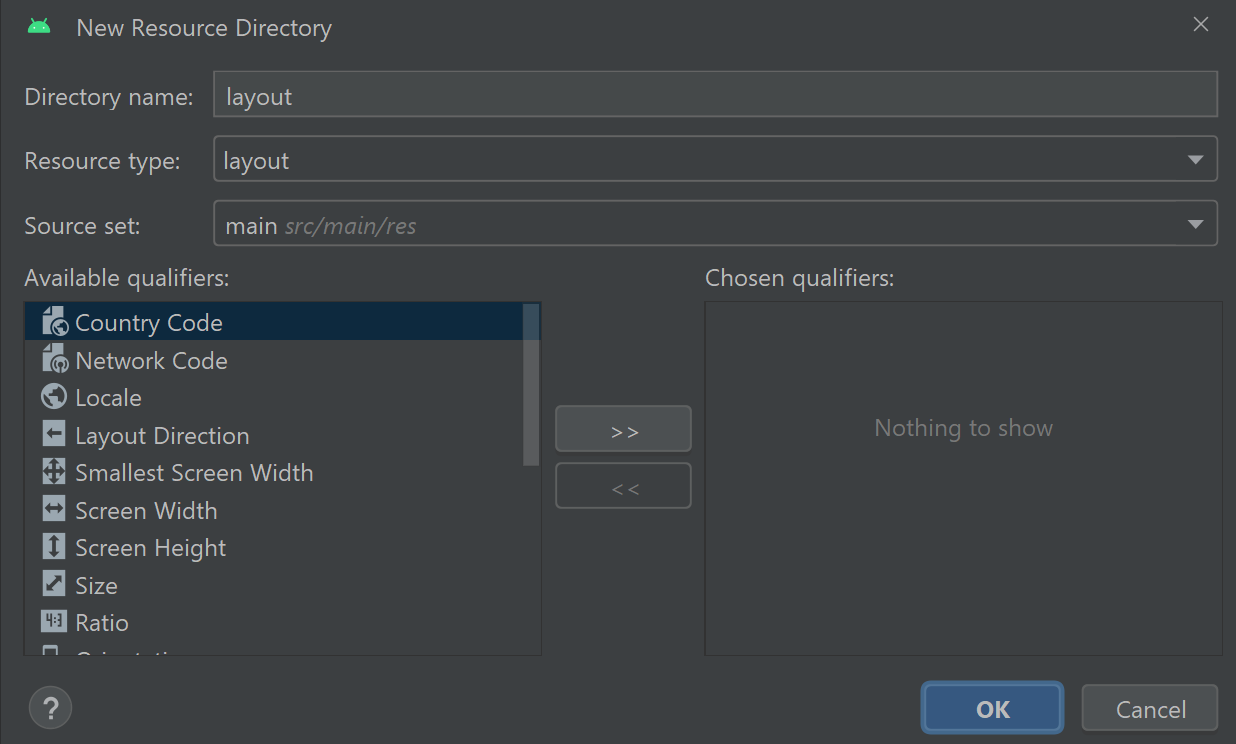
In this section, we will design the layout resource file that will display weather data to the user. For this purpose, we will need a layout file called activity_main.xml that will serve as the main layout file for the application. To create a directory for storing the layout file, navigate through Project > app and right-click the res folder. Next, select New > Android Resource Directory.
Set the directory name and resource type to layout then press OK.
Next, right-click the layout directory and select New > Layout Resource File.
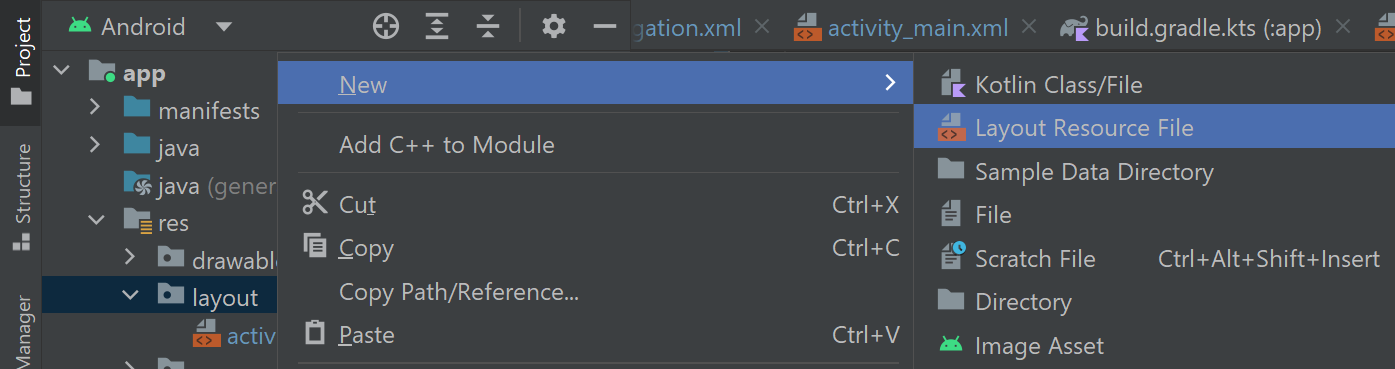
Set the file name to activity_main then press OK to create the layout. Once the new activity_main.xml file opens in the editor, switch to Code view and replace all the code in the file with the following:
<?xml version="1.0" encoding="utf-8"?>
<androidx.swiperefreshlayout.widget.SwipeRefreshLayout xmlns:app="http://schemas.android.com/apk/res-auto"
xmlns:android="http://schemas.android.com/apk/res/android"
android:layout_width="match_parent"
android:layout_height="match_parent">
<androidx.constraintlayout.widget.ConstraintLayout
android:layout_width="match_parent"
android:layout_height="match_parent"
android:padding="16dp">
<TextView
android:id="@+id/txtCity"
android:layout_width="wrap_content"
android:layout_height="wrap_content"
app:layout_constraintStart_toStartOf="parent"
app:layout_constraintEnd_toEndOf="parent"
app:layout_constraintTop_toTopOf="parent" />
<TextView
android:id="@+id/txtUpdated"
android:layout_width="wrap_content"
android:layout_height="wrap_content"
android:textSize="13sp"
app:layout_constraintStart_toStartOf="parent"
app:layout_constraintEnd_toEndOf="parent"
app:layout_constraintTop_toBottomOf="@id/txtCity" />
<ImageView
android:id="@+id/imgWeatherIcon"
android:layout_width="140dp"
android:layout_height="140dp"
android:layout_marginBottom="150dp"
app:layout_constraintStart_toStartOf="parent"
app:layout_constraintEnd_toEndOf="parent"
app:layout_constraintTop_toTopOf="parent"
app:layout_constraintBottom_toBottomOf="parent"
android:contentDescription="@string/weather_icon" />
<TextView
android:id="@+id/txtTemperature"
android:layout_width="wrap_content"
android:layout_height="wrap_content"
android:textSize="40sp"
app:layout_constraintTop_toBottomOf="@+id/imgWeatherIcon"
app:layout_constraintStart_toStartOf="parent"
app:layout_constraintEnd_toEndOf="parent" />
<TextView
android:id="@+id/txtDetails"
android:layout_width="wrap_content"
android:layout_height="wrap_content"
app:layout_constraintStart_toStartOf="parent"
app:layout_constraintEnd_toEndOf="parent"
app:layout_constraintTop_toBottomOf="@+id/txtTemperature" />
<com.google.android.material.floatingactionbutton.FloatingActionButton
android:id="@+id/fab"
android:layout_width="wrap_content"
android:layout_height="wrap_content"
android:layout_margin="16dp"
android:contentDescription="@string/use_current_location"
android:src="@drawable/ic_location"
app:layout_constraintBottom_toBottomOf="parent"
app:layout_constraintEnd_toEndOf="parent" />
</androidx.constraintlayout.widget.ConstraintLayout>
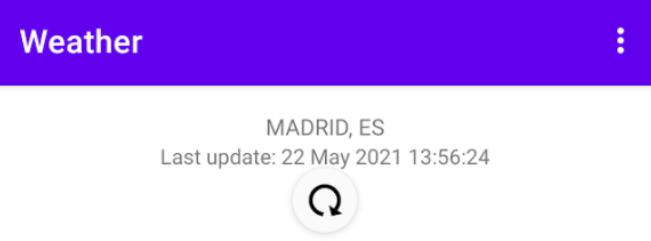
</androidx.swiperefreshlayout.widget.SwipeRefreshLayout>The root element of the activity_main layout is a SwipeRefreshLayout widget. The SwipeRefreshLayout widget will allow the user to refresh the weather data using a swipe-down gesture. Inside the SwipeRefreshLayout is a ConstraintLayout widget, which will organise the layout’s content. The first two widgets inside the ConstraintLayout are TextView widgets, which will display the name of the city that the weather data refers to and the time the data was last updated, respectively. Next, the ConstraintLayout features an ImageView widget that will display an icon representing the current weather (e.g. sunny, cloudy etc.). The start (left), end (right), top and bottom edges of the ImageView widget are constrained to the parent container, which in this case is the ConstraintLayout. These equal and opposite constraints ensure the ImageView widget will position itself in the centre of the layout.
Below the ImageView widget are two further TextView widgets, which will display the current temperature and a description of the weather, respectively. Finally, there is a FloatingActionButton widget, which will load weather data for the user’s current location when clicked. All widgets (except the floating action button) will align themselves centrally down the middle of the layout. The reason for this is that the widgets have equal and opposing start and end constraints linked to the parent ConstraintLayout container. In contrast, the floating action button will position itself in the bottom right corner because it is constrained to the bottom and end of the ConstraintLayout.
 When attempting to run the application, Android Studio may encounter an error inflating the activity_main layout. For example, the error output may reference an IllegalArgumentException e.g. Caused by: java.lang.IllegalArgumentException: The style on this component requires your app theme to be Theme.MaterialComponents (or a descendant).. To resolve this exception, we must direct the application to use a theme that supports AppCompat activities and associated widgets. This can be achieved by opening the themes.xml file (Project > app > res > values) and editing the base style element to use a MaterialComponents parent theme such as the following: <style name="Theme.Weather" parent="Theme.MaterialComponents.DayNight.DarkActionBar" />
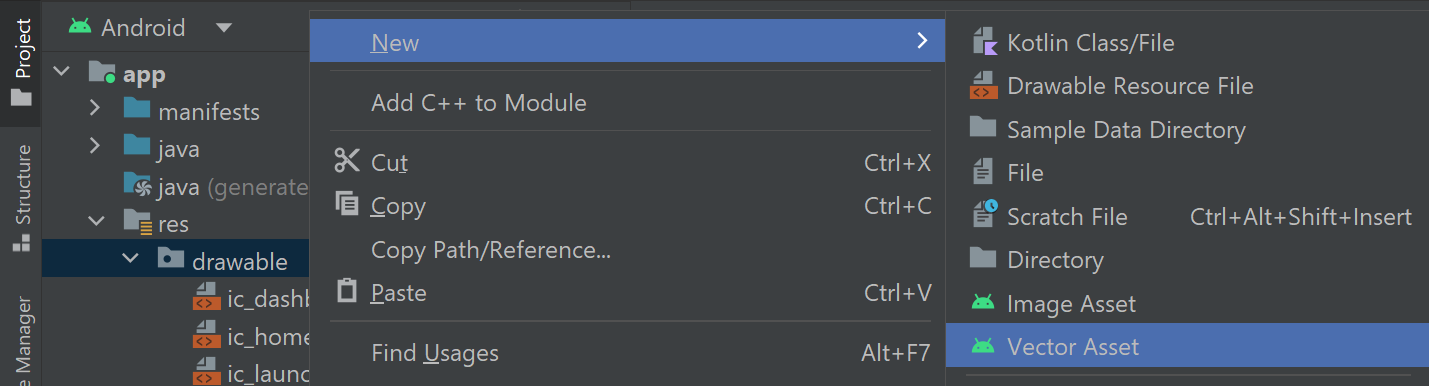
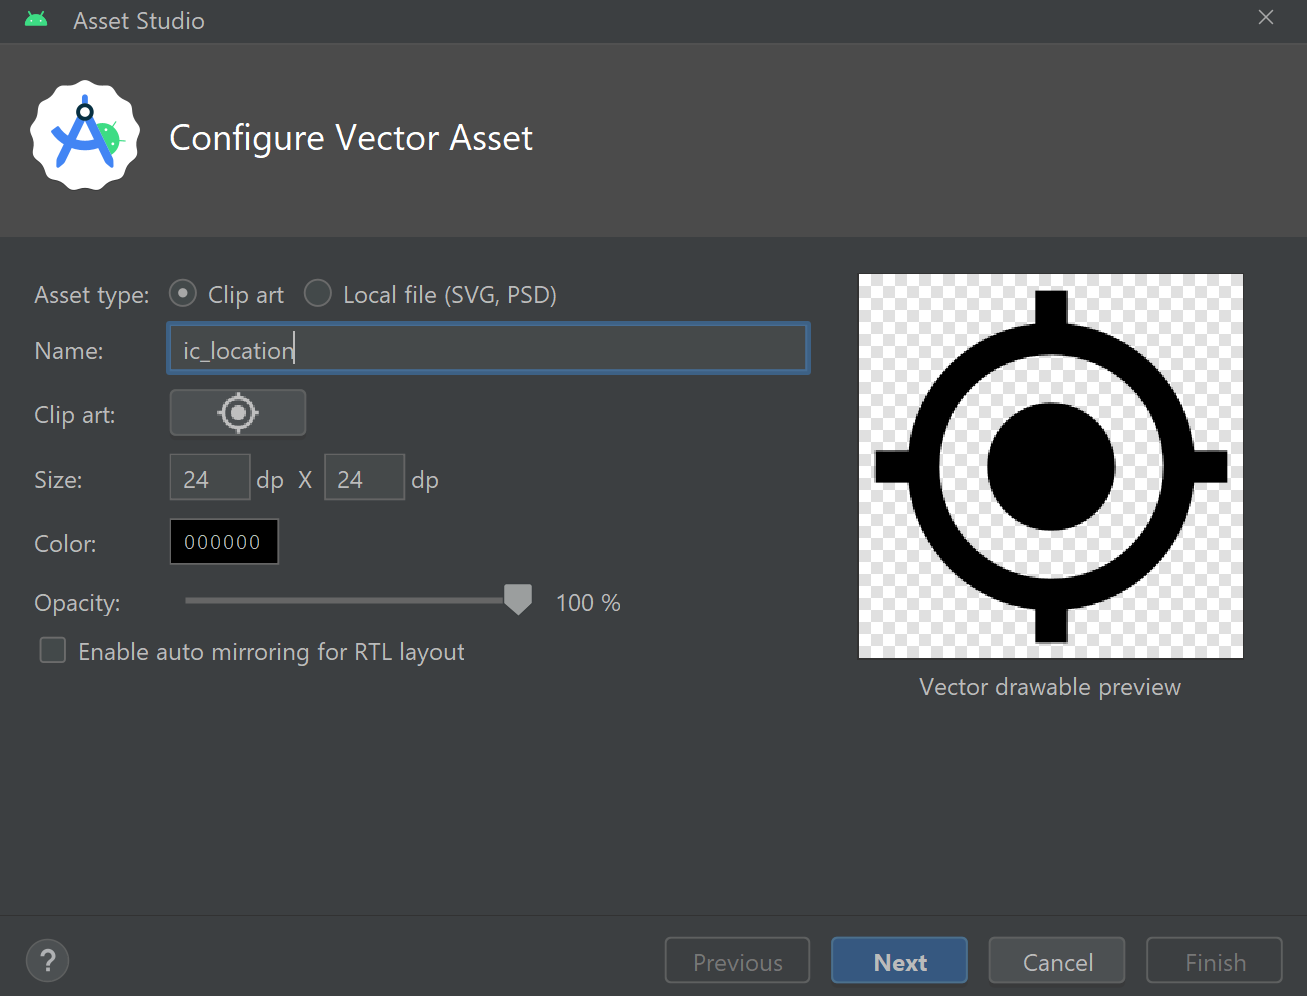
The floating action button features a src attribute which defines an icon that will appear in the button. The icon will be stored as a drawable resource. To create a new drawable resource, navigate through Project > app > res and right-click the drawable directory. Next, select New > Vector Asset.
In the Asset Studio window which opens, click the Clip Art and search for an icon called my location. Select the icon then press OK.
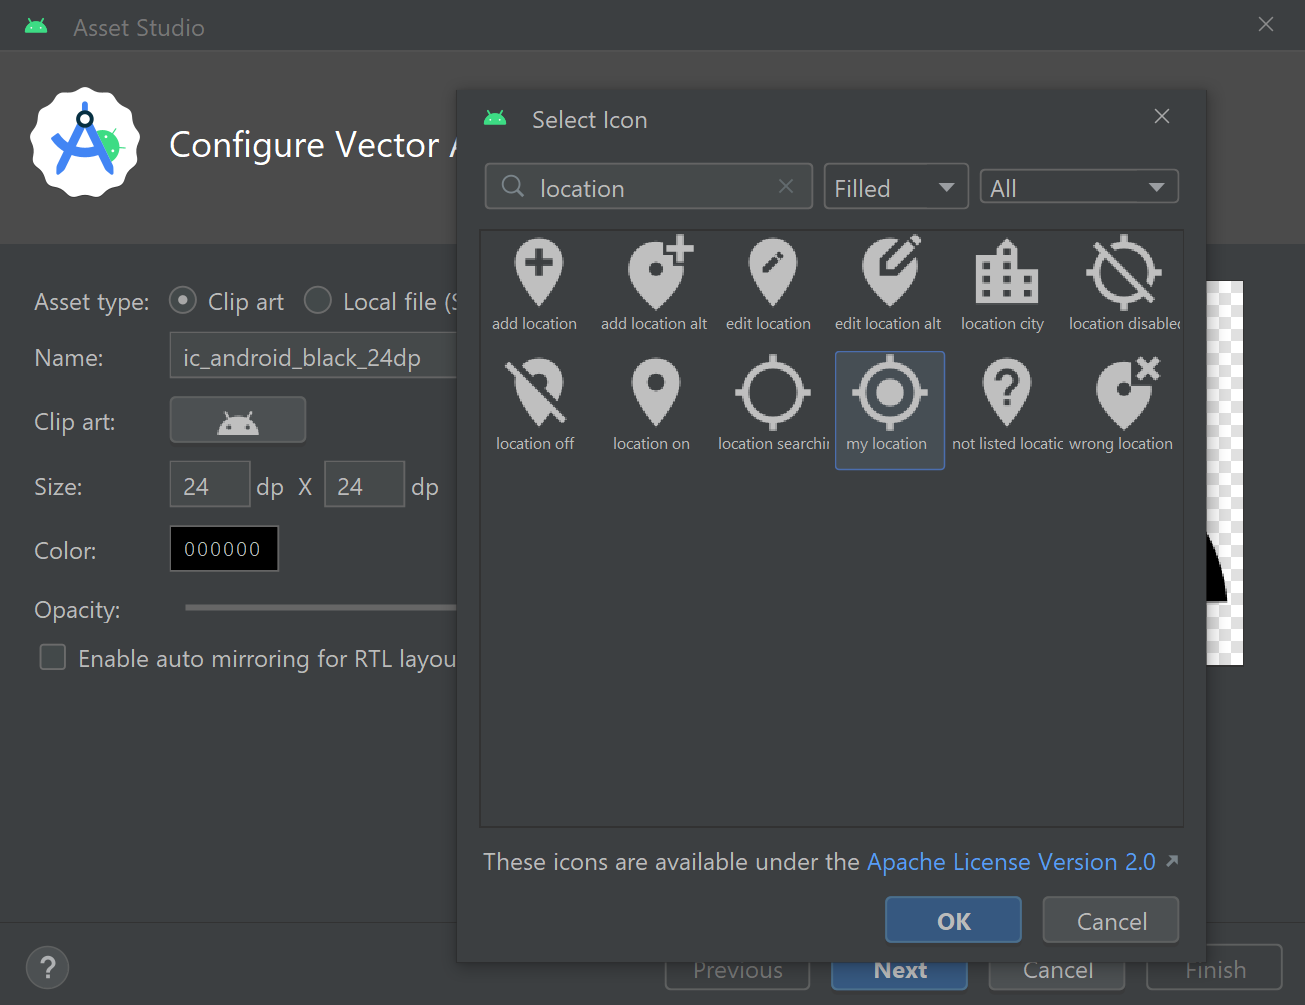
Next, set the name of the asset to ic_location then press Next followed by Finish to save the icon as a drawable resource.
Finally, we need to initialise the layout in the MainActivity class. Open the MainActivity.kt file by navigating through Project > app > java > name of the project then edit the onCreate method so it reads as follows:
private lateinit var binding: ActivityMainBinding

override fun onCreate(savedInstanceState: Bundle?) {
    super.onCreate(savedInstanceState)
    binding = ActivityMainBinding.inflate(layoutInflater)
    setContentView(binding.root)
}
The above code defines a view binding variable for our new activity_main layout and initialises it in the onCreate method. The onCreate method will then render the layout when the app is launched.
Finding the user’s location
The user can request weather data for their current location by clicking the FloatingActionButton widget in the activity_main.xml layout. To enable this functionality, we must initialise some location tools in the MainActivity class. First, return to the MainActivity.kt file (Project > app > java > name of your project) and add the following variables to the top of the class below the binding variable:
private lateinit var fusedLocationClient: FusedLocationProviderClient
private lateinit var sharedPreferences: SharedPreferences
In the above code, the fusedLocationClient variable will hold an instance of the FusedLocationProviderClient class. The FusedLocationProviderClient class interacts with Google’s Fused Location Provider API, which is a battery-efficient tool for finding the user’s location based on GPS and WiFi data. The third variable will store an instance of the SharedPreferences class, which we will use to store the user’s preferences within the app.
All variables feature the lateinit modifier, which means we must initialise them elsewhere in the code before they can be used. To initialise the variables, add the following code to the bottom of the onCreate method:
fusedLocationClient = LocationServices.getFusedLocationProviderClient(this)
sharedPreferences = PreferenceManager.getDefaultSharedPreferences(this)

binding.fab.setOnClickListener {
   getLocation()
}
Note you may need to add the following import statement to the top of the file:
import androidx.preference.PreferenceManagerThe above code initialises the fusedLocationClient and sharedPreferences variables so the app can interact with Google’s Fused Location Provider API and the shared preferences file. Next, the code assigns an onClick listener to the FloatingActionButton widget from the activity_main layout. If the button is clicked, then a method called getLocation will load the weather data for the user’s current location. To define the getLocation method, add the following code below the onCreate method:
private fun getLocation() {
   if (ContextCompat.checkSelfPermission(applicationContext,
           android.Manifest.permission.ACCESS_COARSE_LOCATION) != PackageManager.PERMISSION_GRANTED) {
       ActivityCompat.requestPermissions(this,
           arrayOf(android.Manifest.permission.ACCESS_COARSE_LOCATION), 1)
   } // TODO: Load the user's location here
}
The getLocation method checks whether the app has permission to access the device’s location. If permission has not been granted (‘!=’ is the not-equal-to operator) then the getLocation method will request the user’s permission to access the device’s location. Once the user responds to the permission request, the outcome will be handled by a method called onRequestPermissionsResult, which you can define by adding the following code below the onCreate method:
override fun onRequestPermissionsResult(requestCode: Int, permissions: Array<out String>, grantResults: IntArray) {
   super.onRequestPermissionsResult(requestCode, permissions, grantResults)
   if (requestCode == 1 && grantResults[0] == PackageManager.PERMISSION_GRANTED) getLocation()
   else if (requestCode == 1) {
       Toast.makeText(this, getString(R.string.permission_required), Toast.LENGTH_LONG).show()
   }
}
The onRequestPermissionsResult method will run when the user responds to a permission request. If the result of the request is PERMISSION_GRANTED, then the above code runs the getLocation method again because it should now have the requisite user permissions. On the other hand, if the user refuses permission, then a toast notification will inform the user that the app requires permission to find the weather data for their location.
Note if the onRequestPermissionsResult method signature displays a deprecation warning, then you may need to modify the MainActivity class signature line of code to extend the AppCompatActivity class rather than an alternative class such as ComponentActivity:
class MainActivity : AppCompatActivity()Let’s now return to the getLocation method and write the code that will find the user’s location if the necessary permissions have been granted. In the getLocation method, replace the TODO comment with the following code:
else {
   fusedLocationClient.lastLocation.addOnSuccessListener { location: Location? ->
       location?.let {
           val url = GEO_COORDINATES_URL + location.latitude + "&lon=" + location.longitude
           updateWeatherData(url)
           sharedPreferences.edit().apply {
               putString("location", "currentLocation")
               apply()
           }
       }
   }
}
The above code uses the Fused Location Client class to find the last known location of the user’s device. Once the request has been processed, the onSuccess listener callback will return the location as a Location object. Location objects contain a variety of details about the location, including the longitude and latitude geographical coordinates. In rare cases, the location returned by the Fused Location Client is null. For this reason, the remainder of the code is wrapped in a null-safe let block, as indicated by the ?.let section of the code. The code inside the let block will only run if the value of the location parameter is not null. First, the let block prepares the URL that will be used to request data from the OpenWeather API. The URL will start with the contents of the GEO_COORDINATES_URL variable from the companion object and end with the latitude and longitude coordinates for the user’s location. Altogether, the complete URL will look like this: https://api.openweathermap.org/data/2.5/weather?lat=35&lon=139
Once the URL has been constructed, a method called updateWeatherData (which we’ll define shortly) will initiate the API call and process the results. The getLocation method finishes by writing a value of “currentLocation” under the key “location” to the app’s shared preferences file. The app will retrieve the value of the “location” key whenever it launches, and a value of “currentLocation” will tell the app that it should attempt to load the weather data for the user’s current location, rather than a specific city. Whenever you update the shared preferences file, you must use the apply method as shown above to finalise the changes and close the shared preferences file editor.
Requesting data from the OpenWeather API
In this section, we will cover how to retrieve weather data from the OpenWeather API. First, staying with the MainActivity class, add the following code below the getLocation method to define a method called updateWeatherData that will handle calls to the OpenWeather API:
private fun updateWeatherData(url: String) {
   object : Thread() {
       override fun run() {
           val jsonObject = getJSON(url)
           runOnUiThread {
               if (jsonObject != null) renderWeather(jsonObject)
               else Toast.makeText(this@MainActivity, getString(R.string.data_not_found), Toast.LENGTH_LONG).show()
           }
       }
   }.start()
}
The updateWeatherData method constructs a Thread object, which is used to coordinate a workflow in parallel with other app processes. It is advantageous to make API calls from a Thread because we do not know how long it will take to receive a response from the web server. Other app processes mustn't be blocked if there is a delay in receiving a response. The API call is initiated in the Thread using a method called getJSON. The getJSON method contacts the API and returns the results as a JSON string. Next, the runOnUiThread block dispatches the JSON string to the main application thread for processing. Only the main thread can interact with the user interface, so it is important to return to this thread once the API call is complete so we can display the weather data to the user.
The runOnUiThread block first checks whether the API call has returned a JSON String. If a response has been received, then it is processed by a method called renderWeather; however, if no output is received, then this means something has gone wrong with the API call and a toast notification informs the user that the app was unable to retrieve the weather data.
To define the getJSON method and request weather data from the OpenWeather API, add the following code below the updateWeatherData method:
private fun getJSON(url: String): JSONObject? {
   try {
       val con = URL("$url&appid=$API_KEY&units=metric").openConnection() as HttpURLConnection
       con.apply {
           doOutput = true
           connect()
       }

       val inputStream = con.inputStream
       val br = BufferedReader(InputStreamReader(inputStream!!))
       var line: String?
       val buffer = StringBuffer()
       while (br.readLine().also { line = it } != null) buffer.append(line + "\n")
       inputStream.close()
       con.disconnect()

       val jsonObject = JSONObject(buffer.toString())

       return if (jsonObject.getInt("cod") != 200) null
       else jsonObject
   } catch (_: Throwable) {
       return null
   }
}
Note you may need to add the following import statement to the top of the file:
import java.net.URLThe getJSON method uses the URL sent by the updateWeatherData method to establish a connection with the OpenWeather API. Before the API call is initiated, the URL must be modified to include the application’s API key and weather measurement unit. In this case, the unit is set to metric, which means temperature data will be reported in degrees Celsius (see the OpenWeather API documentation for information on other available units). Next, an apply block is used to configure the URL connection. In Kotlin, apply blocks apply a section of code to an object. The above code uses the apply block to customise the HttpURLConnection object that is stored in the con variable. For example, the doOutput field of the HttpURLConnection object is set to true to indicate that we will use the connection to request data. Next, the HttpURLConnection class’s connect method will initiate the connection and request the weather data.
The remainder of the getJSON method processes the output from the API request. First, an InputStream object captures the flow of data. The data is then decoded by the BufferedReader class and transformed into text. The text is processed line-by-line using the BufferedReader class’s readLine method, which extracts each line of text as a string. The above code interacts with the string using an also block. In Kotlin, an also block allows you to interact with an object without modifying the source of the object. For example, if an also block is applied to a variable, then the variable’s value will be unchanged by the code in the also block. In this case, the also block assigns the string to a variable called line. If the extracted string is not null, then it is incorporated into an instance of the StringBuffer class, which combines fragments of text into a single string. Once all of the data has been processed, the InputStream instance and URL connection are closed to prevent memory leaks.
An example of the full JSON String we might receive from the OpenWeather API is provided below:
{
  "coord": {
    "lon": -122.08,
    "lat": 37.39
  },
  "weather": [
    {
      "id": 800,
      "main": "Clear",
      "description": "clear sky",
      "icon": "01d"
    }
  ],
  "base": "stations",
  "main": {
    "temp":7,
    "pressure":1012,
    "humidity":81,
    "temp_min":5,
    "temp_max":8
  },
  "visibility": 16093,
  "wind": {
    "speed": 1.5,
    "deg": 350
  },
  "clouds": {
    "all": 1
  },
  "dt": 1560350645,
  "sys": {
    "type": 1,
    "id": 5122,
    "message": 0.0139,
    "country": "US",
    "sunrise": 1560343627,
    "sunset": 1560396563
  },
  "timezone": -25200,
  "id": 420006353,
  "name": "Mountain View",
  "cod": 200
}
In addition to describing the weather, the JSON output also includes a field called ‘cod’, which is an internal parameter used by the OpenWeather API to determine whether the API call was successful. If the value of the cod field is 200 then that means the API call was processed correctly; however, if another value is reported then that means something went wrong. For this reason, the getJSON method will only return the JSON object if the cod value equals 200. Otherwise, the method will return a value of null because the API call was unsuccessful. This entire process is enclosed in a try/catch block that will intercept any errors that may occur. For example, there could be an error establishing a connection to the URL. If an exception is thrown, then the catch block is triggered and the getJSON method will return a value of null.
Displaying weather data to the user
In this section, we will process the JSON output from the OpenWeather API and display the weather data to the user. This processing is handled by a method called renderWeather, which uses the data from the JSON object to update the user interface and display information about the weather. To define the renderWeather method, add the following code below the getJSON method:
private fun renderWeather(json: JSONObject) {
   try {
       val city = json.getString("name").uppercase(Locale.US)
       val country = json.getJSONObject("sys").getString("country")
       binding.txtCity.text = resources.getString(R.string.city_field, city, country)

       val weatherDetails = json.optJSONArray("weather")?.getJSONObject(0)
       val main = json.getJSONObject("main")
       val description = weatherDetails?.getString("description")
       val humidity = main.getString("humidity")
       val pressure = main.getString("pressure")
       binding.txtDetails.text = resources.getString(R.string.details_field, description, humidity, pressure)

       // The backup icon is 03d (cloudy) for null results
       // Full list of icons available here https://openweathermap.org/weather-conditions#Weather-Condition-Codes-2
       val iconID = weatherDetails?.getString("icon") ?: "03d"
       val url = "https://openweathermap.org/img/wn/$iconID@2x.png"

       Glide.with(this)
               .load(url)
               .transition(DrawableTransitionOptions.withCrossFade())
               .centerCrop()
               .into(binding.imgWeatherIcon)

       val temperature = main.getDouble("temp")
       binding.txtTemperature.text = resources.getString(R.string.temperature_field, temperature)

       val df = DateFormat.getDateTimeInstance()
       val lastUpdated = df.format(Date(json.getLong("dt") * 1000))
       binding.txtUpdated.text = resources.getString(R.string.updated_field, lastUpdated)
   } catch (_: Exception) { }
}
Note you may need to add the following import statements to the top of the file:
import java.text.DateFormat
import java.util.Date
import java.util.Locale
The renderWeather method extracts information from the JSON output. An example of the JSON output was included at the end of the previous section. For instance, the city name the weather data refers to is stored under the key ‘name’ in the JSON object. The city name is stored as a string, and so can be retrieved from the JSON object using the getString method. For display purposes, the city name is converted to uppercase. Next, the country code is retrieved. Referring back to the example JSON output, the ‘country’ key is inside a nested JSON object called ‘sys’, as indicated by the curly brackets {} after the sys key. Hence, to retrieve the country code, we must first access the sys JSON object before using the getString method to retrieve the ‘country’ key/value pair. Once the city and country have been retrieved, they are incorporated into the city_field string resource and displayed in the txtCity TextView from the activity_main layout.
A similar process is used to display the weather data. Referring back to the JSON output, the weather data is stored under the ‘weather’ key in a JSON array, as indicated by the square [] brackets. The JSON array will contain one or more JSON objects. In this instance, each object describes a type of weather that applies to the target location. Often, there will only be one applicable weather type. For this reason, the above code uses the getJSONObject(0) method to retrieve the first JSON object from the array only.
Another field of data that we will use is stored under the key ‘icon’. The icon key holds a code that can be used to load an image representing the current weather state. The full list of codes and their corresponding icons can be found in the OpenWeather API documentation. To access the weather icon for a given icon code, simply replace $iconID in the following URL with the icon code: https://openweathermap.org/img/wn/$iconID@2x.png. In the above code, we use an image rendering framework called Glide to load the image associated with the URL into the imgWeatherIcon ImageView widget from the activity_main layout. Also, we instruct Glide to crop the icon so it fits in the center of the ImageView, and apply a crossfade animation so the icon will fade into the ImageView when loaded.
Other items of weather information are extracted from the JSON output as required. For example, the temperature is listed as a field called ‘temp’ in a JSON object called ‘main’. The temperature will be displayed using a string resource called temperature_field, which is defined in the strings.xml resource file as follows:
<string name="temperature_field">%1$.2f ℃</string>Finally, the time the weather data was last updated is determined by extracting the value stored under the ‘dt’ key and formatting the value as a date/time instance. The dt key stores the duration in milliseconds that have passed since January 1st 1970, which is referred to as the epoch. The timestamp of the last update is loaded into txtUpdated TextView, thereby concluding the renderWeather method. All of the above code is enclosed in a try/catch block to intercept any exceptions that might otherwise cause the application to crash.
Loading weather data for a specific city
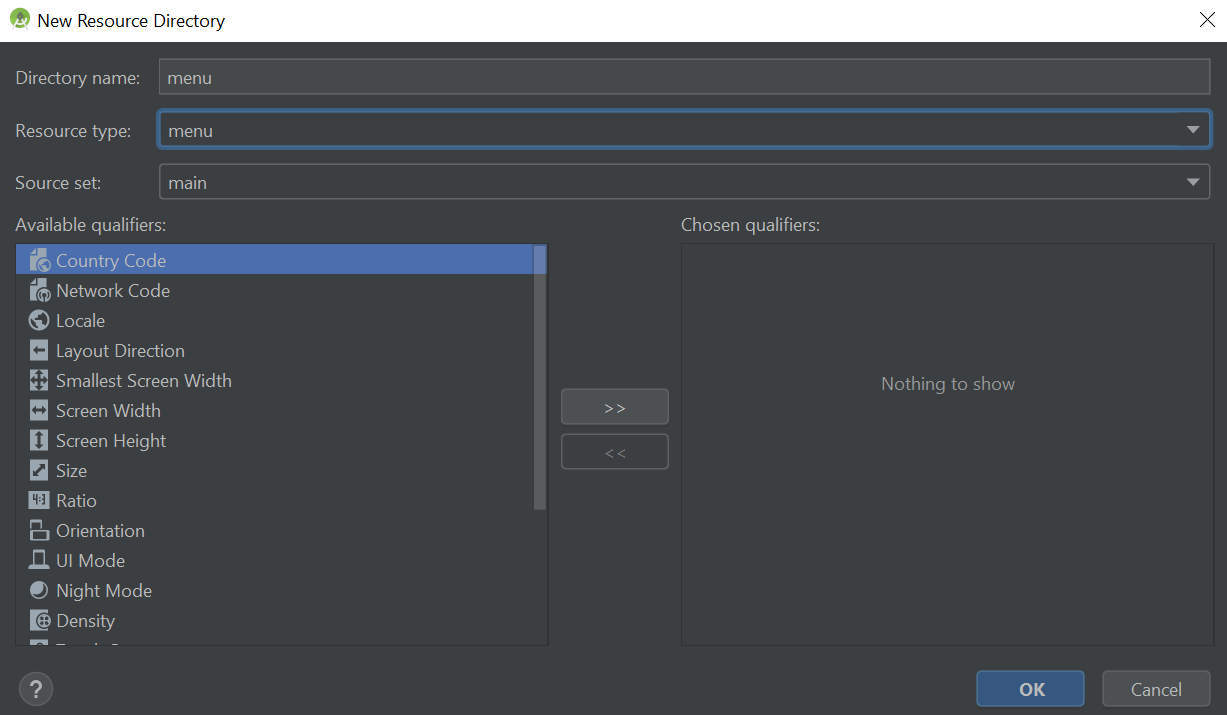
In addition to loading the weather data for the user’s current location, the app will also allow the user to view the weather for other cities around the world. If the user wishes to search for a city, then they can press a menu item in the toolbar to open a dialog window and search for the city name. To create the menu, right-click the res directory (Project > app) then select New > Android Resource Directory.
In the New Resource Directory window, set the directory name to menu and the resource type to menu then press OK to create the directory.
Next, right-click the newly created menu directory and press New > Menu Resource File.
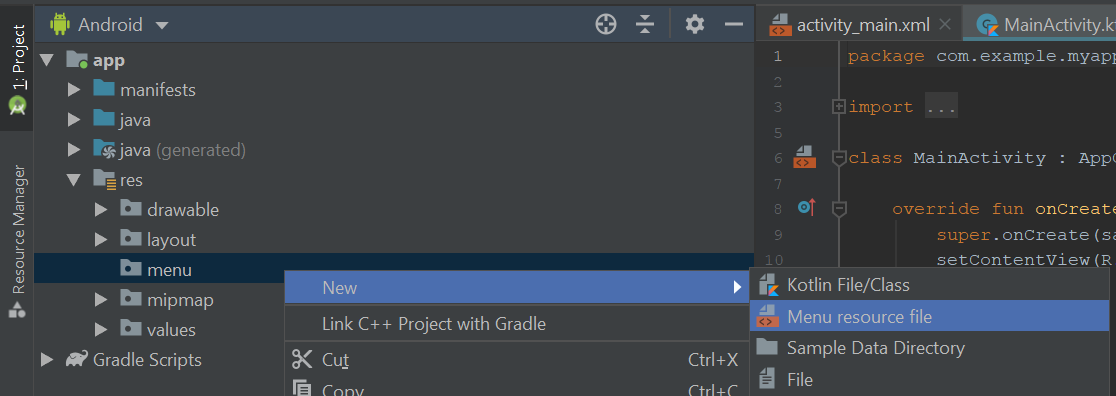
Set the file name to main then press OK to create a menu resource called main.xml.

Once the main.xml file is open in the editor, switch to Code view and edit the file so it reads as follows:
<?xml version="1.0" encoding="utf-8"?>
<menu xmlns:android="http://schemas.android.com/apk/res/android"
   xmlns:app="http://schemas.android.com/apk/res-auto" >
   <item
       android:id="@+id/refresh"
       android:title="@string/refresh"
       app:showAsAction="never"/>

   <item
       android:id="@+id/change_city"
       android:title="@string/change_city"
       app:showAsAction="never"/>
</menu>
The above code defines a menu containing two items. The first item will refresh the weather data, while the second item will open a dialog window that allows the user to enter the name of a city they wish to view the weather for. To make the menu items operational, return to the MainActivity class and add the following code below the onCreate method:
override fun onCreateOptionsMenu(menu: Menu): Boolean {
   menuInflater.inflate(R.menu.main, menu)
   return super.onCreateOptionsMenu(menu)
}
The onCreateOptionsMenu method defined above uses the MenuInflater class to load the main.xml menu resource and interact with its items. To define what happens when an item is clicked, add the following code below the onCreateOptionsMenu method:
override fun onOptionsItemSelected(item: MenuItem): Boolean {
   when (item.itemId) {
       // TODO: Respond to the refresh menu item here

       R.id.change_city -> showInputDialog()

       // TODO: Handle changes in language here
   }
   return super.onOptionsItemSelected(item)
}
The onOptionsItemSelected method states that if the change_city menu item is clicked then a method called showInputDialog should run. The showInputDialog method will display a dialog window that allows the user to enter the name of the city they wish to view the weather data for. To define the showInputDialog method, add the following code below the renderWeather method:
private fun showInputDialog() {
   val input = EditText(this@MainActivity)
   input.inputType = InputType.TYPE_CLASS_TEXT

   AlertDialog.Builder(this).apply {
       setTitle(getString(R.string.change_city))
       setView(input)
       setPositiveButton(getString(R.string.go)) { _, _ ->
           val city = input.text.toString()
           updateWeatherData("$CITY_NAME_URL$city")
           sharedPreferences.edit().apply {
              putString("location", city)
              apply()
           }
       }
       show()
   }
}
Note you may need to add the following import statement to the top of the file:
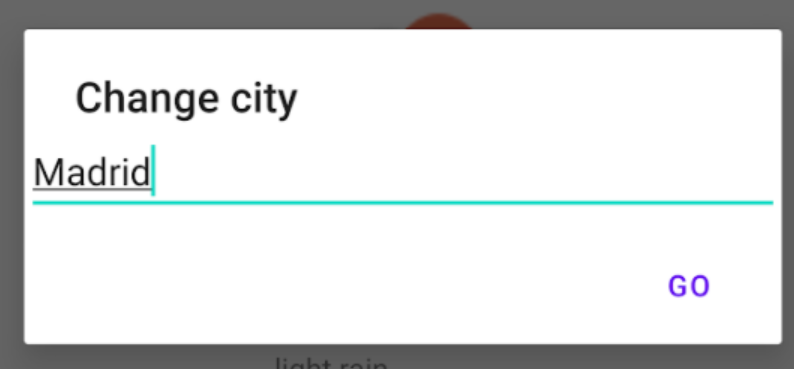
import androidx.appcompat.app.AlertDialogThe showInputDialog method must create the dialog window from scratch. First, it initialises an EditText widget, into which the user can type the city name. The inputType attribute of the EditText widget is set to TYPE_CLASS_TEXT to show that the user is expected to enter plain text. Next, the showInputDialog method constructs an instance of the AlertDialog class. The AlertDialog class prepares a dialog window featuring up to three buttons. These buttons include a positive button, which is used for affirmative actions; a negative button, which is used to dismiss the dialog window without any further action; and a neutral button, which is used to defer the user’s final decision until later.
In the AlertDialog builder, the AlertDialog is assigned a title of ‘Change city’ which will appear at the top of the dialog window. Next, the EditText widget we designed earlier is added to the dialog window. Also, the AlertDialog’s positive action button is initialised. When clicked, the positive action button will retrieve the user’s input from the EditText widget and append it to the CITY_NAME_URL variable from the MainActivity class’s companion object. Once the city name is appended, the URL should read similar to https://api.openweathermap.org/data/2.5/weather?q=london. The completed URL is then sent to the updateWeatherData method which will request the weather data for the user’s chosen city from the OpenWeather API. Finally, the user’s chosen city is written into the shared preferences file, so the app knows which city to request weather data for when launched.
Once the title, contents and positive button are in place, the AlertDialog class’s show method displays the dialog to the user. With that, the user can now search for the weather for any city across the world.
Enabling swipe-to-refresh
The user can refresh the weather data by swiping down from the top of their screen. This functionality is made possible because of the SwipeRefreshLayout widget in the activity_main.xml layout. The SwipeRefreshLayout widget detects swipe-down gestures and responds with a predetermined action.
To define how swipe-down gestures should be handled, add the following code to the bottom of the onCreate method in the MainActivity class:
binding.root.setOnRefreshListener {
   refreshData()
}
The above code assigns an onRefresh listener to the SwipeRefreshLaylout widget (which is the root element of the activity_main layout). The listener will run a method called refreshData in response to swipe-down gestures. To define the refreshData method, add the following code below the showInputDialog method:
private fun refreshData() {
    binding.root.isRefreshing = true
    when (val location = sharedPreferences.getString("location", null)) {
        null, "currentLocation" -> getLocation()
        else -> updateWeatherData("$CITY_NAME_URL$location")
    }
    binding.root.isRefreshing = false
}
The refreshData method starts by setting the isRefreshing property of the SwipeRefreshLayout widget to true, which will ensure the widget displays a loading symbol. Vertical swipe gestures will typically render the loading symbol regardless, but it is helpful to include a manual change to the isRefreshing property here because we will also refresh the weather data in other ways, such as when the app is launched and when the user clicks the “Refresh” menu item.
Next, the method uses a when block to respond to data refresh requests based on the user’s location preference. If the location preference is null or set to “currentLocation”, then the getLocation method will request weather data for the user’s last known location. Meanwhile, if the location preference is set to a city name then the app will attempt to load the weather data for that city instead. Once the above processing is complete, the SwipeRefreshLayout widget’s isRefreshing attribute is set to false to confirm all actions associated with the swipe-down gesture have been executed. Setting the isRefreshing attribute to false also removes the progress bar to show the user that the page has finished refreshing.
Ordinarily, the SwipeRefreshLayout widget would display and remove the progress bar itself; however, we explicitly set its isRefreshing attribute to false because there is an alternative pathway through which the user can refresh the content. The alternative pathway is by selecting the refresh menu item in the app toolbar. This alternative pathway will help support users who depend on external accessibility devices and may be unable to perform the swipe gesture. If you recall when we created the main.xml menu resource file earlier, we defined an item called refresh. The refresh menu item will update the weather data similar to the swipe-down gesture. To make the refresh menu item operational, refer to the onOptionsItemSelected method in the MainActivity class and replace the relevant TODO comment with the following code:
R.id.refresh -> refreshData()The above code responds to clicks on the refresh menu item by running the refreshData method. And with that, the user can now refresh the weather data through either a swipe gesture or by clicking the refresh menu item in the app toolbar.
The last thing we need to do is run the refreshData command whenever the user returns to the app. This measure will ensure the user sees the most up-to-date weather data when they open the app. To implement this feature, add the following code below the onCreate method:
override fun onResume() {
   super.onResume()

   refreshData()
}
The onResume method refers to a stage of the activity lifecycle. It will run after the onCreate and onStart stages when the activity is launched, and also when the user returns to the app after leaving it running in the background. The onResume stage occurs when the activity is ready to begin receiving user input. In this instance, we instruct the onResume stage to run the refreshData method to retrieve the most up-to-date weather data. In this way, the app will attempt to fetch weather data for the user’s chosen location whenever it is launched.
Adding an in-app language picker
For the final section of this project, we will add an in-app language picker that allows the user to change their language preference for our app only. We have already configured the app to support the device’s language setting; this section will add a bespoke language picker for our app. To do this, we will add some additional items to the main.xml menu we defined earlier. Locate and open the main.xml menu file by navigating through Project > app > res > menu. Next, add the following item element below the item elements that have already been defined:
<item android:title="@string/language">
   <menu>
       <item android:id="@+id/language_en"
           android:title="@string/english" />
       <item android:id="@+id/language_es"
           android:title="@string/spanish" />
   </menu>
</item>
The above code defines a submenu. The parent menu item will display the text “Language”, which will load the submenu items when clicked. The submenu items comprise a list of languages that the app supports. When the user clicks a submenu item, the app’s language will change to reflect the user’s selection.
To handle language changes, return to the MainActivity class and locate the TODO comment in the onOptionsItemSelected method. Replace the TODO comment with the following code to handle selections of the English and Spanish language menu items:
R.id.language_en -> changeLanguage("en")
R.id.language_es -> changeLanguage("es")
Language changes will be handled by a method called changeLanguage, which will accept the ISO code of the chosen language as a parameter. To define the changeLanguage method, add the following code below the refreshData method:
private fun changeLanguage(isoCode: String) {
   val appLocale = LocaleListCompat.forLanguageTags(isoCode)
   AppCompatDelegate.setApplicationLocales(appLocale)
}
The above code retrieves the Locale data associated with the supplied ISO country code. Next, it uses the AppCompatDelegate class’s setApplicationLocales method to apply the Locale data to our app. The setApplicationLocales method will also restart the activity, thereby reloading the app in the language associated with the selected Locale. In this way, the user can set their language preference for our app. Other apps on the device will be unaffected.
Summary
Congratulations on completing the Weather app! In creating the app, you have covered the following skills and topics:
- Create a new application using the Empty Activity project template.
- Build dynamic String resources that incorporate text-based and number-based parameters.
- Add translations for the app’s String resources so the app can support different languages.
- Request data from an online API.
- Process JSON output and retrieve information.
- Utilise Google’s Fused Location Provider API to find the user’s last known location.
- Use Kotlin’s let, apply and also scope functions to interact with an object while executing a block of code.
- Implement a SwipeRefreshLayout widget to respond to swipe gestures and display a progress bar when content is being refreshed.
- Incorporate a language picker so the user can change their per-app language preferences.