How to create an application using Spring Boot and Java
A microservices-based system comprises multiple applications, each with a bespoke purpose and technology stack. To help us build the applications that power the microservices, we can use a framework called Spring Boot. Spring Boot provides developers with tools that make it easier to build and configure applications. For example, Spring Boot facilitates dependency injection, which describes the provisioning of the resources needed for the application to run. In this way, Spring Boot helps applications fulfil their responsibilities such as data management, security authorisation, and error monitoring. Also, Spring Boot automatically configures many application components. For instance, if your application uses a database, then Spring Boot will adjust the settings and properties of the database to best meet your application’s needs. While autoconfiguration is a helpful and time-saving feature, it is still good to understand the underlying configuration rationale in case you need to customise an aspect of the application.
The full code for the project covered in this tutorial can be found on our Github.
Creating a new Spring Boot application
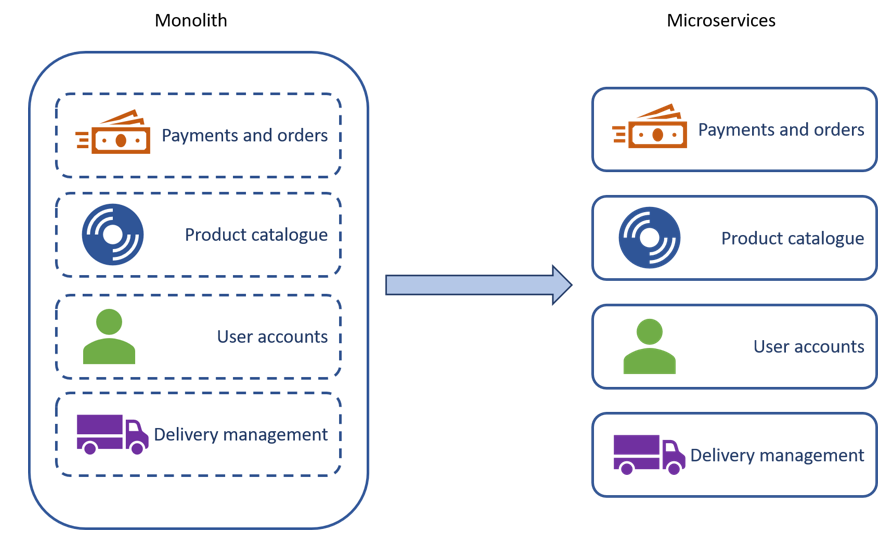
To demonstrate how to create a new application using Spring Boot, we will continue with the online store example business that was described in the previous tutorial on splitting a monolith application into a microservices-based system. The online store will require several microservices to monitor product inventory, process orders, and coordinate shipping.
In this tutorial, we will explore how to create a new Spring Boot-based microservices application. The application will address the first requirement for the online store: inventory management. To facilitate the development process, Spring released an online service called Spring Initializr. Spring Initializr allows you to generate a Spring Boot application template by entering several key project details and dependency requirements. The Spring Initializr service can be accessed at the following URL: https://start.spring.io/. On the Spring Initializr homepage, you will be invited to provide details about the application. For example, you can specify the programming language, language version and build tool that the application will use and provide application metadata. Also, you can add any dependencies (resources) that you would like the application to use. Don’t worry if you’re not sure what dependencies the application will need; you can add or remove them later if required.
For the inventory management application, you can enter the configuration details shown below:
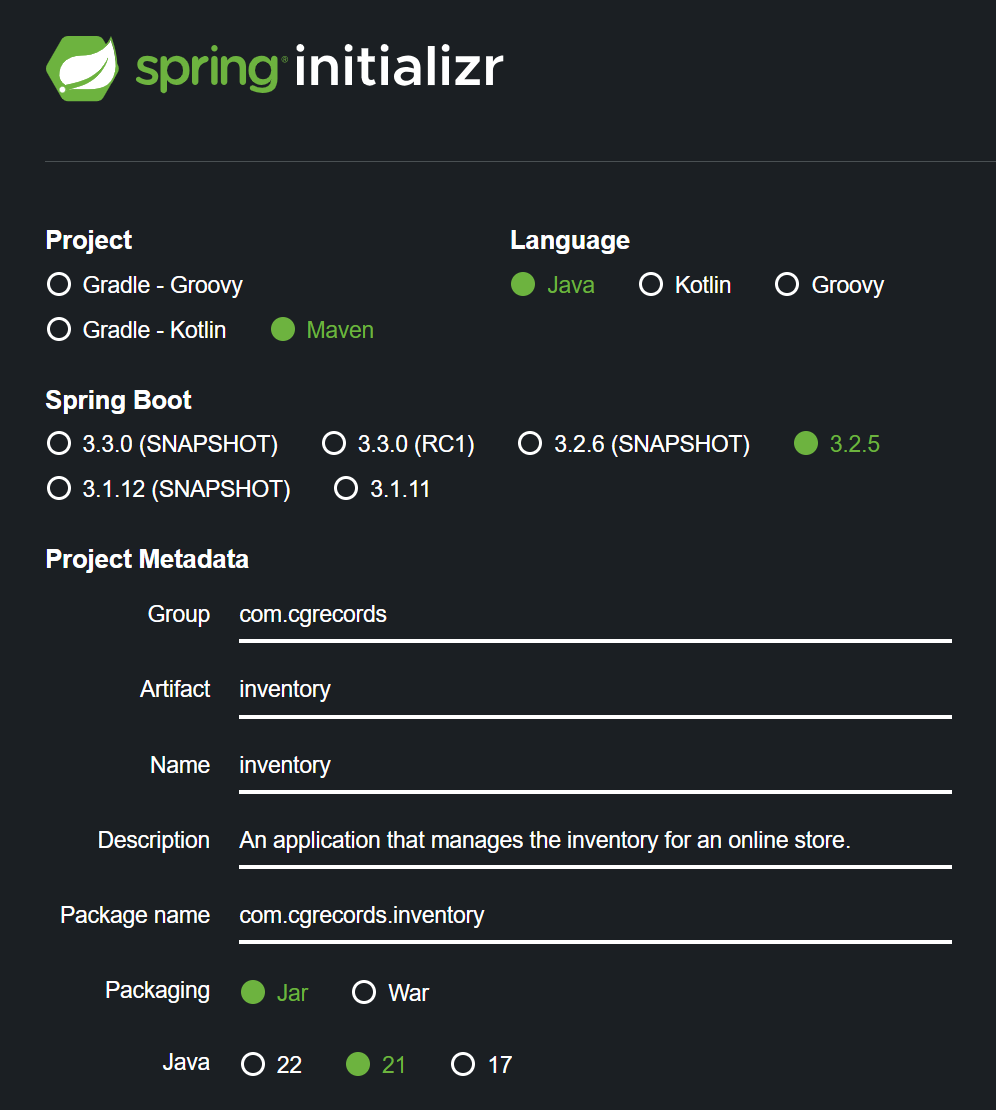
In the above configuration, the project build tool is set to Maven and the programming language is set to Java 21. You must have the selected version of Java installed on your computer. For guidance on how to install Java on your operating system, then see Oracle's website (Oracle own Java). Returning to the Spring Initializr console, the above configuration specifies that the project will be packaged in a JAR file. A JAR file collates all the code and resources required to run the application. The remaining values configure the application's metadata. You can specify a group, which is often a reversed domain name for your organisation’s website; an artifact, which is the name of the application; and a description, which should be a brief overview of what the application does.
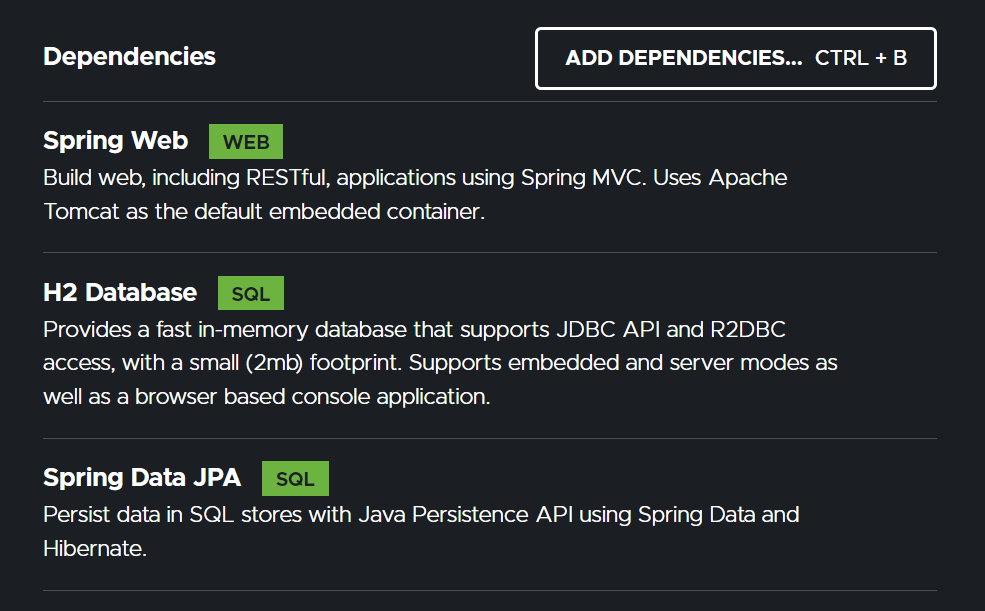
The Spring Initializr service also allows you to add dependencies to the project template. For the inventory management application, you should add the following dependencies: Spring Web, which provides tools for building web-based applications including the ability to map REST endpoints for transmitting data and embedded web servers such as Apache Tomcat that allow you to run your web application; H2 Database, which provides a database for storing application data; and Spring Data JPA, which allows you to map objects to databases and handle database interactions.
Once you have supplied the requisite metadata and added all three dependencies to the template, press the Generate button at the bottom of the Spring Initializr console to download a ZIP folder containing your project template.
Importing the Spring Boot application into an interactive development environment (IDE)
Once the ZIP folder generated by the Spring Initializr console has finished downloading, you can import the contents into an interactive development environment (IDE) and begin working on the application. In these tutorials, we will use a free IDE called IntelliJ IDEA (Version 2021.3.3) but other IDEs are available. To load a Spring Boot application template into IntelliJ, extract the downloaded ZIP folder to the directory on your computer where you want the project files to be saved. Next, launch IntelliJ, click Open, then navigate to and select the folder containing the extracted Spring Boot project template.

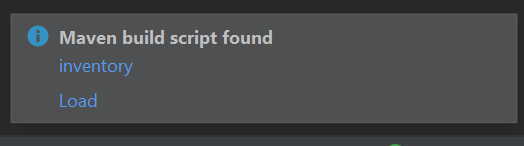
IntelliJ should then load the project and import all the required dependencies using Maven. Dependency configuration is usually automatic, but note that you may have to press 'Load' if you see a dialog message similar to the alert shown below.
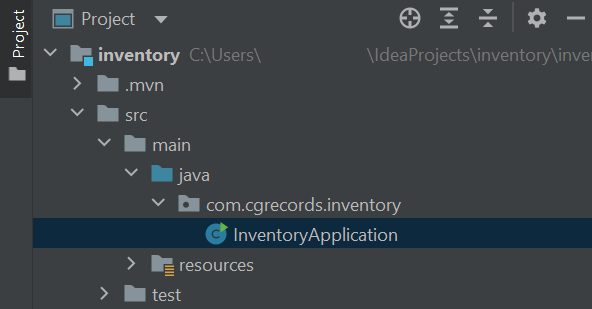
Once all the necessary files and dependencies have been imported, we can explore the project's files. By default, Spring Initializr will configure your project to contain a class file that launches the application. To locate the class, navigate through Project > src > main > java > name of the project and open the file called InventoryApplication.java (note the name of the Java file may vary based on the name of your application).
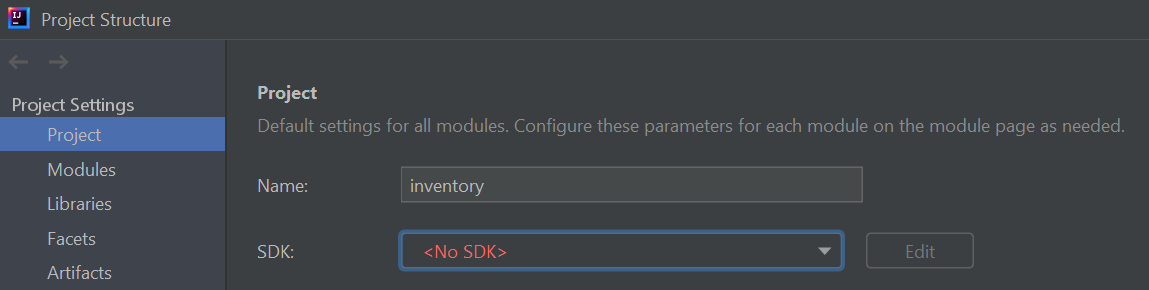
Sometimes, you may notice an error saying that project JDK (Java Development Kit) is not defined.

To fix the Project JDK is not defined error, navigate through File > Project Structure… > Project and locate the SDK (Software Development Kit) section.
In the SDK section, you should see a dropdown menu that allows you to select the version of Java that you wish to use based on the versions that are installed on your computer. Your chosen SDK should match the Java version you provided in the Spring Initializr console. In these tutorials, we will use Java 21.
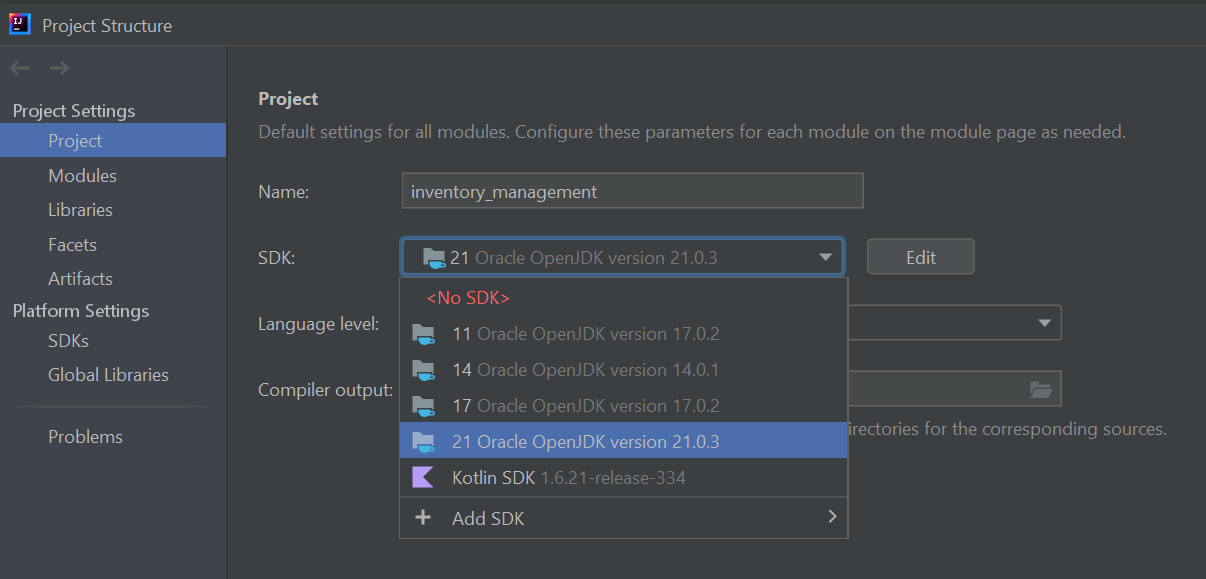
Once you have selected the appropriate Java version, click Apply and close the Project Structure window.
Launching the Spring Boot application
Believe it or not, you should already have a working application. We will begin building the application in earnest in subsequent tutorials. For now, we just want to check that the project can compile successfully without errors. To launch the application, return to the application class file (e.g., InventoryApplication.java) and locate the line that defines the class's name. You should notice a green arrow next to the line number. Click the green arrow to run the class and launch the application.

IntelliJ will begin to compile the project's code and launch the application. You can then refer to logs in the Run tab at the bottom of the window to see the progress of the project build and whether the application has launched successfully. The InventoryApplication class is also labelled with an @SpringBootApplication annotation, which instructs Spring Boot to scan the project package for Spring Boot components. We will discuss different Spring Boot application components further in subsequent tutorials.
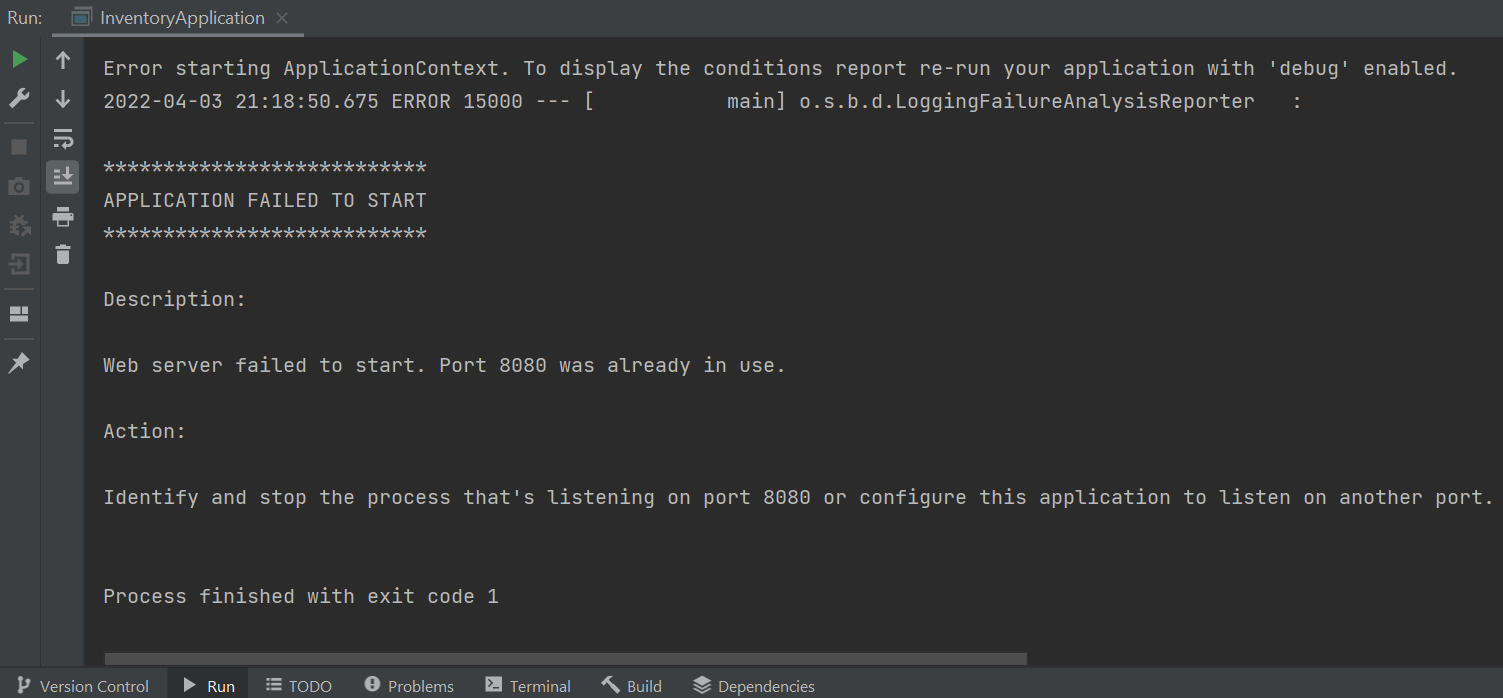
A common error that you may encounter when building a new web-based Spring Boot application is that the application's operating port (usually 8080) is in use. Web-based applications require a port, which helps route traffic to the application over the network. By default, Spring Boot applications use port 8080; however, each port can be only be used by one application at any given time. For this reason, it is common to find that port 8080 is in use, especially when you are working on multiple microservices.
To fix the port in use issue, you simply need to direct the application to an alternative port. An alternative port can be specified by altering the application’s properties. To locate the application’s properties file, navigate through Project > src > main > resources and open the file called application.properties.
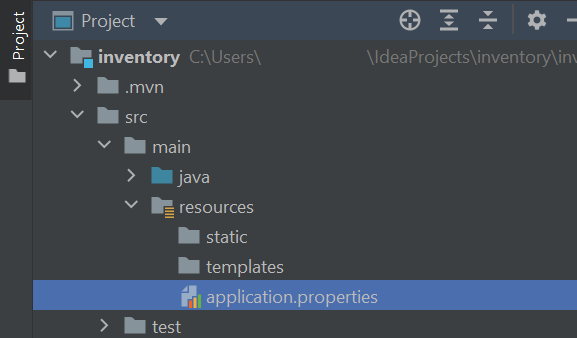
The application.properties file is likely empty. To set the port that the application should use to 8081, then add the following line of code to the file:
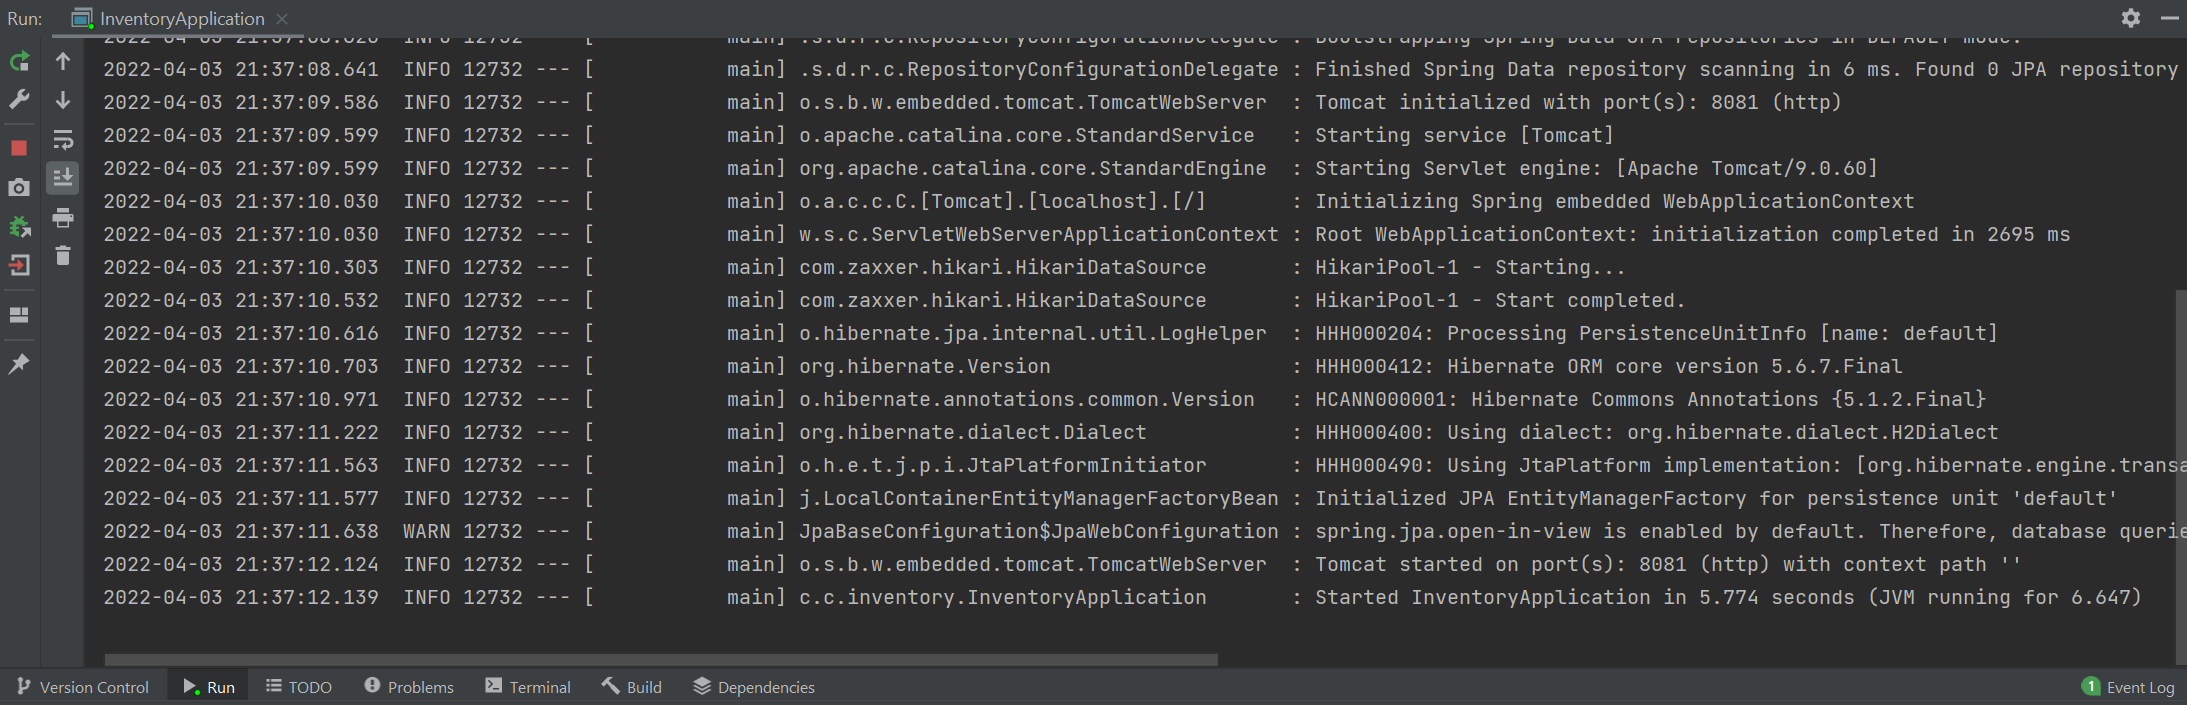
server.port=8081After directing the application to use an available port, you can try to launch the application again. The console logs for a successful launch are shown below. Note that the bottom two lines state that the application was launched on port 8081.
While the application is running, you can visit your application in your web browser by accessing its localhost URL. The localhost URL is formatted as http://localhost:8081/ where 8081 is your chosen port. Currently, the application does not return any content so you will likely see a 404 No Content Found Whitelabel Error page. Seeing the Whitelabel Error page is good news because it means your application loads and is ready for further development.
Enabling Auto Import
As you create a Spring Boot application using IntelliJ, it is beneficial to enable a feature called Auto Import. The Auto Import feature automatically populates your application's Java and Kotlin files with the external classes they need to function. For example, if you use a LocalDate object in your code, then the Auto Import will automatically add the following import statement to the top of the file:
import java.time.LocalDateSometimes there may be multiple suitable classes to choose from and the Auto Import feature may not work, but it is usually a great time saver. In the instances where the Auto Import feature may not automatically determine the appropriate classes, we will explicitly provide the requisite import statements in the code provided in these tutorials.
To enable the Auto Import feature in IntelliJ, navigate through File > Settings > Editor > General > Auto Import. Next, for both Java and Kotlin, ensure the following boxes are checked:
- Add unambiguous imports on the fly
- Optimize imports on the fly
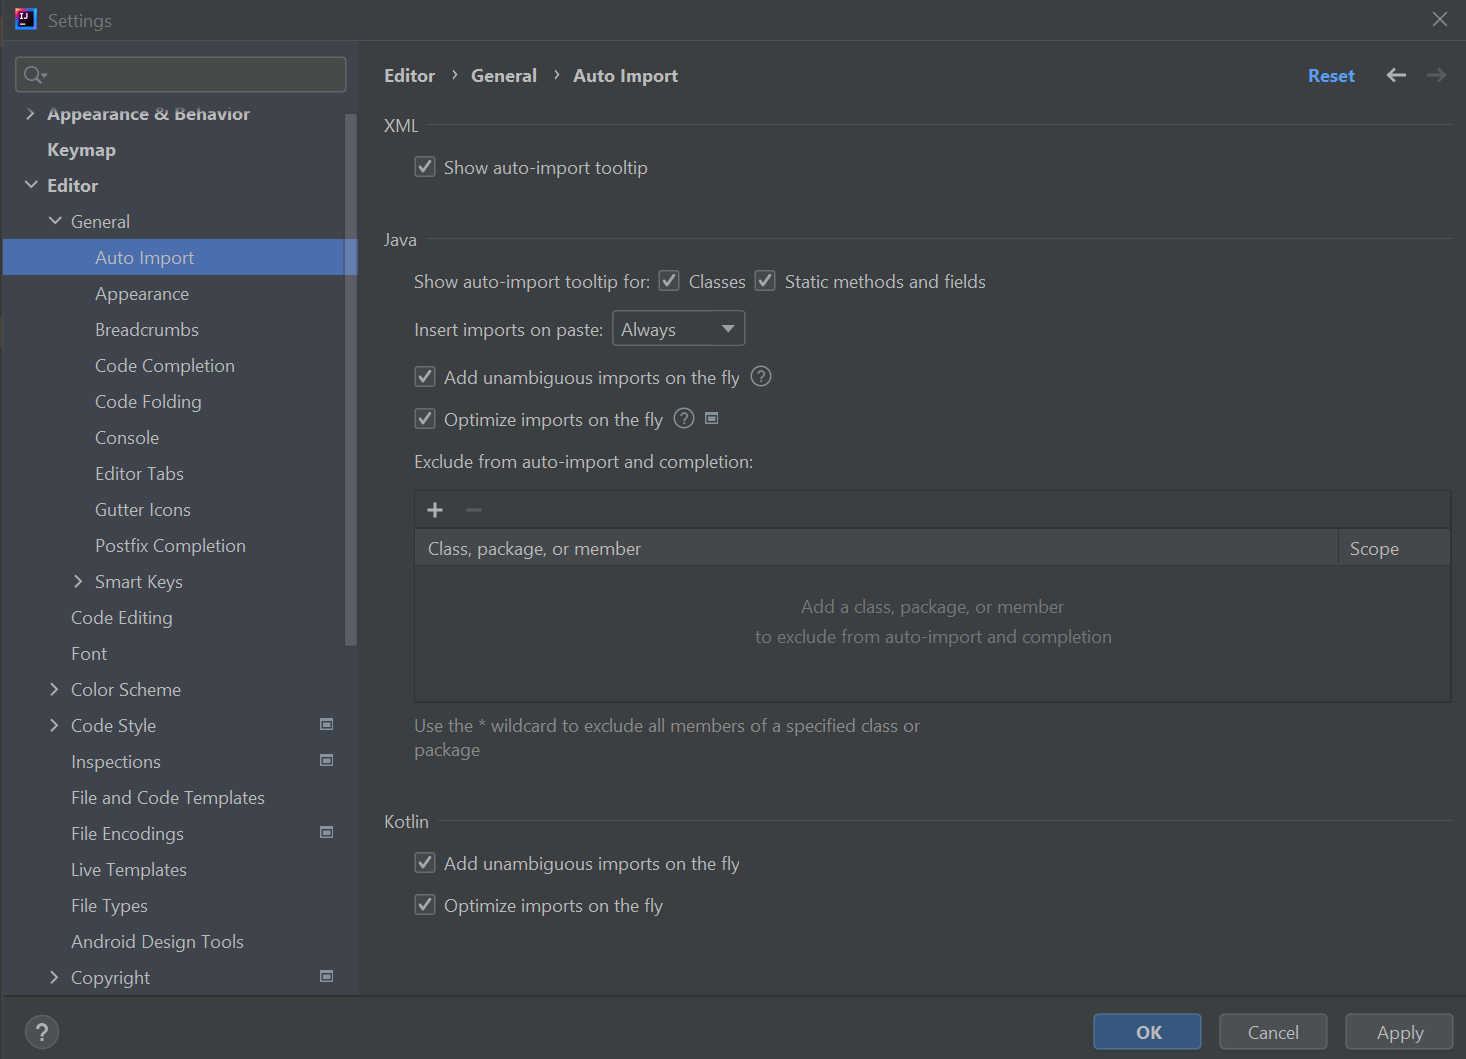
Finally, click Apply. From now on, IntelliJ will automatically attempt to generate the requisite import statements for your Java and Kotlin files as you code. Note you will need to repeat the above steps whenever you start a new IntelliJ project.