How to create a menu for your Android app
This tutorial will cover how to create and add menus to your Android app. You will also learn how to create submenus, dynamically add or remove items from the menu, and create a pop-up menu.
The menu resource directory
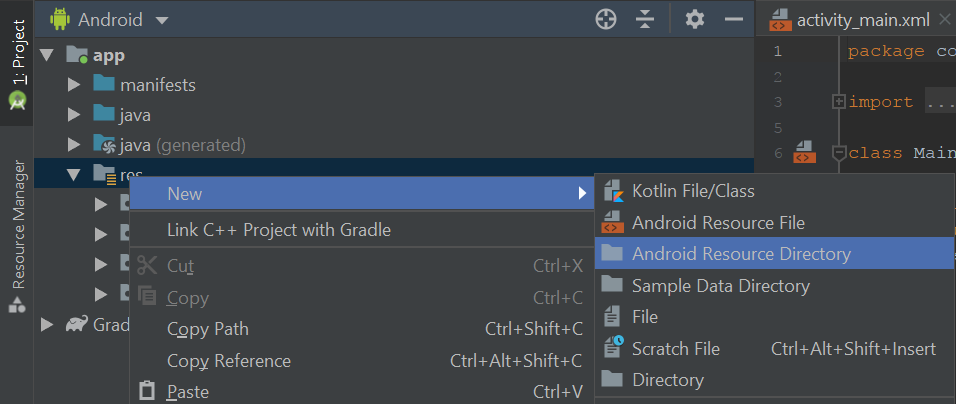
Each menu will require a layout resource file to coordinate its contents. Layout resource files are written using XML and stored inside a dedicated directory called menu. To create the menu directory, right-click the res folder (found by navigating through Project > app) and select New > Android Resource Directory
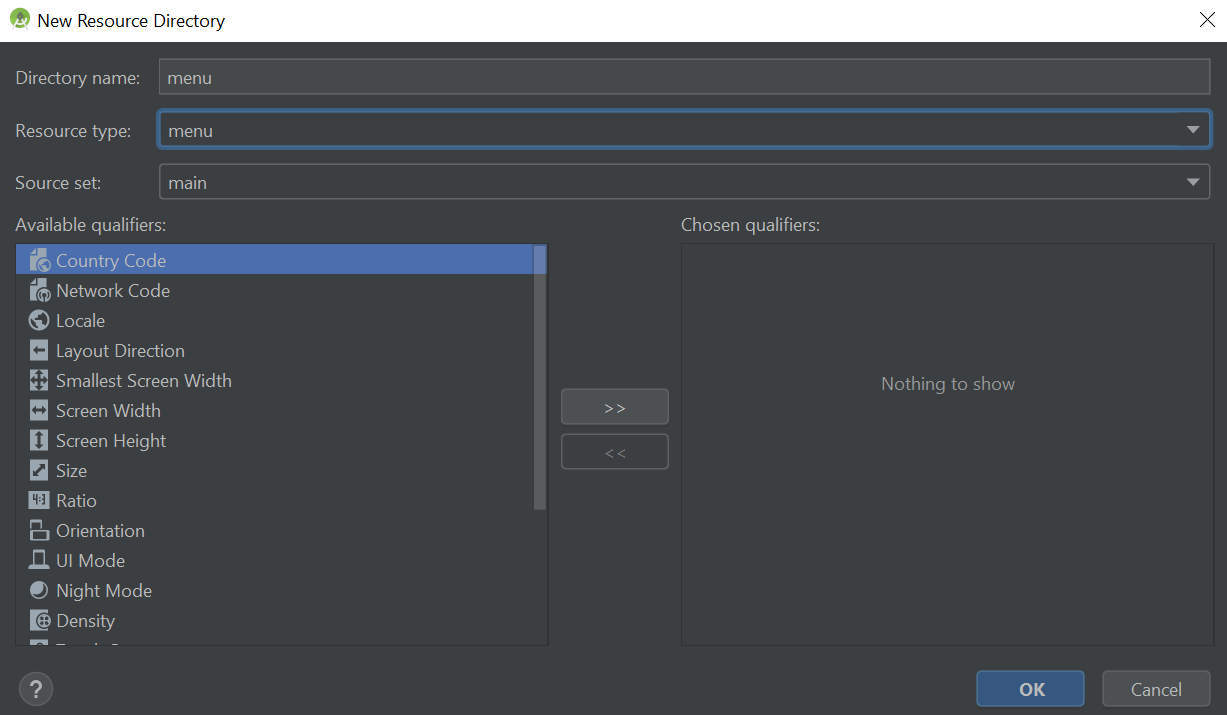
Set both the directory name and resource type to menu then press OK.
Once the menu directory is in place, you can create the layout. To create a new layout resource, right-click the menu directory then select New > Menu resource file
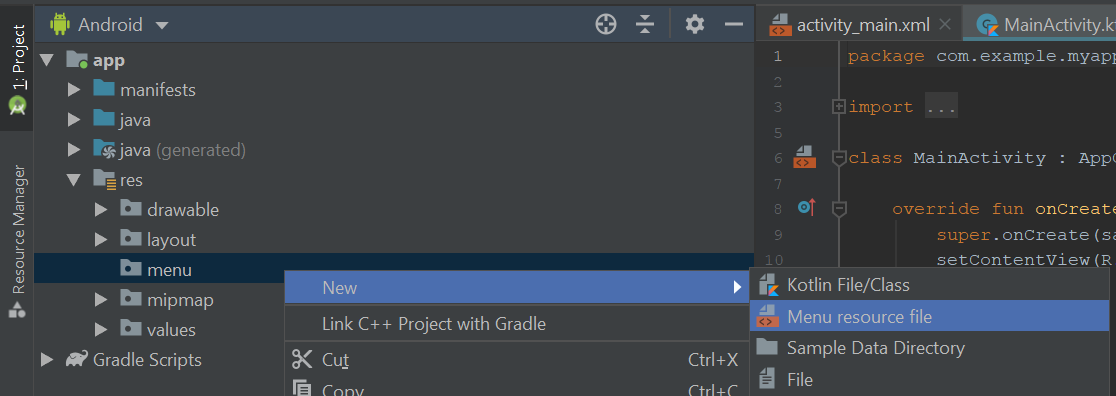
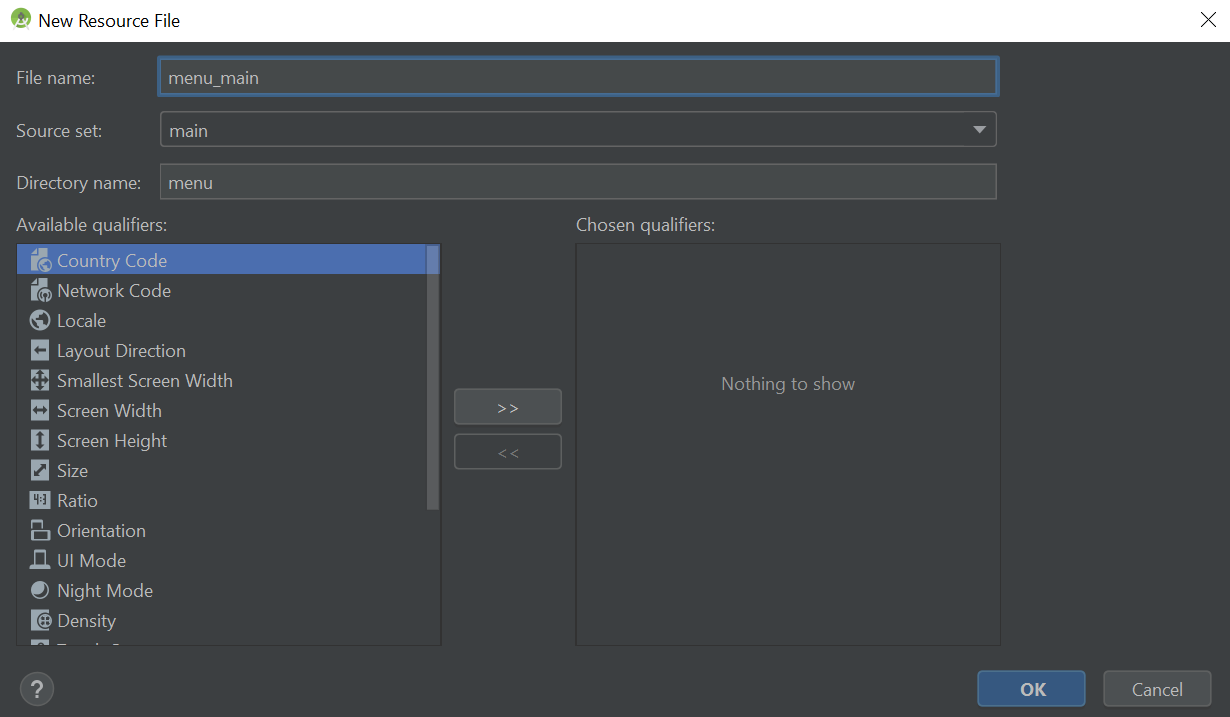
Set the file name to menu_main then press OK.
A layout file called menu_main.xml should then open in the editor. In the next section, we will populate the layout with items and create a menu.
The basic structure of the menu
Open the menu_main.xml layout in Code view and edit the file so it reads as follows:
<?xml version="1.0" encoding="utf-8"?>
<menu xmlns:android="http://schemas.android.com/apk/res/android"
    xmlns:app="http://schemas.android.com/apk/res-auto">

    <item android:id="@+id/menu_settings"
        android:title="@string/menu_settings"
        app:showAsAction="never" />

</menu>
In the above code, we define the menu resource and add an item element to it. The item will display the text which is encoded in a string resource called menu_settings. Currently, the menu_settings string resource does not exist. Let's fix that by opening up the strings resource file. You can find this file by navigating through Project > app > res > values

Next, add the following string to the file:
<string name="menu_settings">Settings</string>The menu item code also includes the line app:showAsAction="never". This line defines an attribute called showAsAction, which determines how the menu item should be displayed. It will accept the following values:
- never - This option means the item will never be immediately visible in the action bar. Instead, the user will have to press the overflow icon.
- always - The item will always be visible in the action bar.
- ifRoom - The item will only be visible if there is sufficient space.
- withText - This attribute only applies if the menu item contains an icon image as well. It ensures both the icon and title are displayed together.
Inflating the menu
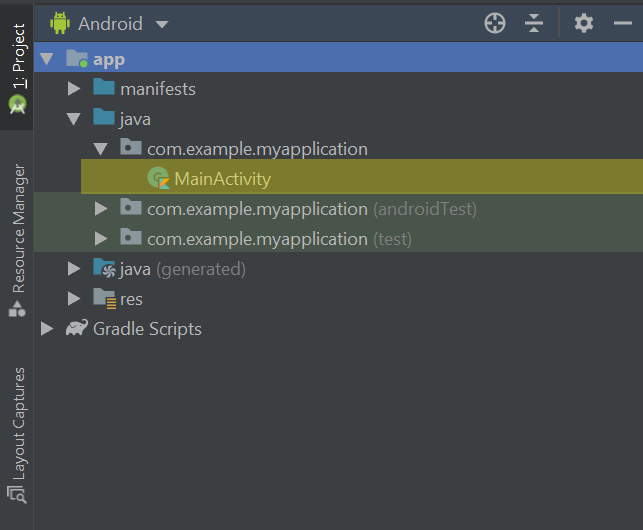
To display the menu to the user ,we must 'inflate' the menu resource file. To do this, open the MainActivity.kt file by navigating through Project > app > java > folder with your project name
Next, enter the following code below the onCreate function:
override fun onCreateOptionsMenu(menu: Menu): Boolean {
    val inflater = menuInflater
    inflater.inflate(R.menu.menu_main, menu)
    return super.onCreateOptionsMenu(menu)
}
Note you may also need to add the following statement to the top of the MainActivity.kt file to import the Menu class:
import android.view.MenuIn the above code, we override the onCreateOptionsMenu function, which is a readymade function that Android activities use to display menus. We override the method because we want to provide additional instructions for opening the menu that we made. For example, the above code uses the menuInflater class to import the contents of the menu_main.xml file into the action bar. The app is now ready to display our menu. For the remainder of this tutorial, we will explore how to format the menu and make the menu functional.
Creating a submenu and grouping items
Submenus
If you want to create a submenu then simply add another menu element inside the item that will open the submenu. For example, you could add two submenu items to the menu like this:
<?xml version="1.0" encoding="utf-8"?>
<menu xmlns:android="http://schemas.android.com/apk/res/android"
    xmlns:app="http://schemas.android.com/apk/res-auto">

    <item android:id="@+id/menu_settings"
        android:title="@string/menu_settings"
        app:showAsAction="never">

        <!-- The submenu starts here -->
        <menu>
            <item android:id="@+id/submenu_item1"
                android:title="@string/submenu_item1" />
            <item android:id="@+id/submenu_item2"
                android:title="@string/submenu_item2" />
        </menu>
    </item>
</menu>
Remember to define string resources in the strings.xml file for each submenu item's title.
<string name="submenu_item1">Item 1</string>
<string name="submenu_item2">Item 2</string>
Grouping menu items
In addition to creating a submenu, you can also group menu items together so they can be worked on collectively.
<?xml version="1.0" encoding="utf-8"?>
<menu xmlns:android="http://schemas.android.com/apk/res/android"
    xmlns:app="http://schemas.android.com/apk/res-auto">

    <item android:id="@+id/menu_settings"
        android:title="@string/menu_settings"
        app:showAsAction="never">

	<!-- Grouped items go here -->
        <group android:id="@+id/group_items1">
            <item android:id="@+id/group_item1"
                android:title="@string/group_item1"
                app:showAsAction="ifRoom" />
            <item android:id="@+id/group_item2"
                android:title="@string/group_item2"
                app:showAsAction="ifRoom" />
        </group>
    </item>
</menu>
Any items in the same group that share a showAsAction attribute of 'ifRoom' will either all be displayed in the action bar together or not at all. You won't get one item showing without the other.
Another useful reason to group menu items is that you can apply methods to all of them with a single command. For example, you can use:
- setGroupVisible() - Hides/reveals all group items.
- setGroupEnabled() - Enables/disables all group items
- setGroupCheckable() - Determines whether the group items can display a checkmark
You can apply these methods in your Kotlin code so they are initiated when a function is called. For example, you could run the methods when the menu is loaded:
override fun onCreateOptionsMenu(menu: Menu): Boolean {
    val inflater = menuInflater
    inflater.inflate(R.menu.menu_main, menu)

    // Set whether the group items are visible or not using 'true' and 'false'
    menu.setGroupVisible(R.id.group_items1, true)

    // Determine whether the group items can be pressed or not (true or false)
    menu.setGroupEnabled(R.id.group_items1, true)

    // Render group items checkable (true or false) and determine whether only one item or all items can be checked at once (exclusive: true or false)
    menu.setGroupCheckable(R.id.group_items1, true, false)

    return super.onCreateOptionsMenu(menu)
}
Modifying the menu based on user activity
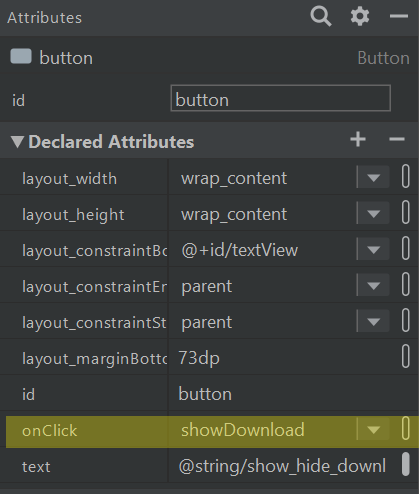
There are times when you may wish to change the layout of the menu based on user action. For example, maybe you want a 'Download' button to appear when the user presses a button. To make a menu item appear or disappear, open the Kotlin file that manages the menu (e.g. MainActivity.kt and declare the following variables:
private var downloadItem = 1
private var showDownloadItem = false
Together these variables will help us create a menu item that is hidden by default because the boolean value is set to false.
Next, add the following line to the onCreateOptionsMenu function to incorporate the Download item into the menu:
menu.add(0, downloadItem, 0, R.string.download_item)Note you may need to define a string called download_item in your strings.xml file:
<string name="download_item">Download</string>Next, add a function called onPrepareOptionsMenu to your Kotlin file. The onPrepareOptionsMenu function can modify the menu's items. In this case, we set the isVisible property of the Download item to the value of the showDownloadItem variable. As it stands, the value of the showDownloadItem variable is false, so the Download item will be hidden by default.
override fun onPrepareOptionsMenu(menu: Menu?): Boolean {
    var menuItem = menu!!.findItem(downloadItem)
    menuItem.isVisible = showDownloadItem
    menuItem.setShowAsAction(MenuItem.SHOW_AS_ACTION_ALWAYS)
    return super.onPrepareOptionsMenu(menu)
}
Note you may need to add the following statement to the top of the Kotlin file to import the MenuItem class.
import android.view.MenuItemNext, add a function called showDownload to your Kotlin file using the code shown below. The showDownload function toggles the value of the showDownloadItem variable from false to true (or vice versa) then runs a command called invalidateOptionsMenu. The invalidateOptionsMenu command will regenerate the menu and hide/reveal the Download item because the value of the showDownloadItem variable has changed.
fun showDownload() {
    showDownloadItem = !showDownloadItem
    invalidateOptionsMenu()
}
The last thing to do is add a button to one of the app's user interface layout files such as activity_main.xml. The button should contain an onClick attribute set to showDownload, which will instruct the button to run the showDownload function and hide/reveal the Download menu item whenever the button is clicked.
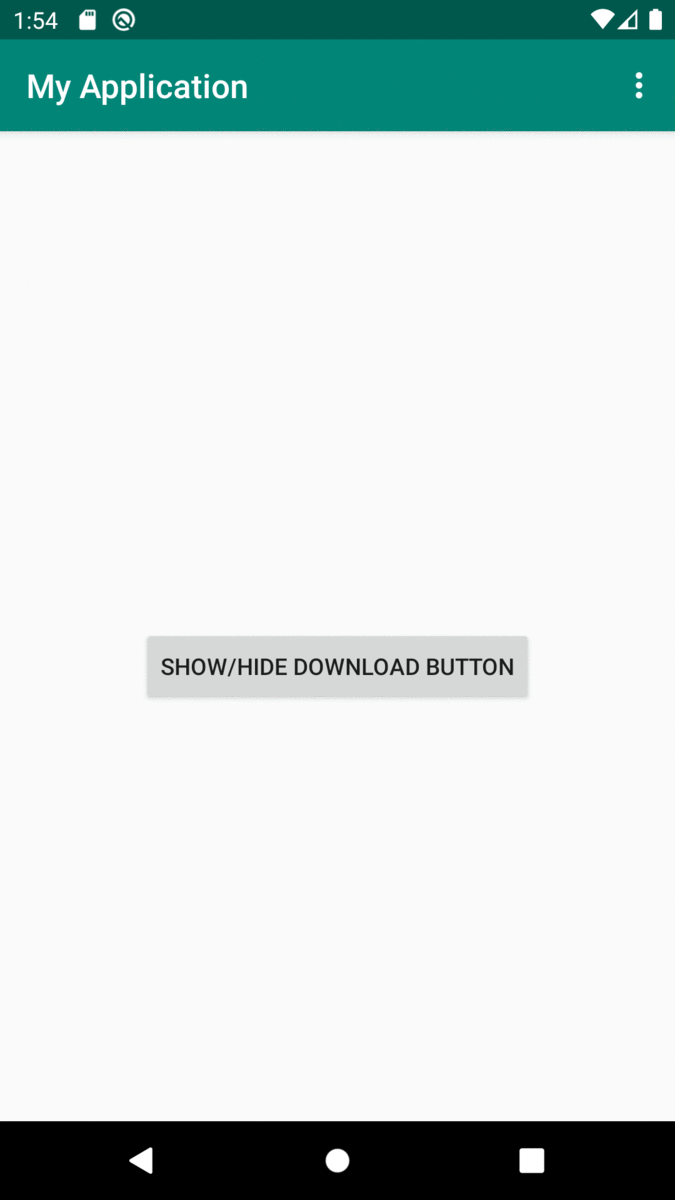
Your app should now work like this:
Creating a pop-up menu
Pop-up menus are not restricted to the action bar and can be loaded in the main body of the app. For example, you might want to create a reply button that gives the user a list of options for responding to an email.
First, add the following items to your strings.xml file to define the string resources that we will use to populate the menu items:
<string name="menu_reply">Reply</string>
<string name="menu_reply_all">Reply All</string>
<string name="menu_forward">Forward</string>
Next, create a layout file for the pop-up menu. To do this, navigate through Project > app > res, right-click the menu folder and select New > Menu resource file.
Name the file popup then press OK. Copy and paste the following code into the newly created popup.xml file to give the menu three items (reply, reply all and forward).
<?xml version="1.0" encoding="utf-8"?>
<menu xmlns:android="http://schemas.android.com/apk/res/android">
<item android:id="@+id/menu_reply"
android:title="@string/menu_reply" />
<item android:id="@+id/menu_reply_all"
android:title="@string/menu_reply_all" />
<item android:id="@+id/menu_forward"
android:title="@string/menu_forward" />
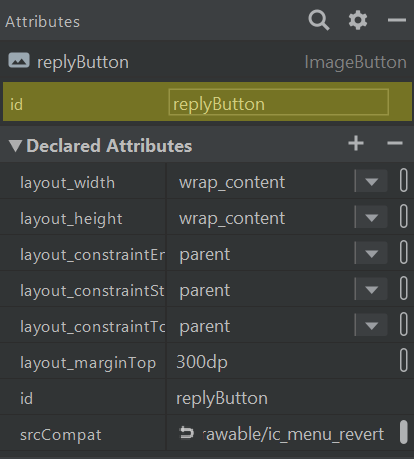
</menu>We will use an ImageButton to load the popup menu. Add an ImageButton widget to your layout of choice (e.g. activity_main.xml) by dragging and dropping the widget from the Palette. A resources window should open and invite you to set the icon that should be used for the button. Set the icon to ic_menu_revert then press OK.
Set the id of the ImageButton to replyButton so you can refer to the button in your Kotlin code.
We'll now write the code which will allow the ImageButton to load the pop-up menu when pressed. Open your main Kotlin file (e.g. MainActivity.kt) and add the following code to the onCreate function:
val clickListener = View.OnClickListener { view ->
    when (view.id) {
        R.id.replyButton -> {
            showPopup(view)
        }
    }
}

replyButton.setOnClickListener(clickListener)
The above code calls the showPopup function each time the ImageButton is clicked. We have not written this function yet and so it may be coloured in red. Note you may also need to import the layout which holds the ImageButton. If the ImageButton is located in the activity_main.xml file then the import statement will look like this:
import kotlinx.android.synthetic.main.activity_main.*All we need to do now to get the ImageButton working is write the showPopup function. This function will inflate the popup.xml menu layout whenever the user presses the ImageButton:
private fun showPopup(view: View) {
    val popup = PopupMenu(this, view)
    popup.inflate(R.menu.popup)

    popup.show()
}
Note you may need to import the PopupMenu class.
import androidx.appcompat.widget.PopupMenuAnd that's it! You have now created a pop-up menu!