How to create a Music application using Kotlin | Part 1
For this project, we will create a music app that allows the user to play songs on their device, build play queues and manage their music library. In creating this application, you will learn how to create and query a Room SQLite database that stores information about the music library, use a media browser service to coordinate playback, display interactive notifications, register a content observer that monitors changes to the media on the user’s device in real-time, and more.
The example code for the Music application can be found here. The project was built using Android Studio Giraffe and targets Android 13 (API 33/SDK 33).
Due to the length of this tutorial, it has been split into two parts. Part 2 can be found here.
Getting started
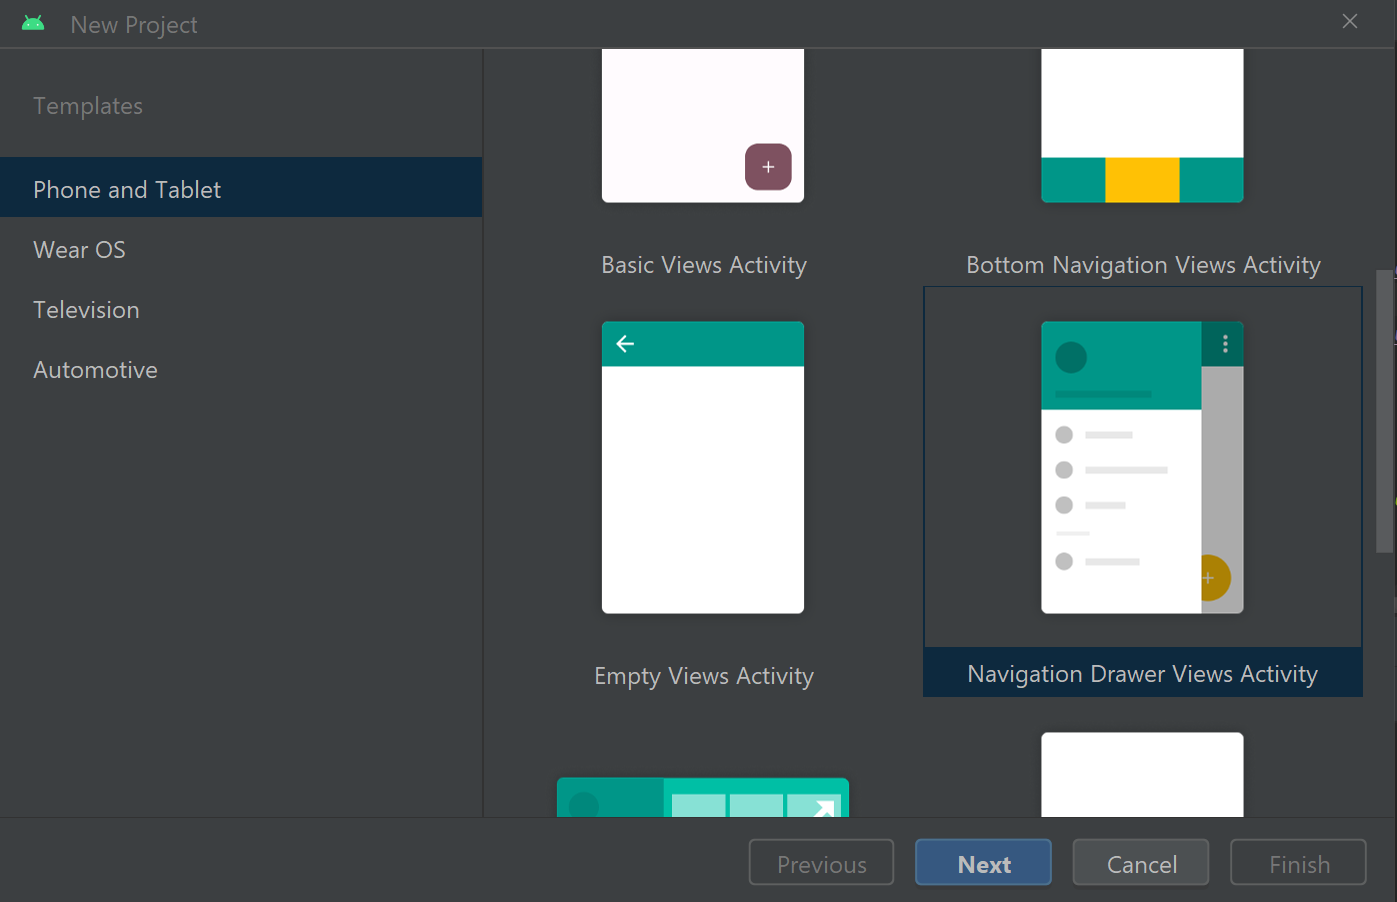
To begin, open Android Studio and create a new project. Select Navigation Drawer Views Activity as the project template. The Navigation Drawer Views Activity template provides your app with an expandable navigation panel, which will slide out from the left-hand side and allow the user to navigate around the app.
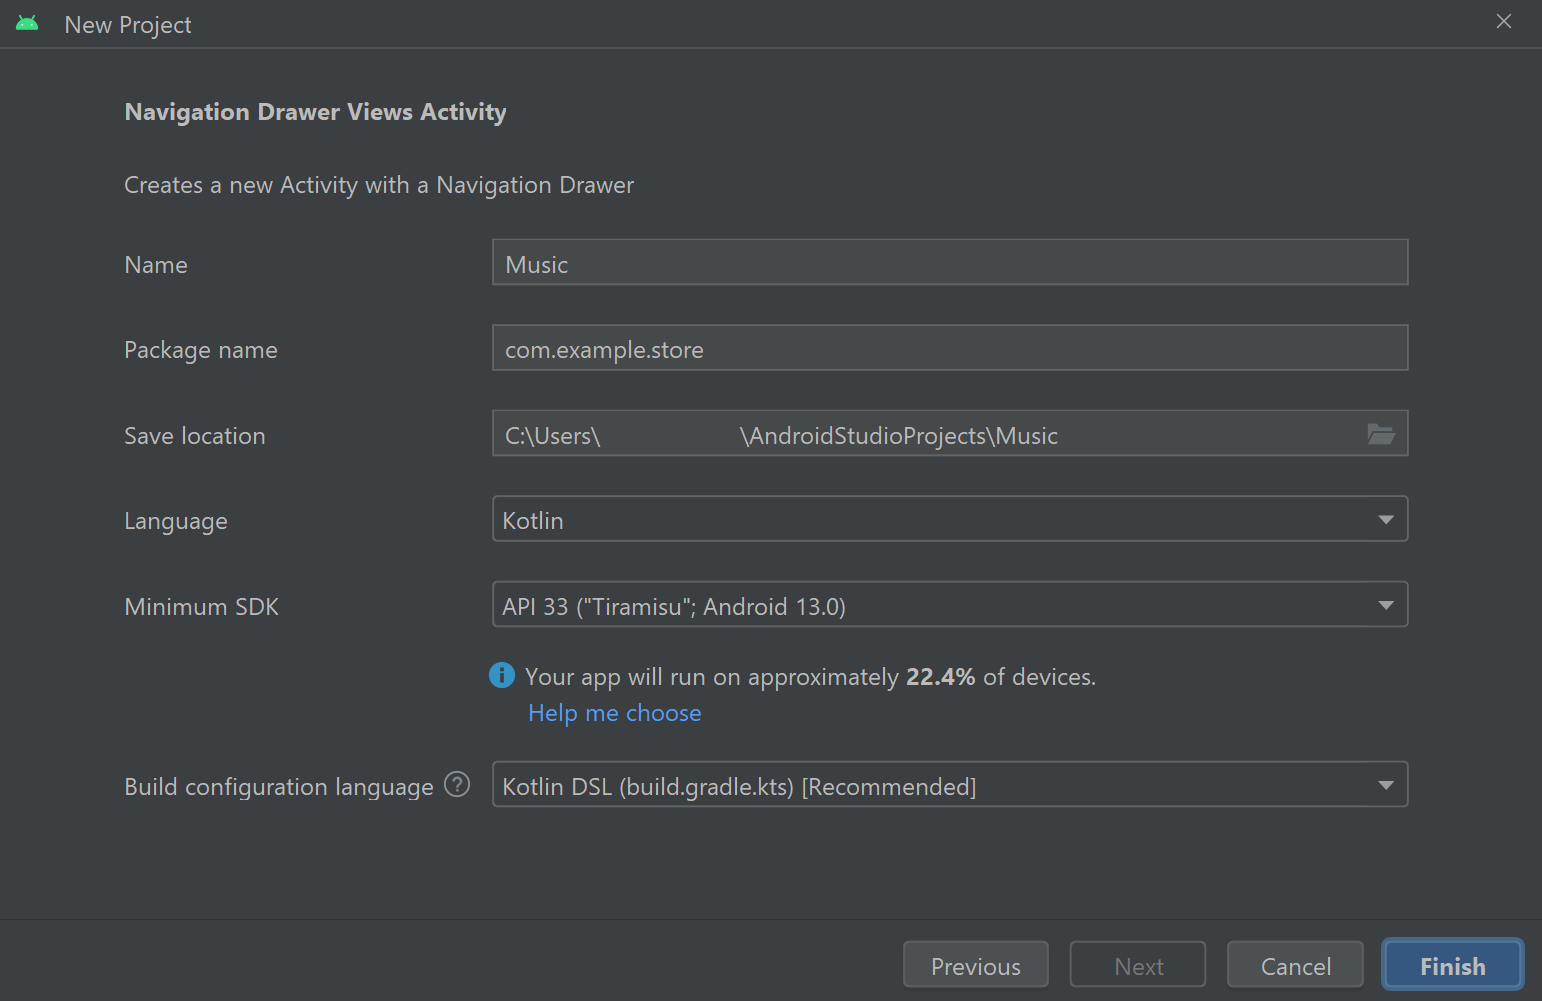
In the Create New Project window, name the project Music, set the language to Kotlin and select API level 33.
It is recommended you enable Auto Imports to direct Android Studio to add any necessary import statements to your Kotlin files as you code. These import statements are essential for incorporating the external classes and tools required for the app to run. To enable Auto Imports, open Android Studio’s Settings window by clicking File > Settings. In the Settings window, navigate through Editor > General > Auto Import then select ‘Add unambiguous imports on the fly’ and ‘Optimise imports on the fly’ for both Java and Kotlin then press Apply and OK.
Android Studio should now add most of the necessary import statements to your Kotlin class files automatically. Sometimes there are multiple classes with the same name and the Auto Import feature will not work. In these instances, the requisite import statement(s) will be specified explicitly in the example code. You can also refer to the finished project code to find the complete files including all import statements.
Configuring the Grade scripts
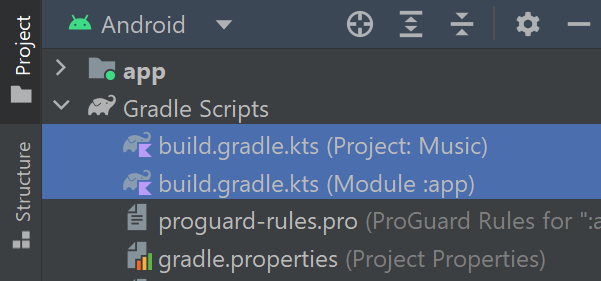
For the Music app to perform all the operations we want it to, we must import several external libraries using a toolkit called Gradle. To do this, navigate through Project > Gradle Scripts and open the Project and Module level build.gradle.kts files:
In the Project-level build.gradle.kts file, add the following entry to the plugins element:
id("androidx.navigation.safeargs.kotlin") version "2.5.3" apply false
id("com.google.devtools.ksp") version "1.9.10-1.0.13" apply false
The above code imports a plugin called Safe Args, which is a mechanism for transferring data between areas in the app, and a plugin called ksp, which is a plugin that allows you to use Java annotations in Kotlin code. We will use ksp to support the Room database that stores the music library.
Next, switch to the Module-level build.gradle.kts file and add the following lines to the plugins element at the top of the file:
The above implementation statements enable your app access to several features including a database management system called Room; a JSON string processor called GSON, which will help prepare complex objects for storage; and a fast scroller that will allow the user to quickly navigate RecyclerView widgets that hold lots of data (e.g. the list of songs in the user’s music library). The RecyclerView fast scroller library was built by myself! If you would like to read how it was made then I have published a dedicated tutorial.
We’re now finished with the Gradle Scripts files. Don’t forget to re-sync your project when prompted!
Configuring the manifest file
We’ll now turn our attention to the application's manifest file, which contains an overview of the app’s activities, as well as the user permissions the app requires to run. Open the AndroidManifest.xml file by navigating through Project > app > manifests then add the following line of code above the application element:
The above uses-permission elements signal to the device (and the Google Play store) that this app will require permission from the user to launch a foreground service (necessary to play music and show notifications) and access audio files on the user’s device.
Next, locate the activity element and add the following attribute to the opening activity tag:
android:windowSoftInputMode="adjustPan"
The above code sets the windowSoftInputMode attribute for the MainActivity activity to adjustPan. Setting the soft input mode to adjustPan instructs the app not to reorganise its content when the keyboard is visible. Instead, the keyboard will slide up above the content if necessary. This is useful in several situations, such as when the user is searching for songs. Without the windowSoftInputMode attribute, the keyboard would push the playback controls up the screen and obscure the search results.
Moving on, add the following code below the activity element:
The above code lays the groundwork for a service that will manage audio playback. The service will handle several types of external stimuli, including media buttons (such as those found on Bluetooth earphones) and audio becoming noisy (e.g. when earphones are disconnected during playback). Don’t worry if MediaPlaybackService is highlighted in red. This warning will disappear once we create the service.
Defining the String resources used in the app
Like the other projects on this website, the Music app will store all the strings of text used throughout the application in a resource file. To define the string resources, navigate through Project > app > res and open the file called strings.xml. Once the file opens in the editor, modify its contents so it reads as follows:
<resources>
   <!-- accessibility strings -->
   <string name="close_currently_playing">Close the currently playing view</string>
   <string name="handle_view_desc">Icon that allows you to reorder songs in the current playback list.</string>
   <string name="options_menu">Options menu</string>
   <string name="permission_required">Storage permission is required to run this application</string>
   <string name="play_or_pause_current_track">Play or pause current track</string>
   <string name="repeat_current_playlist">Repeat current playlist</string>
   <string name="search_results">Search results</string>
   <string name="set_album_artwork">Set album artwork</string>
   <string name="shuffle_play_queue">Shuffle the current play queue</string>
   <string name="shuffle_tracks">Play a shuffled version of the music library</string>

   <!-- application strings -->
   <string name="app_name">Music</string>

   <!-- controls strings -->
   <string name="play_pause">Play or pause</string>
   <string name="play_prev">Play previous</string>
   <string name="skip_ahead">Skip ahead a track</string>
   <string name="skip_back">Skip back a track</string>

   <!-- library strings -->
   <string name="album_artwork">Album artwork</string>
   <string name="artist">Artist</string>
   <string name="check_fields_not_empty">Check none of the fields are empty</string>
   <string name="details_saved">Details saved</string>
   <string name="disc">Disc</string>
   <string name="error">An error has occurred. If the song file has been moved or deleted please wait for the library to refresh.</string>
   <string name="library">My Library</string>
   <string name="no_results">No results found</string>
   <string name="songs">Songs</string>
   <string name="track">Track</string>
   <string name="year">Year</string>

   <!-- menu strings -->
   <string name="added_to_queue">%1$s has been added to the play queue</string>
   <string name="done">Done</string>
   <string name="edit_metadata">Edit music info</string>
   <string name="play_next">Play next</string>
   <string name="play_queue">Play queue</string>
   <string name="remove_from_queue">Remove from play queue</string>
   <string name="save">Save</string>
   <string name="search">Search</string>
   <string name="search_hint">Search music</string>
   <string name="title">Title</string>
   <string name="transition_image">transition_image</string>
   <string name="transition_title">transition_title</string>
   <string name="transition_subtitle">transition_subtitle</string>
   <string name="transition_subtitle2">transition_subtitle2</string>
   <string name="transition_back">transition_back</string>
   <string name="transition_play">transition_play</string>
   <string name="transition_forward">transition_forward</string>
</resources>
The above code separates the strings into categories using comments so you can get an idea of how they will be used in the app. For example, the accessibility strings will provide content descriptions for images to help people with access needs. The only other noteworthy string is the app_name string in the application strings category. This string defines the name of the app, as specified in the AndroidManifest.xml file.
Customising the application’s themes
Similar to the strings resource file, the project will also contain a resource file detailing all the custom colours that are used throughout the app. Android Studio should already have generated a colours resource file called colors.xml, which you can locate by navigating through Project > app > res > values. For the music app, we will define several colours that will be used to tint the icons that appear in the navigation drawer.
To define the custom colours, add the following items to the colors.xml file:
Next, let’s turn our attention to the theme resource themes.xml files, which control the appearance of the app and its components. By default, Android Studio generates two themes.xml files: a base theme and a night theme. To locate the themes.xml files, navigate through Project > app > res > values > themes. There will be two theme files, one with the word ‘night’ in brackets after the filename and one without. The file without the term ‘night’ is the base theme file and the one that we will edit. All style guidelines defined in the base theme resource file will also apply to the night theme unless the night theme resource file specifies otherwise. In the base theme themes.xml file, find the style element with the name attribute set to “Theme.Music” and add the following items inside the element:
The above code overrides the guidelines for the TabLayout and TextView widgets with custom style elements. The first custom guidelines will style the TabLayout widget that will allow the user to swipe between the play queue and songs tabs.
To define the custom guidelines, add the following element to the base themes.xml file:
The above style element is called Widget.Custom.TabLayout. The style element uses its parent attribute to inherit all the style instructions issued by Material Design for TabLayout widgets, then overwrites specific attributes as required. For example, the style element adds a 14dp elevation to create a shadow effect. Also, the tabMode property is set to fixed and the tabGravity property is set to fill, which together ensure the tab layout stretches across the full width of the device window and the individual tabs are equally spaced apart from one another.
Next, to define the custom TextView widget guidelines, add the following style element to the base themes.xml file:
Similar to the TabLayout style element, the above code imports the default TextView style instructions from Material Design and overrides attributes as required. In this instance, the ellipsize property is set to none, which ensures text that stretches beyond the container of the TextView is not truncated with an ellipsis. Instead, a horizontal fading edge will appear to provide a faded effect for Text which is too large.
Finally, add the following element to the base themes.xml file to define style guidelines that we will apply to certain buttons such as the playback controls:
The style element defined above changes the button’s tint to a medium-emphasis colour that contrasts with the surface. The material_on_surface_emphasis_medium color attribute uses the onSurface colour for the active theme, and so will automatically adapt to the base and night themes. Also, the background attribute is set to selectableItemBackgroundBorderless, which means the ripple effect that appears when the button is pressed will be circular and stretch beyond the normal rectangular/square border of the button.
Creating the Song data class
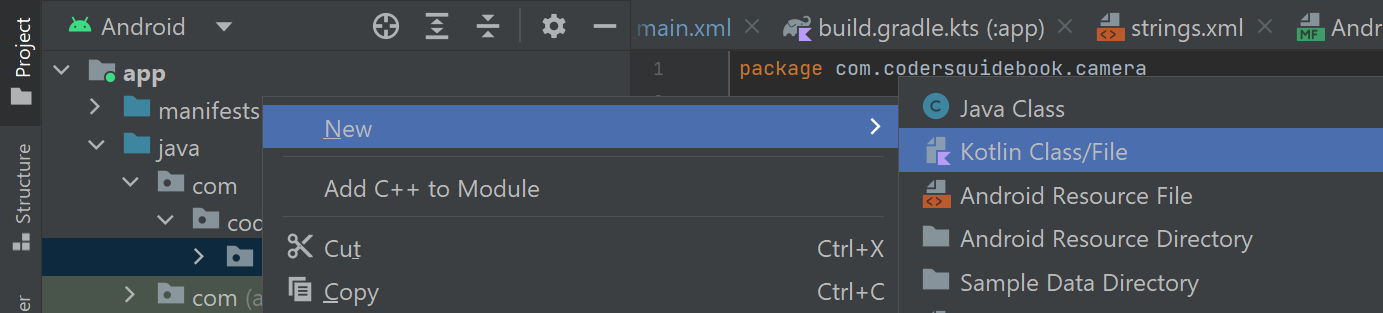
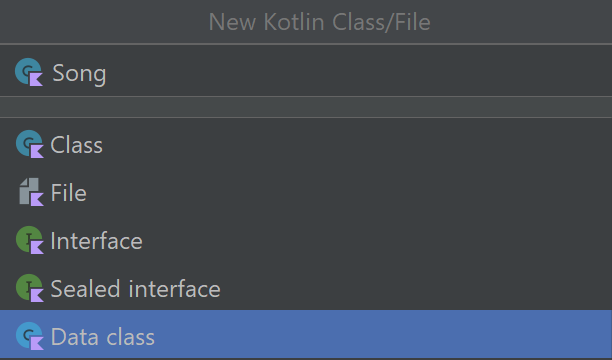
To build the user’s music library, the app will store information about each audio file in a dedicated data class called Song. A new instance of the Song class will be created for each audio file, and all the Song objects will be stored in an internal database. To create the Song data class, navigate through Project > app > java and right-click the folder with the name of the project. Next, select New > Kotlin File/Class, name the class Song and select Data Class from the list of options.
A file called Song.kt should open in the editor. Edit the class’s code so it reads as follows:
import kotlinx.parcelize.Parcelize

@Parcelize
@Entity(tableName = "music_library")
data class Song(
   @PrimaryKey val songId: Long,
   @ColumnInfo(name = "song_track") var track: Int,
   @ColumnInfo(name = "song_title") var title: String,
   @ColumnInfo(name = "song_artist") var artist: String,
   @ColumnInfo(name = "song_album") var album: String,
   @ColumnInfo(name = "song_album_id") val albumId: String,
   @ColumnInfo(name = "song_year") var year: String
) : Parcelable
The Song data class features several annotations (preceded by the @ symbol) because instances of the data class will be mapped to a database table using Room. Each annotation defines a characteristic of the data. The first annotation, while not strictly necessary for the Room database, is @Parcelize. The Parcelize annotation signals that instances of the class are Parcelable objects. Parcelable objects can be more easily sent between different areas of the app (e.g. activities, fragments and services).
Next, the Song data class is labelled with the @Entity annotation and assigned a table name. An entity is essentially a map for a table in the Room database. In this instance, we are defining a table called ‘music_library’ and using the different properties of the Song data class as the columns. Columns will be created for the song’s ID, track number, title, artist, album name, album ID and year.
The songId property of the Song data class is labelled with the @PrimaryKey annotation. The primary key distinguishes different entries in the database table, and each entry must have a unique primary key value. For our purposes, it makes sense to set the song ID as the primary key because each audio file will have a unique ID in the device’s media storage facility.
The final annotation is @ColumnInfo. The ColumnInfo annotation defines information about the column in the database table, such as the column name, data type and default value. For example, in the above code, the ColumnInfo annotation specifies that the track parameter will be stored in a column called song_track.
Configuring the Room SQLite database
We’ll now create a class that will configure the Room database. Right-click the folder that contains the MainActivity class (Project > app > java > name of the project) and select New > Kotlin File/Class. Name the file MusicDatabase and select Class from the list of options. Once the MusicDatabase.kt file opens in the editor, modify its code so it reads as follows:
@Database(entities = [Song::class], version = 1, exportSchema = false)
abstract class MusicDatabase : RoomDatabase() {

   abstract fun musicDao(): MusicDao

   companion object {
       @Volatile
       private var database: MusicDatabase? = null

       fun getDatabase(context: Context): MusicDatabase {
           database ?: kotlin.run {
               database = Room.databaseBuilder(context, MusicDatabase::class.java, "music_database")
                   .build()
           }

           return database!!
       }
   }
}
The above code states that the database will contain one table, as mapped by the Song entity class. Interactions with the Song table will be handled by a data access object called MusicDAO which we will create later. Inside the companion object, there is a method called getDatabase, which builds the database and names it music_database.
How to prepopulate a Room database with data
While not required for the Music app, it is possible to automatically add entries to a Room database table the moment it is created. To demonstrate how this works, we will configure the Song entity to always contain an entry for an imaginary song called “Guitar solo”. The first step is to modify the getDatabase method so it reads as follows:
In the above code, an argument called scope is added to the getDatabase method. The scope variable will contain a CorourtineScope instance that will allocate database interactions to an alternative worker thread behind the scenes. In this app, the getDatabase method will be called by a view model that we will create. View models have a native coroutine scope called viewModelScope, so to run the getDatabase method with the new set of parameters, you could write the following:
Next, an instance of a class called MusicDatabaseCallback is added as a callback to the database builder. The MusicDatabaseCallback instance will detect when the database is running and insert the data we need.
private class MusicDatabaseCallback(private val scope: CoroutineScope) : RoomDatabase.Callback() {

    override fun onCreate(db: SupportSQLiteDatabase) {
        super.onOpen(db)
        database?.let { database ->
            scope.launch {
                // Prepopulate the Song entity with a readymade Song object
                database.musicDao().insert(Song(1,1001, "Guitar solo", "Guitarist", "Greatest Hits", "22", "content://010101", "2021"))
            }
        }
    }
}
The MusicDatabaseCallback class contains instructions that will be carried out at specific stages of the database lifecycle. For example, in the above code, the onCreate method is used to define what happens when all of the database tables have been created. Other database states you can override include onOpen, which occurs when the database is opened; and onDestructiveMigration, which defines what happens if you attempt to update a Room entity (e.g. with columns added or removed) but Room is unable to successfully migrate data from the previous database configuration to the new database configuration. For more information about the database state callback methods see the official Android documentation.
In this instance, we only wish to override the onCreate database state and use the opportunity to pre-populate the music_library table with a song called “Guitar solo”. This means when the database is created it will already have a readymade Song object. The completed Song object is inserted into the Room database using a MusicDAO method called insert. We’ll cover how to interact with the database in the next section.
The music data access object (DAO)
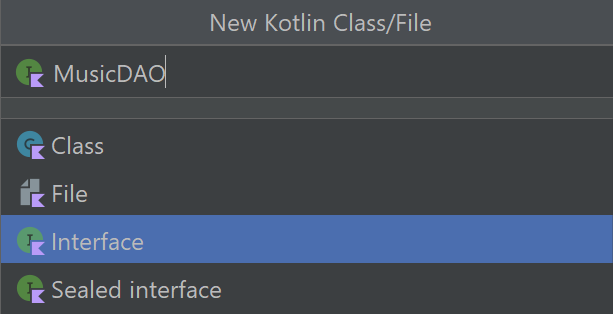
Once the database has been created, you can interact with its entities and insert, delete, update and retrieve data. All database interactions are handled by a data access object (DAO). To make a DAO, right-click the folder that contains the MainActivity class (Project > app > java > name of the project) and select New > Kotlin File/Class. Select Interface from the list of options and name the interface MusicDao.
Once the MusicDao.kt file opens in the editor, edit its code so it reads as follows:
@Dao
interface MusicDao {

   @Delete
   suspend fun delete(song: Song)

   @Query("SELECT * from music_library ORDER BY song_title")
   fun getSongsOrderByTitle(): LiveData<List<Song>>

   @Query("SELECT * FROM music_library WHERE song_title LIKE :search OR song_artist LIKE :search OR song_album LIKE :search")
   suspend fun getSongsLikeSearch(search: String): List<Song>

   @Query("SELECT * FROM music_library WHERE songId = :songId")
   suspend fun getSongById(songId: Long): Song?

   @Insert(onConflict = OnConflictStrategy.IGNORE)
   suspend fun insert(song: Song)

   @Update(onConflict = OnConflictStrategy.REPLACE)
   suspend fun update(song: Song)
}
The above code details every query we will look to run on the music table. The role of each query will be discussed in greater depth when we use them in the code. For now, we’ll discuss Room queries more generally so you can write your own if you wish!
The first thing to note is that Room DAOs offer several readymade "convenience" methods which allow you to easily perform routine tasks. The first method we will discuss is called Insert, which adds a new entry/row to the database table. For example, the following method will insert a Song object into the music table:
@Insert(onConflict = OnConflictStrategy.IGNORE)
suspend fun insert(song: Song)
The above code references an ‘on conflict’ strategy. On conflict strategies describe how Room will handle a request where two entries have the same primary key value (remember each entry must have a unique primary key). In this instance, the on conflict strategy is IGNORE. This tells Room not to insert Song objects into the database unless they have a unique primary key. Alternative strategies include REPLACE, which replaces the previous entry for that primary key with the new information, and ABORT. The ABORT strategy is similar to IGNORE, in that conflicting entries will not be processed by Room; however, the ABORT strategy also reverses any other changes which were processed as part of the query. The ABORT strategy is typically only used for complex queries.
Other convenience methods include: Delete: which will remove a Song object from the database table:
@Delete
suspend fun delete(song: Song)
Update: will replace an entry in the database. The outgoing and incoming object must share the same primary key value; however, all other details can be different:
@Update(onConflict = OnConflictStrategy.REPLACE)
suspend fun update(song: Song)
Room databases also allow you to select and retrieve entries that meet certain conditions. For example, imagine you wanted to retrieve all the Song objects which contain a reference to "Oasis". In the music DAO we have a function that does just that called getSongsLikeSearch:
@Query("SELECT * FROM music_library WHERE song_title LIKE :search OR song_artist LIKE :search OR song_album LIKE :search")
suspend fun getSongsLikeSearch(search: String): List<Song>
The above code uses a SELECT-based query to retrieve all entries that have either a title, artist or album name containing the text specified in the "search" method parameter. The return type of the above query is a regular list of Song objects; however, sometimes you may see a live data return type (e.g. the getSongsOrderByTitle method). Live data provides a continuous stream of results that updates whenever the underlying data changes. Live data is useful for monitoring the output of a query over time, but if the query only needs to be run once then non-live data return types should be used.
SELECT-based queries can be refined further. For instance, the list of songs could be sorted in reverse alphabetical order by adding ORDER BY song_title DESC to the end of the query. Also, you can restrict the size of the list to 10 songs by adding LIMIT 10:
@Query("SELECT * FROM music_library WHERE song_title LIKE :search OR song_artist LIKE :search OR song_album LIKE :search ORDER BY song_title DESC LIMIT 10")
suspend fun getSongsLikeSearch(search: String): List<Song>
There are many different routes you can go down when writing Room queries. If you would like to learn more then you may find the official SQLite documentation useful.
The database repository
In this section, we’ll turn our attention to the database repository. The repository will process Room DAO queries and keep the underlying work of the database separate from the rest of the app. To set up the repository, create a new Kotlin class in the same folder as MainActivity.kt, name it MusicRepository and add the following code:
class MusicRepository(private val musicDao: MusicDao) {

    val allSongs: LiveData<List<Song>> = musicDao.getSongsOrderByTitle()

    suspend fun insertSong(song: Song) {
        musicDao.insert(song)
    }

    suspend fun deleteSong(song: Song) {
        musicDao.delete(song)
    }

    suspend fun updateSong(song: Song){
        musicDao.update(song)
    }

    suspend fun getSongById(songId: Long): Song? = musicDao.getSongById(songId)
}
The MusicRepository class contains a variable called allSongs that will store a list of every song in the user’s music library. The allSongs variable stores the list of songs in LiveData format, which means the contents of the variable can be observed elsewhere in the app. All observers will be notified whenever the underlying data changes, such as when songs are added or removed from the music library.
Next, several methods are defined. Each method features the suspend modifier, which means the method can be paused and resumed. Methods that feature the suspend modifier must be launched from a coroutine (a mechanism for handling tasks behind the scenes). The methods declared above perform several routine operations including inserting Song objects into the database, deleting entries, updating entries, and searching for a given entry based on its ID.
The music library and play queue view models
The database is almost fully operational. All that remains is to create a view model, which will manage data and help the app coordinate tasks. The view model will make the songs in the user’s music library available to different areas of the app and handle requests to insert, delete, and update database entries.
Create a new Kotlin class in the same folder as MainActivity.kt, name it MusicViewModel and construct the class using the following code:
import androidx.lifecycle.viewModelScope
import kotlinx.coroutines.launch

// We use AndroidViewModel so we can access the application context
class MusicViewModel(application: Application) : AndroidViewModel(application) {

   private val repository: MusicRepository
   val allSongs: LiveData<List<Song>>

   init {
       val musicDao = MusicDatabase.getDatabase(application).musicDao()
       repository = MusicRepository(musicDao)
       allSongs = repository.allSongs
   }

   fun deleteSong(song: Song) = viewModelScope.launch(Dispatchers.IO) {
       repository.deleteSong(song)
   }

   fun insertSong(song: Song) = viewModelScope.launch(Dispatchers.IO) {
       repository.insertSong(song)
   }

   fun updateSong(song: Song) = viewModelScope.launch(Dispatchers.IO) {
       repository.updateSong(song)
   }

   suspend fun getSongById(songId: Long) : Song? = repository.getSongById(songId)
}
In the above code, the init block connects to the music library repository and stores the contents of the repository's allSongs variable in a view model variable of the same name. Like the repository’s allSongs variable, the view model's allSongs variable will store the list of songs in LiveData format. This means the contents of the list will automatically update whenever the underlying data in the repository (and hence the database) changes. The remainder of the view model comprises several methods for inserting, deleting, updating and finding Song entries via the repository. The methods will be accessible to all areas of the app, so any activities or fragments looking to interact with the database can do so using the view model.
You may notice that each view model method uses viewModelScope to launch the request to the repository. The viewModelScope is a coroutine scope for running tasks on dedicated worker threads in a resource-efficient manner. If you did not use coroutines, then the app would complete the task on the main thread, which may cause the app to freeze until the work is complete. Tasks launched using viewModelScope are automatically cancelled when the view model is destroyed. If the view model is closed while an operation is ongoing then it will need to be restarted when the view model is next active.
Before we move on, there is another view model we need to create called PlayQueueViewModel. The PlayQueueViewModel view model will store information relating to the playback state such as the play queue, playback progress and duration of the currently playing song. Create a new Kotlin class in the same folder as MainActivity, name it PlayQueueViewModel and add the following code:
import android.support.v4.media.session.MediaSessionCompat.QueueItem
import android.support.v4.media.session.PlaybackStateCompat.STATE_NONE

class PlayQueueViewModel : ViewModel() {
   var playQueue = MutableLiveData<List<QueueItem>>()
   var currentQueueItemId = MutableLiveData<Long>()
   var currentlyPlayingSongMetadata = MutableLiveData<MediaMetadataCompat?>()
   var playbackDuration = MutableLiveData<Int>()
   var playbackPosition = MutableLiveData<Int>()
   var playbackState = MutableLiveData(STATE_NONE)
}
The PlaybackViewModel view model will share information relating to the current playback state across the app. All variables in the PlaybackViewModel class store data in MutableLiveData format, which like LiveData, means the variables can be observed by other areas of the app. The difference between MutableLiveData and LiveData is that MutableLiveData can be modified. Furthermore, MutableLiveDate also allows you to assign a default value. For example, the playbackState variable will have a default value of STATE_NONE, which our app will interpret as a resting state where no songs are loaded for playback.
The app toolbar menu
To help the user interact with the app, we will create a toolbar menu that allows the user to search their music library and perform other actions based on their current location in the app. The menu items will be defined in a file called main.xml, which should have been automatically generated by Android Studio. Locate and open the file by navigating through Project > app > res > menu, then replace the contents of the menu element with the following items:
The above code defines menu items for a search icon, a save button and a done button. You may notice that the save and done menu items have a visible attribute set to false. The reason for this is that those items will be hidden by default, and will only be used by certain fragments. The search icon item is not hidden because the search functionality will be available in most areas of the app. Each menu item contains a showAsAction attribute that determines whether Android should try and insert the item into the app bar itself (ifRoom) or the overflow menu (never).
The reference to the search icon @drawable/ic_search may be highlighted in red. This is because the drawable resource file (which contains the icon image) does not exist yet. We’ll address that in the next section.
Defining the drawable resources used in the project
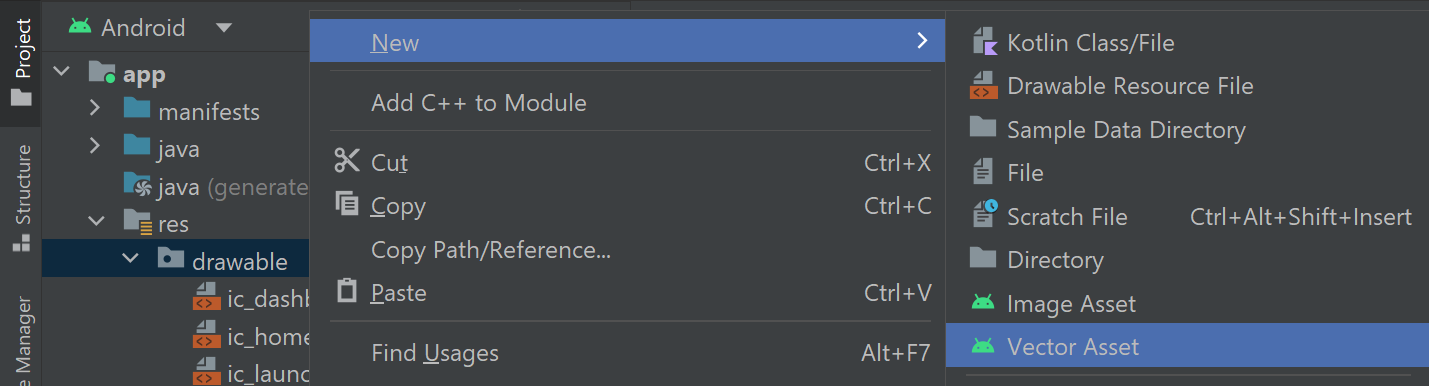
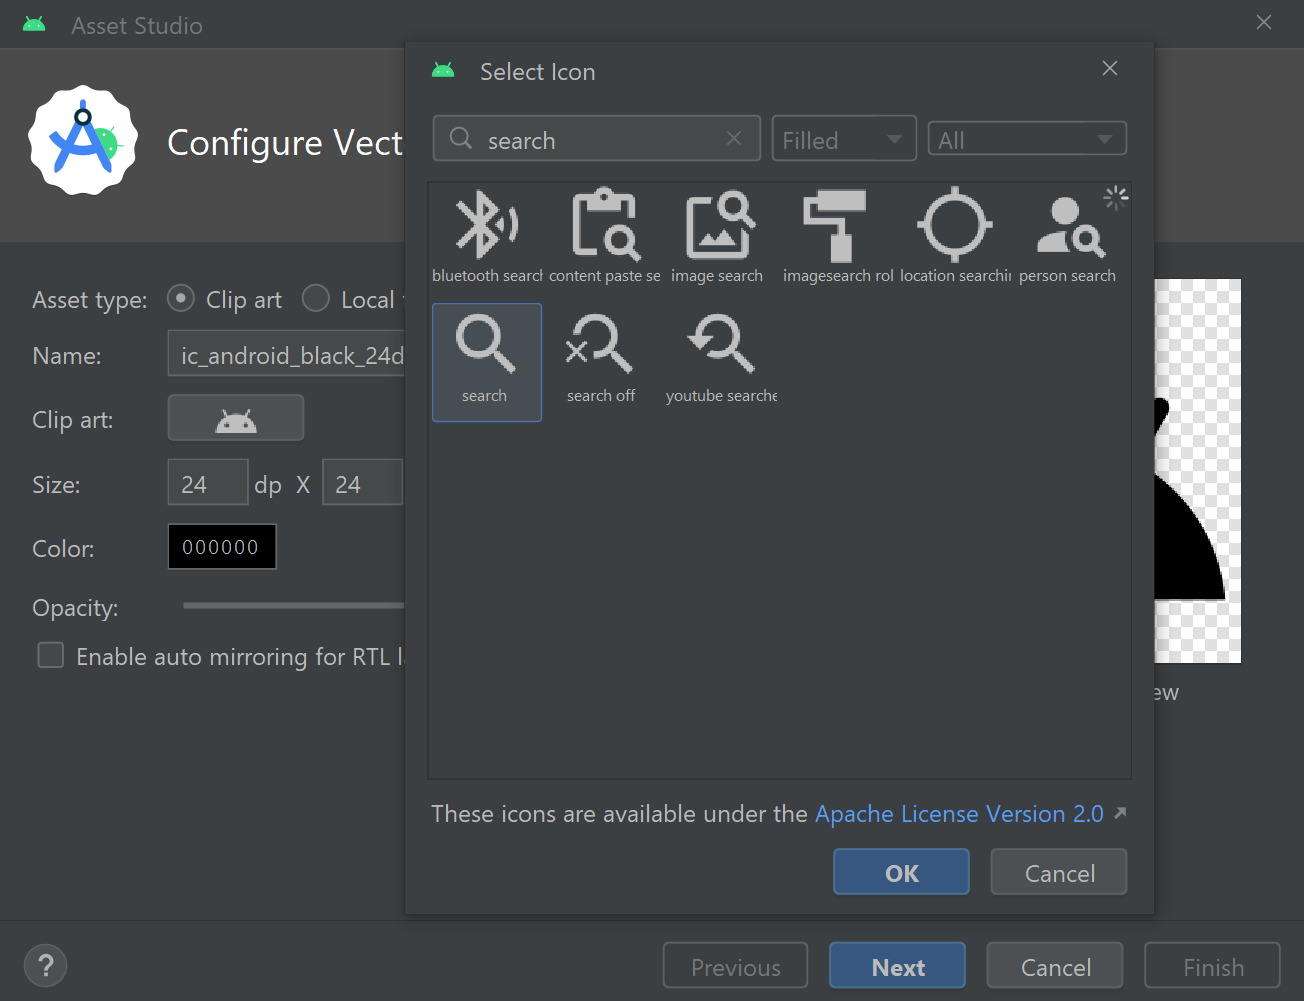
The images and icons that are used in the app must be defined as drawable resources. For example, as mentioned in the previous section, we need a drawable resource for a search icon. To create a new drawable resource, navigate through Project > app > res then right-click the drawable directory and select New > Vector Asset.
In the Configure Vector Asset window, click the clip art image then locate the search icon and click OK.
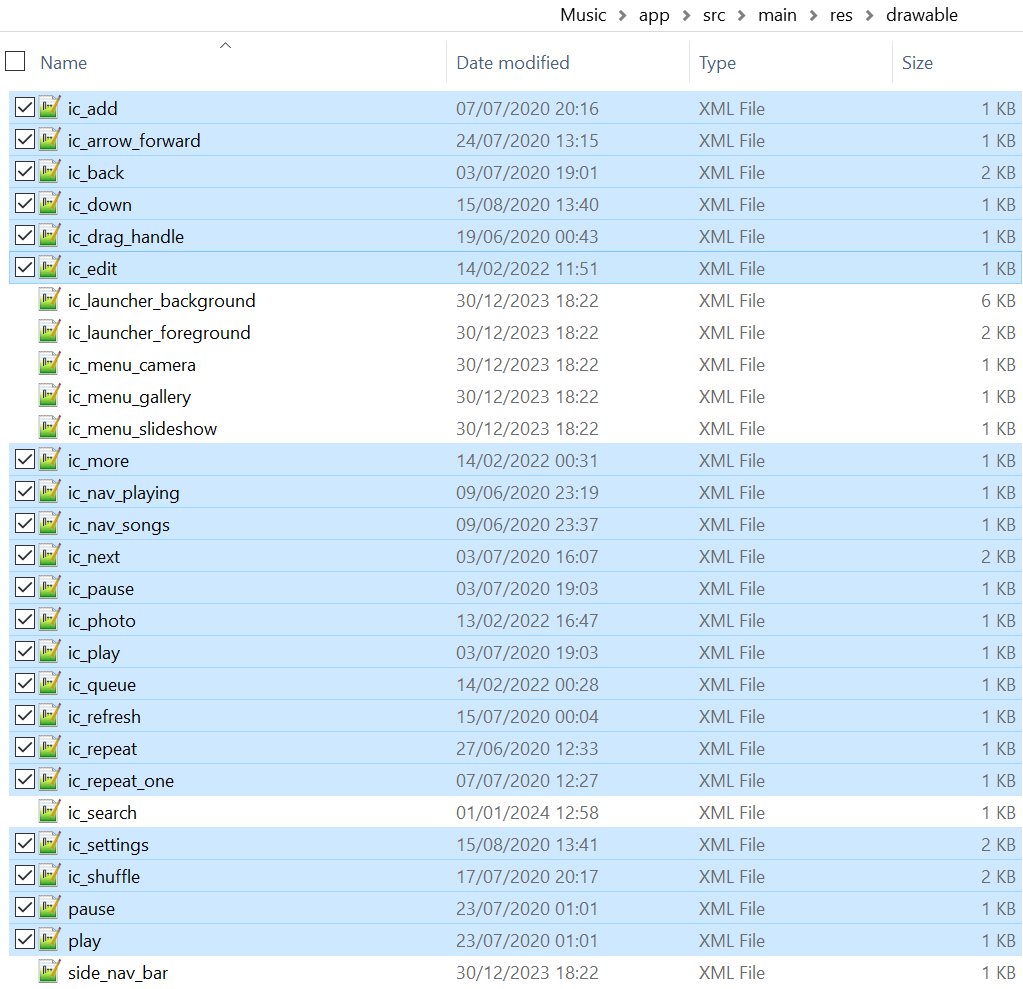
Set the name of the asset to ic_search then click Next and Finish to save the icon as a drawable resource. In this project, we will use over 20 different drawable resources. It would be quite tedious to create these resources manually so instead I would invite you to copy the source files from the example code into the drawable directory of your project. To locate the drawable files in the example code, navigate through app > src > main > res > drawable and copy the files highlighted below. You could also copy the unhighlighted files over; some are default drawable files created by Android Studio and others are custom files we will discuss later.
To copy files into your Android Studio project, simply drag and drop them into the drawable directory as shown below:
Most of the icons used in this project are open-source Material Design icons, except for the following files:
ic_play.xml
ic_pause.xml
ic_next.xml
Ic_back.xml
These icons were made by Elias Bikbulatov from www.flaticon.com and are free for commercial use with attribution.
The media browser service - part 1
The Music app will use a service to manage audio playback. The service will handle audio files, display notifications, respond to Bluetooth devices and more. To set up the service, create a new Kotlin class in the same folder as MainActivity (Project > app > java > name of the project) and name it MediaPlaybackService. Once the MediaPlaybackService.kt file is open in the editor, add the following code to initialise the class and some of its variables and methods:
import android.media.AudioManager.*
import android.os.Handler
import android.support.v4.media.session.MediaSessionCompat.QueueItem
import android.support.v4.media.session.PlaybackStateCompat.*

class MediaPlaybackService : MediaBrowserServiceCompat() {

    private val channelId = "music"
    private var currentlyPlayingQueueItemId = -1L
    private val handler = Handler(Looper.getMainLooper())
    private var mediaPlayer: MediaPlayer? = null
    private val playQueue: MutableList<QueueItem> = mutableListOf()
    private lateinit var audioFocusRequest: AudioFocusRequest
    private lateinit var mediaSessionCompat: MediaSessionCompat

    private val mediaSessionCallback: MediaSessionCompat.Callback = object : MediaSessionCompat.Callback() {
    // TODO: Playback actions will be defined here
    }

    override fun onCreate() {
        super.onCreate()

        mediaSessionCompat = MediaSessionCompat(baseContext, channelId).apply {
            setFlags(MediaSessionCompat.FLAG_HANDLES_QUEUE_COMMANDS)
            setCallback(mediaSessionCallback)
            setSessionToken(sessionToken)
            val builder = Builder().setActions(ACTION_PLAY)
            setPlaybackState(builder.build())
        }
    }

    override fun onGetRoot(clientPackageName: String, clientUid: Int, rootHints: Bundle?): BrowserRoot? {
        return if (TextUtils.equals(clientPackageName, packageName)) {
            BrowserRoot(getString(R.string.app_name), null)
        } else null
    }

    override fun onLoadChildren(parentId: String, result: Result<List<MediaBrowserCompat.MediaItem>>) {
        result.sendResult(null)
    }
}
In the above code, the MediaPlaybackService class extends the MediaBrowserServiceCompat class, which will provide the MediaPlaybackService class with all the data required to behave as a media browser service and coordinate media playback. When the service starts, the onCreate stage of the service lifecycle will run. In the above code, we override the onCreate method and initialise a variable called mediaSessionCompat. The mediaSessionCompat variable contains an instance of the MediaSessionCompat class, which handles playback-related processes. First, the MediaSessionCompat instance is linked with a callback variable called mediaSessionCallback, which we will later configure to support playback functions such as play, pause, skip forward etc. Next, we assign the MediaSessionCompat instance a session token, which identifies the media session and allows us to coordinate session processes such as notifications. Finally, the playback state of the service is set to an instance of PlaybackStateCompat.Builder with an action of “ACTION_PLAY”, which prepares the service to commence playback.
After the onCreate method, we implement two methods called onGetRoot and onLoadChildren. Both methods are mandatory when extending the MediaBrowserServiceCompat class, however, we will not use them in the Music app. Typically, the onGetRoot method would return information about the service client, while the onLoadChildren method returns data about a media item’s child elements.
In the onCreate method, we will also initialise a “noisy receiver”. The noisy receiver will detect changes to how audio is broadcast, such as when headphones are disconnected and audio might otherwise sound from the device. Typically, users would expect a Music app to stop playback when headphones are disconnected, so we should implement this functionality. To do this, add the following code to the end of the onCreate method:
val filter = IntentFilter(ACTION_AUDIO_BECOMING_NOISY)
registerReceiver(noisyReceiver, filter)
The above code registers a broadcast receiver to the service that will detect notifications from the device that audio is about to become noisy. To define how the service will respond to incoming notifications, add the following broadcast receiver variable to the top of the class:
private val noisyReceiver = object : BroadcastReceiver() {
   override fun onReceive(context: Context, intent: Intent) {
       if (mediaPlayer != null && mediaPlayer!!.isPlaying) mediaSessionCallback.onPause()
   }
}
Broadcast receivers feature a method called onReceive, which determines how the broadcast receiver will respond to incoming notifications. In this case, the broadcast receiver will respond to audio becoming noisy, so we use the onReceive method to pause the media player if playback is in progress.
Moving on, let’s define the playback actions that will be coordinated by the MediaSessionCompat callback. Locate the mediaSessionCallback variable and replace the TODO comment with the following code:
Note you may need to add the following import to the top of the file:
import android.view.KeyEvent
The onMediaButtonEvent callback method defines how the service will respond to buttons on external hardware such as Bluetooth earphones. Each type of button and action is linked with a keyCode and the above method links these keyCodes with the appropriate response. For example, the KEYCODE_MEDIA_PLAY keyCode initiates playback via the onPlay method (which we’ll define shortly). You can find a full list of media keyCodes in the official Android documentation.
To define the callback method that prepares audio files for playback, add the following code below the onMediaButtonEvent method:
override fun onPrepare() {
   super.onPrepare()

   if (playQueue.isEmpty()) {
       onError(mediaPlayer, MEDIA_ERROR_UNKNOWN, 0)
       return
   }

   // If no queue item ID has been set, then start from the beginning of the play queue
   if (currentlyPlayingQueueItemId == -1L) currentlyPlayingQueueItemId = playQueue[0].queueId

   mediaPlayer?.apply {
       stop()
       release()
   }

   try {
       val currentQueueItem = getCurrentQueueItem()
       val currentQueueItemUri = currentQueueItem?.description?.mediaId?.let {
           ContentUris.withAppendedId(
               MediaStore.Audio.Media.EXTERNAL_CONTENT_URI,
               it.toLong())
       }
       if (currentQueueItemUri == null) {
           onError(mediaPlayer, MEDIA_ERROR_UNKNOWN, MEDIA_ERROR_MALFORMED)
           return
       }
       mediaPlayer = MediaPlayer().apply {
           setAudioAttributes(
               AudioAttributes.Builder()
               .setUsage(AudioAttributes.USAGE_MEDIA)
               .setContentType(AudioAttributes.CONTENT_TYPE_MUSIC)
               .build()
           )
           setDataSource(application, currentQueueItemUri)
           setOnErrorListener(this@MediaPlaybackService)
           prepare()
       }
       // Refresh the notification and metadata so the user can see the song has changed
       setCurrentMetadata()
       refreshNotification()
       setMediaPlaybackState(STATE_NONE)
   } catch (_: IOException) {
       onError(mediaPlayer, MEDIA_ERROR_UNKNOWN, MEDIA_ERROR_IO)
   } catch (_: IllegalStateException) {
       onError(mediaPlayer, MEDIA_ERROR_UNKNOWN, MEDIA_ERROR_IO)
   } catch (_: IllegalArgumentException) {
       onError(mediaPlayer, MEDIA_ERROR_UNKNOWN, MEDIA_ERROR_MALFORMED)
   }
}
The onPrepare method will prepare the service for the playback of a new song. In the above code, we first check that the play queue contains items. If the play queue is empty, then an error will be raised using a method called onError which we will discuss shortly. Next, if the media player has already been initialised, then we use the media player’s stop and release methods to remove the previously loaded song. We will load a new song based on its content URI, which is a path to the song on the device’s media store. To generate a content URI for an audio file, we simply need to append the song’s media store ID to the relevant content URI prefix. In this case, the media store ID will be packaged in the description of the play queue item, and the content URI prefix for the device’s audio media store can be retrieved from the constant EXTERNAL_CONTENT_URI. A completed content URI would read similar to the following content://media/external/audio/media/271.
The song’s content URI is loaded into an instance of the MediaPlayer class using the setDataSource method. We also specify that the MediaPlaybackService class will handle any playback errors and prime the media player for playback using the prepare method. Finally, we run several methods that we will define shortly called setCurrentMetadata, refreshNotification and setMediaPlaybackState. Collectively, these methods will prepare the metadata for the currently playing song, refresh the media player notification with the new metadata so the user can see the song has changed, and update the playback state.
Much of the code in the onPrepare method is wrapped in a try block to catch errors that may occur when the MediaPlayer instance is being prepared. For example, the media player may be in an illegal state or the audio file may not be accessible. If a problem occurs, then a method called onError will reset the media player and notify the user. When designing try/catch blocks yourself, you can find a list of potential exceptions (errors) that the methods you’re using may throw in the Android documentation. For example, a list of exceptions that the setDataSource method can throw is listed in the official Android documentation).
The service will use a convenience method called getCurrentQueueItem to retrieve the QueueItem object for the currently playing song. To define the getCurrentQueueItem method, add the following code to the service class:
The above code uses Kotlin’s find function to search the playQueue list for a QueueItem element with a queueId value matching the currentlyPlayingQueueItemId variable. If a match is found then the QueueItem object is returned. Otherwise, null is returned.
The MediaPlaybackService class must be capable of handling errors. To facilitate this, modify the MediaPlaybackService class declaration so it extends the MediaPlayer class’s OnErrorListener interface, as shown below:
class MediaPlaybackService : MediaBrowserServiceCompat(), MediaPlayer.OnErrorListener {
To extend the OnErrorListener interface successfully, we must implement a method called onError. To achieve this, add the following code below the onCreate method:
The onError method requires three parameters to be supplied: the MediaPlayer instance associated with the error (or null if no MediaPlayer instance is involved); the type of media error that has occurred, which can be either MEDIA_ERROR_UNKNOWN for unspecified errors or MEDIA_ERROR_SERVER_DIED for server errors that require the media player to be recreated; and an extra error-specific code. From referring to the documentation for the OnErrorListener interface, we can see the error-specific code can be one of several values including MEDIA_ERROR_IO, MEDIA_ERROR_MALFORMED, MEDIA_ERROR_UNSUPPORTED and MEDIA_ERROR_TIMED_OUT. You could use the error code to determine the cause of the error and respond accordingly.
In this app, we will respond to all media player errors in the same way. The onError method defined above sets the playback state to STATE_ERROR, stops playback, and displays an error message to the user via a Toast notification. Also, the media browser service is removed from the foreground state using a method called stopForeground with a parameter of STOP_FOREGROUND_REMOVE. Removing the service from the foreground in this way closes the media player notification and signals to the device that the service can be closed if processing power needs to be reallocated elsewhere.
The playback state of the service should be broadcast to the other areas of the app so the user interface can be updated and other application processes can respond accordingly. Changes in playback state will be handled by a method called setMediaPlaybackState, which you can define by adding the following code below the getCurrentQueueItem method:
private fun setMediaPlaybackState(state: Int, bundle: Bundle? = null) {
   val playbackPosition = mediaPlayer?.currentPosition?.toLong() ?: 0L
   val playbackSpeed = mediaPlayer?.playbackParams?.speed ?: 0f
   val playbackStateBuilder = Builder()
       .setState(state, playbackPosition, playbackSpeed)
       .setActiveQueueItemId(currentlyPlayingQueueItemId)
   bundle?.let { playbackStateBuilder.setExtras(it) }
   mediaSessionCompat.setPlaybackState(playbackStateBuilder.build())
}
The setMediaPlaybackState method sets the playback state to the desired value and also attaches any extra data such as the current playback position, playback speed and extras bundle. Later in the project, we will configure the MainActivity class to respond to changes in the playback state and execute any necessary actions such as preparing a song for playback and updating the user interface (e.g. updating the playback progress, toggling the play/pause button etc.).
The media browser service - part 2
Let’s now return to the mediaSessionCallback variable and continue to define the media player callback actions. To handle requests to initiate or resume playback, add the following code below the onPrepare method:
The onPlay method begins by building an instance of the AudioFocusRequest class to request audio focus from the device’s audio manager. Applications that wish to play media should always request audio focus to prevent multiple applications from playing media simultaneously. For example, if the user is listening to a podcast in another app and then attempts to play a song in our app, our app should request audio focus from the podcast app. Upon losing audio focus, the losing application should stop playback. Audio focus changes can also be transient, such as if the gaining application only requires audio focus briefly. For example, a Maps application may require transient audio focus to provide directions to the user. In this case, the losing application could respond by turning its volume down until full audio focus is restored.
The Music app will respond to audio focus changes via an onAudioFocusChange listener that we attach to the AudioFocusRequest object. To define the onAudioFocusChange listener, add the following code to the list of variables at the top of the class:
The above code defines how the service should respond to changes in audio focus. If the app loses audio focus then the service will pause the media playback. However, if the audio focus loss is transient and the gaining application signals that our app can lower its output volume (a process referred to as “ducking”) then the service will do that instead of pausing playback. Whenever our app gains or restores audio focus, the service will set the output volume back to full.
Continuing with the onPlay method, if the app has been granted audio focus, then playback is initiated on the audio file that was loaded into the media player by the onPrepare method. Next, the notification is refreshed (to ensure the correct play/pause button is displayed) and the playback state is updated. The call to setMediaPlaybackState will also include an extras bundle, which will be returned by a method called getBundleWithSongDuration. The reason for this is that we are starting to play a new song, so it would be useful to let areas of the app that are observing the media service know how long the song is. To define the getBundleWithSongDuration method, add the following code below the setMediaPlaybackState method:
private fun getBundleWithSongDuration(): Bundle {
   val playbackDuration = mediaPlayer?.duration ?: 0
   return Bundle().apply {
       putInt("duration", playbackDuration)
   }
}
After initiating playback using the MediaPlayer’s start method, we can also define an onCompletion listener, which will determine what action the media player should take once playback is complete. To do this, replace the TODO comment in the onPlay method with the following code:
The onCompletion listener will run whenever a song finishes. In this case, the next song to play is determined based on the active repeat mode preference. If the repeat mode is set to REPEAT_MODE_ONE, then the currently playing song will be reloaded and played again. Meanwhile, if the repeat mode is set to REPEAT_MODE_ALL or there are further songs in the play queue, then the onSkipToNext method will skip to the next song in the play queue (or restart the play queue from the beginning if appropriate). Finally, if none of the above conditions apply, then this means there are no further songs in the play queue and the repeat mode is set to REPEAT_MODE_NONE. In this case, playback will stop and no further songs will be loaded.
Moving on, let’s handle requests to pause playback. To do this, add the following code below the onPlay method:
override fun onPause() {
   super.onPause()
   mediaPlayer?.pause()
   setMediaPlaybackState(STATE_PAUSED, getBundleWithSongDuration())
   refreshNotification()
}
The above code pauses the media player and sets the playback state of the service to STATE_PAUSE. Also, the refreshNotification method is run to refresh the notification and replace the pause button with a play button, so the user can resume playback from the notification bar if they wish.
Next, add the following code below the onPause method to handle requests to skip to a given play queue item based on its ID:
override fun onSkipToQueueItem(id: Long) {
   super.onSkipToQueueItem(id)

   if (playQueue.find { it.queueId == id} != null) {
       val playbackState = mediaSessionCompat.controller.playbackState.state
       currentlyPlayingQueueItemId = id
       onPrepare()
       if (playbackState == STATE_PLAYING || playbackState == STATE_SKIPPING_TO_NEXT) {
           onPlay()
       }
   }
}
The onSkipToQueueItem method uses Kotlin’s find function to search the playQueue list for a queue item with the supplied queue ID. If a match is found, then the queue ID is set as the current playing queue item ID and the onPrepare method is called to load the song into the service. If playback was in progress when the onSkipToQueueItem method was called, then the newly loaded song will be played instead.
Moving on, add the following methods to handle requests to skip to the next and previous tracks in the play queue:
override fun onSkipToNext() {
   super.onSkipToNext()

   val repeatMode = mediaSessionCompat.controller.repeatMode
   currentlyPlayingQueueItemId = when {
       playQueue.isNotEmpty() &&
               playQueue[playQueue.size - 1].queueId != currentlyPlayingQueueItemId -> {
           val indexOfCurrentQueueItem = playQueue.indexOfFirst {
               it.queueId == currentlyPlayingQueueItemId
           }
           playQueue[indexOfCurrentQueueItem + 1].queueId
       }
       // We are at the end of the queue. Check whether we should start over from the beginning
       repeatMode == REPEAT_MODE_ALL -> playQueue[0].queueId
       else -> return
   }

   onSkipToQueueItem(currentlyPlayingQueueItemId)
}

override fun onSkipToPrevious() {
   super.onSkipToPrevious()

   if (playQueue.isNotEmpty()) {
       if (mediaPlayer != null && mediaPlayer!!.currentPosition > 5000 ||
                   currentlyPlayingQueueItemId == playQueue[0].queueId) onSeekTo(0L)
       else {
           val indexOfCurrentQueueItem = playQueue.indexOfFirst {
               it.queueId == currentlyPlayingQueueItemId
           }
           currentlyPlayingQueueItemId = playQueue[indexOfCurrentQueueItem - 1].queueId
           onSkipToQueueItem(currentlyPlayingQueueItemId)
       }
   }
}
The onSkipToNext and onSkipToPrevious methods are similar but perform opposing actions. The onSkipToNext method loads the next item in the play queue, or returns to the first item of the play queue if we have reached the end and the repeat mode is set to REPEAT_MODE_ALL. Meanwhile, the onSkipToPrevious method will load the previous song in the play queue, or restart the current song if there are no previous elements. Importantly, the onSkipToPrevious method contains additional code to check whether the media player has progressed further than five seconds into the current song. If more than five seconds have elapsed, then the onSkipToPrevious method will restart the current song rather than skip back to the previous track.
The next method we’ll cover is onStop, which will handle requests to stop playback:
override fun onStop() {
   super.onStop()

   playQueue.clear()
   mediaSessionCompat.setQueue(playQueue)
   currentlyPlayingQueueItemId = -1L
   if (mediaPlayer != null) {
       mediaPlayer?.stop()
       mediaPlayer?.release()
       mediaPlayer = null
       stopForeground(STOP_FOREGROUND_REMOVE)
       try {
           val audioManager = getSystemService(Context.AUDIO_SERVICE) as AudioManager
           audioManager.abandonAudioFocusRequest(audioFocusRequest)
       } catch (_: UninitializedPropertyAccessException){ }
   }
   setMediaPlaybackState(STATE_STOPPED)
   stopSelf()
}
The onStop method defined above will run when the play queue has ended or the app is closed and the service must shut down. It clears the play queue, stops and resets the media player, removes the media player notification, abandons the media focus, and sets the playback state to STATE_STOPPED. The code that abandons the audio focus is wrapped in a try/catch block because there is a chance the service could be opened and closed before audio focus is granted. Finally, the above code terminates the media player service using the stopSelf method.
The next callback method we will define is onSeekTo, which will handle requests to seek a specific playback position. To define the onSeekTo method, add the following code below the onStop method:
override fun onSeekTo(pos: Long) {
   super.onSeekTo(pos)

   mediaPlayer?.apply {
       if (pos > this.duration.toLong()) return@apply

       val wasPlaying = this.isPlaying
       if (wasPlaying) this.pause()

       this.seekTo(pos.toInt())

       if (wasPlaying) {
           this.start()
           setMediaPlaybackState(STATE_PLAYING, getBundleWithSongDuration())
       } else setMediaPlaybackState(STATE_PAUSED, getBundleWithSongDuration())
   }
}
The onSeekTo method will set the playback position of the media player to the value specified in the method’s pos argument. The code which performs this action is wrapped in a let block based on the mediaPlayer variable, which means the code will only run if the MediaPlayer instance is not null. It is important to wrap the code in a let block because attempts to interact with a null variable could throw an exception. If the song is currently playing then it must be temporarily paused while the playback position is changed because the audio may become distorted. The new playback position is conveyed to other areas of the app by updating the playback state.
For the final part of this section, we will define two implementations of a callback method called onAddQueueItem, which will handle requests to add a song to the play queue. The first implementation will just accept details about the song to add, while the second implementation will also accept a position within the play queue where the song should be added. To define both implementations, add the following code below the onSeekTo method:
Both implementations of the onAddQueueItem method accept a MediaDescriptionCompat object as a parameter. MediaDescriptionCompat objects contain information about a song’s metadata. The second implementation also accepts an index parameter, which details the position in the play queue that the song should be added to. The first implementation calls the second implementation and passes the size of the play queue as the index parameter, which essentially adds the song to the end of the play queue.
The second implementation of the onAddQueueItem method handles the addition of elements to the play queue. It starts by determining a suitable play queue ID. Priority will be given to any play queue ID that is supplied in an extras bundle with the MediaDescriptionCompat object. For example, when restoring the play queue after the app has been restarted, it will be important to ensure the songs have the correct queue IDs in case the play queue needs to be shuffled and unshuffled.
If no pre-existing play queue ID has been supplied (or the supplied queue ID is already in use) then the next available queue ID will be used instead. The next available queue ID is determined by sorting the play queue in order of queue ID using Kotlin’s sortByDescending function, then adding 1 to the highest ID. Once the play queue ID has been set, a QueueItem object is assembled using the queue ID and MediaDescriptionCompat object. The QueueItem object is then added to the play queue at the position specified in the onAddQueueItem method’s index parameter. If the supplied index exceeds the length of the play queue, then an IndexOutOfBounds exception will be thrown. In this case, the QueueItem is added to the next available space at the end of the play queue.
The media browser service - part 3
In this section, we will continue to work on the media browser service and enable further functionality. For example, during playback, the service should regularly communicate the playback progress to the MainActivity class. The MainActivity class can use the playback position data to update a playback progress bar that will feature with the playback controls. To monitor the playback position, we will create a Runnable object that checks the playback progress at regular intervals. The Runnable object will be stored in a variable called playbackPositionRunnable, which you can define by adding the following code to the list of variables at the top of the MediaPlaybackService class:
private var playbackPositionRunnable = object : Runnable {
   override fun run() {
       try {
           if (mediaPlayer?.isPlaying == true) setMediaPlaybackState(STATE_PLAYING)
       } finally {
           handler.postDelayed(this, 1000L)
       }
   }
}
The Runnable object defined above contains a callback method called run that will repeat at regular intervals. The run method retrieves the playback position of the currently playing song from the media player and communicates it to other areas of the app by updating the playback state. An if expression ensures the playback state is only updated when playback is in progress because it is not necessary to send progress updates if playback is paused or stopped. Once the playback state has been updated, the Handler class’s postDelayed method schedules the Runnable task to run again after a 1000 ms delay. Altogether, the above code dispatches progress updates once per second during playback.
To initiate the Runnable task when the service is launched, add the following code to the bottom of the onCreate method:
playbackPositionRunnable.run()
Moving on, we will now define a method called setCurrentMetadata that will process the metadata associated with the currently playing song. To define the setCurrentMetadata method, add the following code below the getBundleWithSongDuration method:
private fun setCurrentMetadata() {
   val currentQueueItem = getCurrentQueueItem() ?: return
   val currentQueueItemDescription = currentQueueItem.description
   val metadataBuilder= MediaMetadataCompat.Builder().apply {
       putString(MediaMetadataCompat.METADATA_KEY_MEDIA_ID, currentQueueItemDescription.mediaId)
       putString(MediaMetadataCompat.METADATA_KEY_TITLE, currentQueueItemDescription.title.toString())
       putString(MediaMetadataCompat.METADATA_KEY_ARTIST, currentQueueItemDescription.subtitle.toString())
       val extras = currentQueueItemDescription.extras
       val albumName = extras?.getString("album") ?: "Unknown album"
       putString(MediaMetadataCompat.METADATA_KEY_ALBUM, albumName)
       val albumId = extras?.getString("album_id")
       putBitmap(MediaMetadataCompat.METADATA_KEY_ALBUM_ART, getArtworkByAlbumId(albumId))
       putString(MediaMetadataCompat.METADATA_KEY_ALBUM_ART_URI, albumId)
   }
   mediaSessionCompat.setMetadata(metadataBuilder.build())
}
The above code defines the metadata for the currently playing song, which includes information about the song’s title, artist, album and artwork. These details are all based on data that is packaged with the currently playing queue item. The album artwork will be retrieved using a method called getArtworkByAlbumId, which can be defined by adding the following code below the setCurrentMetadata method:
private fun getArtworkByAlbumId(albumId: String?): Bitmap {
   albumId?.let {
       try {
           val directory = ContextWrapper(applicationContext).getDir("albumArt", Context.MODE_PRIVATE)
           val imageFile = File(directory, "$albumId.jpg")
           if (imageFile.exists()) {
               return BitmapFactory.decodeStream(FileInputStream(imageFile))
           }
       } catch (_: Exception) { }
   }
   // If an error has occurred or the album ID is null, then return a default artwork image
   return BitmapFactory.decodeResource(applicationContext.resources, R.drawable.ic_launcher_foreground)
}
The getArtworkByAlbumId method searches the albumArt directory in the app’s internal files for an image associated with the album ID of the currently playing song. If a matching file is found, then the image is decoded as a Bitmap, which is an image representation that can be used elsewhere in the app. Meanwhile, if no matching file is found, then a FileNotFound exception will occur. In this case, the app launcher icon (the drawable resource called ic_launcher_foreground) will be used instead as a fallback image.
The returned Bitmap will be attached to the currently playing song’s metadata and used in the media player notification. The notification will contain the details of the currently playing song (as specified in the metadata) and some action buttons to allow the user to pause, play and skip the current song.
To render the notification, add the following code below the getArtworkByAlbumId method:
private fun refreshNotification() {
   val isPlaying = mediaPlayer?.isPlaying ?: false
   val playPauseIntent = if (isPlaying) {
       Intent(applicationContext, MediaPlaybackService::class.java).setAction("pause")
   } else Intent(applicationContext, MediaPlaybackService::class.java).setAction("play")
   val nextIntent = Intent(applicationContext, MediaPlaybackService::class.java).setAction("next")
   val prevIntent = Intent(applicationContext, MediaPlaybackService::class.java).setAction("previous")

   val intent = packageManager
       .getLaunchIntentForPackage(packageName)
       ?.setPackage(null)
       ?.setFlags(Intent.FLAG_ACTIVITY_NEW_TASK or Intent.FLAG_ACTIVITY_RESET_TASK_IF_NEEDED)
   val activityIntent = PendingIntent.getActivity(applicationContext, 0, intent, PendingIntent.FLAG_IMMUTABLE)

   val builder = NotificationCompat.Builder(applicationContext, channelId).apply {
       val mediaMetadata = mediaSessionCompat.controller.metadata

       // Previous button
       addAction(
           NotificationCompat.Action(R.drawable.ic_back, getString(R.string.play_prev),
               PendingIntent.getService(applicationContext, 0, prevIntent, PendingIntent.FLAG_IMMUTABLE)
           )
       )

       // Play/pause button
       val playOrPause = if (isPlaying) R.drawable.ic_pause
       else R.drawable.ic_play
       addAction(
           NotificationCompat.Action(playOrPause, getString(R.string.play_pause),
               PendingIntent.getService(applicationContext, 0, playPauseIntent, PendingIntent.FLAG_IMMUTABLE)
           )
       )

       // Next button
       addAction(
           NotificationCompat.Action(R.drawable.ic_next, getString(R.string.play_next),
               PendingIntent.getService(applicationContext, 0, nextIntent, PendingIntent.FLAG_IMMUTABLE)
           )
       )

       setStyle(androidx.media.app.NotificationCompat.MediaStyle()
           .setShowActionsInCompactView(0, 1, 2)
           .setMediaSession(mediaSessionCompat.sessionToken)
       )

       val smallIcon = if (isPlaying) R.drawable.play
       else R.drawable.pause
       setSmallIcon(smallIcon)

       setContentIntent(activityIntent)

       // Add the metadata for the currently playing track
       setContentTitle(mediaMetadata.getString(MediaMetadataCompat.METADATA_KEY_TITLE))
       setContentText(mediaMetadata.getString(MediaMetadataCompat.METADATA_KEY_ARTIST))
       setLargeIcon(mediaMetadata.getBitmap(MediaMetadataCompat.METADATA_KEY_ALBUM_ART))

       // Make the transport controls visible on the lockscreen
       setVisibility(NotificationCompat.VISIBILITY_PUBLIC)
       priority = NotificationCompat.PRIORITY_DEFAULT
   }
   // Display the notification and place the service in the foreground
   startForeground(1, builder.build())
}
Note you may need to add the following import statement to the top of the file:
import androidx.core.app.NotificationCompat
The notification will feature playback control buttons that the user can interact with. If the user clicks a button, then an intent will be sent from the notification to the media browser service. For example, if the user presses the pause button then an intent will be dispatched with an action of “pause”, which will direct the service to pause playback. Likewise, the skip forward, skip back and play buttons are associated with intent actions that the service can use to determine the appropriate response.
In addition to the buttons, the notification itself has an intent assigned to it, as defined in the activityIntent variable. When clicked, the notification should return the user to the application. To achieve this, the getLaunchIntentForPackage method finds the launcher activity for the application package. If you refer to the AndroidManifest.xml file (Project > app > manifests), you will see the MainActivity activity is assigned the LAUNCHER category. The intent is also assigned the flags FLAG_ACTIVITY_NEW_TASK and FLAG_ACTIVITY_RESET_TASK_IF_NEEDED, which means the intent will bring the MainActivity activity to the foreground above any other apps that may be running. In other words, if another application is in the foreground and the user clicks the notification, the Music app will become the foreground application again.
The notification is assembled using a NotificationCompat class builder. The builder will direct the notification to launch using the “music” channel ID. The channel ID helps the application monitor the notifications it is responsible for. The notification builder proceeds to define the skip pack, play/pause and skip forward buttons and set the style of the notification to a MediaStyle object. The MediaStyle object is a readymade style package that automatically defines the notification layout and adjusts the notification colour scheme to contrast the album artwork bitmap that is loaded into the notification using the setLargeIcon method.
In addition to defining a large icon, which will occupy the main body of the notification, you can also specify a small icon. The small icon will appear in the notification bar and top left corner of the notification itself. For this app, the small icon will be either a play symbol or a pause symbol based on whether playback is in progress. The name and artist of the currently playing song will be loaded into the notification using the setContentTitle and setContentText commands, respectively. Also, the notification visibility is set to public to ensure the notification is always visible in the notification bar, even when the screen is locked. Finally, once all of the notification details have been set, the notification is launched using the startForeground method.
As discussed, the notification contains playback control buttons that fire an intent when clicked. The service detects incoming intents via its onStartCommand method, so add the following code below the onError method to handle the different notification actions:
The above code uses a when block to respond to the various intent actions. For example, if the notification’s play button is pressed then the action will be “play”. The when block will respond to the play intent action by running the service’s onPlay method and commencing playback.
The last thing we need to do is define what happens when the service is destroyed. To do this, add the following code below the onStartCommand method:
The onDestroy method refers to a stage of the service lifecycle that occurs when the service is shut down. In this instance, we direct the onDestroy method to cancel any playback progress updates that had been scheduled with the Handler instance. Also, the noisy broadcast receiver, media session and notification manager are closed so they do not continue to consume computational resources.
Interacting with the media browser service
The majority of the application’s interactions with the media browser service will occur via the MainActivity class. For example, the MainActivity class will change the currently playing song, update the user interface and respond to user interactions. To begin, open the MainActivity.kt file (Project > app > java > name of the project) and add the following variables under the binding variable at the top of the class:
private var currentPlaybackPosition = 0
private var currentPlaybackDuration = 0
private var currentQueueItemId = -1L
private var playQueue = listOf<QueueItem>()
private val playQueueViewModel: PlayQueueViewModel by viewModels()
private lateinit var mediaBrowser: MediaBrowserCompat
Note you may need to add the following import statement to the top of the file:
The above variables provide the MainActivity class access to several features including the playback position, duration and queue ID for the currently playing song; the play queue; the PlaybackViewModel view model that will store information relating to media playback; an instance of the MediaBrowserCompat class that can interact with the media browser service; and an instance of the SharedPreferences class that can manage the user’s preferences. Several of the variables use the lateinit modifier, which means they have not been initialised but should be treated as non-null.
When the MainActivity activity is launched, we should initialise the mediaBrowser variable. To do this, add the following code to the bottom of the onCreate method:
The above code builds an instance of the MediaBrowserCompat class. The MediaBrowserCompat instance will be associated with the media browser service we created earlier and a Callback object variable called connectionCallbacks. The Callback object will respond to the different media browser service connection states (connected, disconnected etc.). To define the Callback object, add the following code to the list of variables at the top of the class:
private val connectionCallbacks = object : MediaBrowserCompat.ConnectionCallback() {
   override fun onConnected() {
       super.onConnected()

       mediaBrowser.sessionToken.also { token ->
           val mediaControllerCompat = MediaControllerCompat(this@MainActivity, token)
           MediaControllerCompat.setMediaController(this@MainActivity, mediaControllerCompat)
       }

       MediaControllerCompat.getMediaController(this@MainActivity)
           .registerCallback(controllerCallback)
   }
}
The MediaBrowserCompat.ConnectionCallback object defined above contains a method called onConnected that will run when a connection with the media browser service is established. The onConnected method retrieves the media browser service’s session token and uses it to register a MediaControllerCompat.Callback object. The Callback object will monitor the media session and respond to media button actions (play, pause, skip forward etc.) and changes in playback state and media metadata. To define the MediaControllerCompat.Callback object, add the following code below the connectionCallbacks variable:
The MediaControllerCompat.Callback object will monitor the playback state and metadata updates that are dispatched from the media browser service. For example, each time the playback state changes, the onPlaybackStateChanged callback method uses a when block to determine the appropriate response:
STATE_PLAYING or STATE_PAUSED - the current playback position and song duration are extracted from the PlaybackStateCompat object and uploaded to the PlaybackViewModel view model. The playback position can be extracted from the PlaybackStateCompat object directly, whereas the duration must be extracted from the extras bundle under the “duration” key (refer to the getBundleWithSongDuration method in the MediaBrowserService class to see how the duration is packaged in the extras bundle).
STATE_STOPPED - the playback position, duration and metadata are cleared because playback has ended.
STATE_ERROR - a playback error has occurred, so MainActivity will run a method called refreshMusicLibrary (that we’ll define later) to scan the device for music library updates. This may help if the cause of the error is an audio file being moved or deleted.
The MediaControllerCompat.Callback object also contains a method called onMetadataChanged, which will run whenever the metadata associated with the currently playing song changes. In this case, the new metadata is dispatched to the PlayQueueViewModel view model. Also, if the media ID of the currently playing song has changed, then the playback position is reset to zero, as the active song has changed so any playback progress is lost.
Moving on, you may recall the media browser service will display a notification containing the details of the currently playing song. This notification will be broadcast through a notification channel with a channel ID of “music”. The MainActivity activity needs to initialise the notification channel before it can be used by the media browser service. To handle this, add the following code below the onSupportNavigateUp method in the MainActivity class:
private fun createChannelForMediaPlayerNotification() {
   val channel = NotificationChannel(
       "music", "Notifications",
       NotificationManager.IMPORTANCE_DEFAULT
   ).apply {
       description = "All app notifications"
       setSound(null, null)
       setShowBadge(false)
   }
   val notificationManager = getSystemService(Context.NOTIFICATION_SERVICE) as NotificationManager
   notificationManager.createNotificationChannel(channel)
}
The createChannelForMediaPlayerNotification method creates a channel through which notifications can be broadcast. It also defines the characteristics of the notification. For example, the setSound method is run using null values for the sound and audioAttributes arguments, which prevents a sound from playing when the notification appears. Otherwise, there would be an alert noise each time the notification is changed. To create the notification channel when the app is launched, add the following line of code to the bottom of the onCreate method:
createChannelForMediaPlayerNotification()
We need to disconnect the media browser service when the app is closed. For this purpose, we will instruct the MainActivity activity to close the service when it enters the onDestroy stage of the activity lifecycle. To arrange this, add the following code below the onSupportNavigateUp method:
The MainActivity class is now equipped to connect and disconnect from the media browser service, respond to playback state and metadata changes, and create a notification channel for playback notifications to be broadcast.
For the final part of this section, we will configure the volume control stream to support music playback. Add the following code to the MainActivity.kt file (Project > app > java > name of the project) below the onCreate method:
override fun onResume() {
   super.onResume()
   volumeControlStream = AudioManager.STREAM_MUSIC
}
The onResume method refers to a stage of the Android activity lifecycle that runs when the activity is ready to handle user interactions. In the above code, we set the activity’s volumeControlStream attribute to STREAM_MUSIC, which means the app will respond to the device’s volume control buttons by altering the volume of the music being played.
Initiating playback
In this section, we’ll configure the MainActivity class to support media playback and manage the play queue. The first method we’ll discuss is called playNewPlayQueue and will prepare new play queues. To define the playNewPlayQueue method, add the following code below the createChannelForMediaPlayerNotification method:
fun playNewPlayQueue(songs: List<Song>, startIndex: Int = 0, shuffle: Boolean = false)
       = lifecycleScope.launch(Dispatchers.Default) {
   if (songs.isEmpty() || startIndex >= songs.size) {
       Toast.makeText(this@MainActivity, getString(R.string.error), Toast.LENGTH_LONG).show()
       return@launch
   }
   mediaController.transportControls.stop()

   val startSongIndex = if (shuffle) (songs.indices).random()
   else startIndex

   val startSongDesc = buildMediaDescription(songs[startSongIndex], startSongIndex.toLong())

   // TODO: Add songs to the play queue
}
The playNewPlayQueue method features parameters called songs, which contains the list of Song objects that will form the play queue; startIndex, which contains the index in the list of songs that playback should begin; and shuffle, which contains a boolean (true/false value) indicating whether the play queue should be shuffled. The startIndex and shuffle parameters feature default values of 0 and false, respectively. In Kotlin, if a method parameter has a default value, then you do not need to supply a value for that parameter when calling the method unless you wish to override the default. Hence, in this case, you could call the playNewPlayQueue method by simply providing a list of songs, and playback would begin unshuffled from the first element in that list.
The playNewPlayQueue method starts by checking that the list of songs is not empty and that the starting index does not exceed the number of songs provided. If either of these conditions are true, then an error message will display and no further action will occur. Next, if the user has indicated that the play queue should be shuffled, then the start index is overridden with the index of a random element in the list of songs. Once the start index has been finalised, the corresponding Song object is sent to a method called buildMediaDescription. The buildMediaDescription method will use the song’s data to construct a MediaDescriptionCompat object, which is the media browser service’s preferred mechanism for handling metadata.
To define the buildMediaDescription method, add the following code below the playNewPlayQueue method:
The buildMediaMetadata method starts by assembling an extras bundle. The bundle will contain information that we wish to supply to the media browser service, but which is not covered by the existing fields of the MediaDescriptionCompat class. For example, the above code supplies the song’s album name and album ID, and an optional queue item ID. Next, the extras bundle and any remaining song metadata including the song’s media ID, artist name and title are assembled into a MediaDescriptionCompat instance and returned by the method.
Returning to the playNewPlayQueue method, we can now replace the TODO comment with the necessary code to start sending MediaDescriptionCompat objects to the media browser service and assemble the play queue:
val mediaControllerCompat = MediaControllerCompat.getMediaController(this@MainActivity)
mediaControllerCompat.addQueueItem(startSongDesc)
skipToAndPlayQueueItem(startSongIndex.toLong())

for ((index, song) in songs.withIndex()) {
   if (index == startSongIndex) continue
   val songDesc = buildMediaDescription(song, index.toLong())
   mediaControllerCompat.addQueueItem(songDesc, index)
}

when {
   shuffle -> setShuffleMode(SHUFFLE_MODE_ALL)
   mediaControllerCompat.shuffleMode == SHUFFLE_MODE_ALL -> setShuffleMode(SHUFFLE_MODE_NONE)
}
The above code sends the MediaDescriptionCompat for the first song to play to the media browser service and adds it to the play queue using the addQueueItem method. Next, a method called skipToAndPlayQueueItem (which we’ll discuss in a moment) initiates playback for that song. The first song is loaded and played before the remainder of the play queue is processed so that playback of that song can begin right away. If we waited for the entire play queue to be loaded before initiating playback, then there could be a noticeable lag if the play queue is large.
Once playback of the first song has begun, the remainder of the songs in the play queue are loaded into the media browser service. The remaining songs are loaded by iterating through the songs using a for loop and Kotlin’s withIndex function, which returns both the Song object and its index for each element in the songs list. A MediaDescriptionCompat object is built for each song and added to the target index in the play queue using the media browser service’s addQueueItem method.
Finally, the shuffle mode is set using a method called setShuffleMode. If the play queue has been shuffled then the shuffle mode will be set to SHUFFLE_MODE_ALL, while if the play queue has not been shuffled then the shuffle mode will be SHUFFLE_MODE_NONE. We’ll discuss how the shuffle functionality works in the next section. For now, add the following code below the buildMediaDescription method to define the skipToAndPlayQueueItem method and handle requests to initiate playback:
fun skipToAndPlayQueueItem(queueItemId: Long) {
   mediaController.transportControls.skipToQueueItem(queueItemId)
   mediaController.transportControls.play()
}
The skipToAndPlayQueueItem method uses the media browser service’s skipToQueueItem and play methods to skip to and play a given play queue element based on its queue ID. The method is public (it does not feature the private modifier) because it may be called from other classes in the application. For example, in the play queue fragment, if the user clicks an item in the play queue then the skipToAndPlayQueueItem method will initiate the playback of the user’s selection.
Shuffling and unshuffling the play queue
The Music app will allow the user to shuffle and unshuffle the songs in the play queue. To handle the shuffle/unshuffle functionality, we need to add more code to MainActivity and the media browser service. Starting with MainActivity, add the following code below the skipToAndPlayQueueItem method to communicate the user’s shuffle mode preference to the media browser service:
private fun setShuffleMode(shuffleMode: Int) {
   val bundle = Bundle().apply {
       putInt("SHUFFLE_MODE", shuffleMode)
   }

   mediaController.sendCommand("SET_SHUFFLE_MODE", bundle, null)
}
The setShuffleMode method dispatches the shuffle mode to the media browser service using a method called sendCommand. The sendCommand method is not one we’ve encountered yet, but it’s similar to previous media browser service methods such as play or skipToQueueItem etc. The difference with the sendCommand method is that it allows us to define custom behaviours, which is necessary in this instance because there’s no conventional way to communicate shuffle mode state changes to the media browser service. The sendCommand method requires you to supply a key identifying the action, an extras bundle containing any supplementary data, and an optional ResultReceiver that can execute follow-up actions based on the outcome. We don’t need to perform additional actions, so pass null for the ResultReceiver parameter.
To process the shuffle command, open the MediaBrowserService class and add the following methods to the list of callback functions in the mediaSessionCallback variable:
Note you may need to add the following import statement to the top of the file:
import android.os.ResultReceiver
The above code also defines a callback method called onCommand, which will handle any custom actions that the media browser service should handle. For now, we only define one command "SET_SHUFFLE_MODE”; however, we will create others later. For the "SET_SHUFFLE_MODE" action, the selected shuffle mode is retrieved from the extras bundle included with the request using the getInt method. The first parameter of the getInt method specifies the key that the data is saved under, while the second parameter defines a default value that should be used if no value is found. In this case, the default shuffle mode will be SHUFFLE_MODE_NONE.
Once the appropriate shuffle mode has been determined, it is set as the active mode of the service and the play queue is shuffled/unshuffled accordingly. If the play queue is being shuffled, then the currently playing song is moved to the beginning of the play queue and the remaining queue items are shuffled. Meanwhile, if the play queue is unshuffled, then the queue items are sorted by queue ID. The queue IDs increment whenever a new song is added to the play queue, so provides an effective way of recording the original play queue order. Finally, a method called setPlayQueue will load the play queue and notify other areas of the app via a playback state update. To define the setPlayQueue method, add the following code below the refreshNotification method:
private fun setPlayQueue() {
   mediaSessionCompat.setQueue(playQueue)
   setMediaPlaybackState(mediaSessionCompat.controller.playbackState.state)
}
Sending out a playback state update is important even if the state itself has not changed because it will prompt MainActivity to refresh the play queue and receive the new order of the queue items.
Preparing the fragment packages
The Music app will contain multiple fragments. A fragment is a destination within an activity that has a distinct lifecycle and user interface but can communicate information to other fragments and the parent activity when needed. When the project was created using the Navigation Drawer Activity template, Android Studio will likely have generated readymade fragment packages called Gallery, Home and Slideshow, as shown below.
The Music app will require six packages in total:
controls
currentlyPlaying
library
playQueue
search
songs
To prepare these packages, it is best to delete the Gallery, Home and Slideshow packages and create six new packages from scratch. To create a package, right-click the ui directory then select New > Package and enter a name from the above list.
Once all required packages have been created the ui directory should look like this:
Designing the activity_main layout
User interfaces are defined using layout resource files. When the project was created using the Navigation Drawer Activity template, Android Studio will likely have generated several layout resource files, most of which we will not use. To delete the superfluous layout files, navigate through Project > app > res > layout and delete every file except activity_main.xml.
Next, open the activity_main.xml layout file in Code view. The activity_main layout is the layout that will load when the app is launched, as directed by the call to setContentView in the MainActivity class’s onCreate method. The activity_main layout will coordinate the fragments and other components such as the toolbar and audio playback controls.
The root element of the activity_main layout is a DrawerLayout widget. DrawerLayout widgets act as a top-level container and feature a side panel that can be pulled from the left or right side of the window. The direction which the panel can be pulled is determined using the DrawerLayout’s openDrawer property (start = left; end = right). In the Music app, we will draw a side panel from the left-hand side and the panel will contain items for the navigational destinations in the app.
In the activity_main layout, locate the DrawerLayout element and delete the following line of code:
android:fitsSystemWindows="true"
When set to true, the fitsSystemWindows attribute prevents the layout from stretching below the device’s notification bar. This restriction will not be necessary for this app because when the user views the currently playing song, the artwork of that song should be visible under the notification bar as shown below:
Next, locate the include element and replace it with the following code:
In the above code, we define a CoordinatorLayout widget that will contain the app toolbar and two FragmentContainerView widgets. The FragmentContainerViews will house fragments that display the user’s current destination in the app and the playback controls, respectively. The toolbar will contain menu items to facilitate user interactions with the app and navigation drawer. An AppBarLayout widget contains the toolbar and has an elevation of 0dp, transparent background and the fitsSystemWindows attribute set to true. Altogether, these attributes ensure there is no shadow under the toolbar, the toolbar is the same colour as the underlying fragment and the toolbar will leave enough space for the notification bar at the top of the screen. The FragmentContainerView widgets both contain a reference to a navGraph (navigation graph), which defines the network of fragments that the FragmentContainerView can host and use to facilitate user navigation. We’ll discuss the navigation graphs in more detail later.
The last change to make in the activity_main.xml file is to locate the NavigationView widget and remove the headerLayout attribute because the navigation drawer will not use a header:
app:headerLayout="@layout/nav_header_main"
The main navigation graph
In the previous section, we added a FragmentContainerView widget to the activity_main layout with the ID nav_host_fragment. The FragmentContainerView references a navigation graph called mobile_navigation.xml, which will define the network of the core destinations in the app. To define the graph, navigate through Project > app > res > navigation, open the file called mobile_navigation.xml in Code view and edit the file so it reads as follows:
The root element of the above navigation graph contains an attribute called startDestination. The startDestination attribute defines the origin of the navigation network. In this instance, the start destination is set to a fragment called nav_library, which will contain an overview of the user’s music library and the tabs that allow the user to switch between the play queue and songs fragments. Next, the details of each fragment are defined. Each fragment is assigned an ID that will identify that destination in the navigation graph. The name of the fragment is its position within the project’s directory structure. Note you may need to replace the “example.music” part of each fragment name to reflect the structure of your project. Finally, each fragment also contains a label, which will be displayed in the toolbar when the fragment is open, and a layout attribute that defines the layout that will display the fragment’s content.
You may notice some fragment entries also contain an argument. The argument describes a piece of data that is sent to the fragment when it is loaded. Argument data types can include strings, integers and even custom objects such as the Song data class. Arguments allow us to transmit information from one destination to another. For example, when the user navigates to the EditSongFragment it is necessary to send the Song object that the user wishes to modify the details of. At the end of the navigation graph, a couple of global actions are defined. Each action contains a destination attribute that specifies the fragment that the action will load. The actions are considered global because they are not tied to any particular fragment and can be launched from anywhere in the navigation network.
The navigation drawer
To help the user navigate around the app, we will create a navigation drawer, which is a panel that slides out from the left-hand side of the screen.
The items in the navigation drawer are defined in a menu resource file called activity_main_drawer.xml. Locate the file by navigating through Project > app > res > menu, open it and replace the items inside the group element with the following code:
The above code defines two menu items that will appear in the navigation drawer. The menu items will allow the user to navigate to the play queue and songs fragments, although you could add further destinations if you wish (e.g. Albums, Artists, Playlists etc.). Each item features an icon and title, which will be displayed to the user.
Sometimes you may like to add a dividing line between navigation drawer items as shown below.
To achieve this, you must define two separate menu groups for items that should appear above and below the dividing line, respectively. Assign the first group an orderInCategory value of 1 and the second group an orderInCategory value of 2 e.g.
android:orderInCategory="1"
You should now see a dividing line between group 1 and group 2.
To make the navigation drawer operational, return to the MainActivity class and locate the part of the onCreate method that initialises the appBarConfiguration variable:
The fragments listed in the AppBarConfiguration instance will be treated as top-level destinations. Top-level destinations are considered the origins of navigational pathways. Also, top-level destinations influence the composition of the app toolbar. For example, when a top-level destination is open there will be a hamburger icon in the top-left corner of the toolbar. Meanwhile, regular destinations will have a back arrow instead. The hamburger icon will open the navigation drawer, while the back arrow will return the user to their previous destination.
To define the top-level destinations for this app, edit the appBarConfiguration variable initialisation code so it reads as follows:
There are also other changes we must make to MainActivity to support the navigation drawer. First, edit the onCreate method’s setSupportActionBar call to the following:
setSupportActionBar(binding.toolbar)
Also, delete the following lines of code from the onCreate method because they do not apply to the Music app:
binding.appBarMain.fab.setOnClickListener { view ->
    Snackbar.make(view, "Replace with your own action", Snackbar.LENGTH_LONG)
        .setAction("Action", null).show()
}
Next, locate the line of code that defines a variable called navController and replace it with the following:
val navHostFragment = supportFragmentManager.findFragmentById(R.id.nav_host_fragment) as NavHostFragment
val navController = navHostFragment.navController
The above code initialises a NavHostFragment object, which will provide access to the first FragmentContainerView widget from the activity_main.xml layout. The NavController object associated with the FragmentContainerView is then assigned to a variable called navController, so the MainActivity class can interact with the network defined in the mobile_navigation.xml navigation graph.
Next, add the following code to the bottom of the onCreate method:
val onNavigationItemSelectedListener = NavigationView.OnNavigationItemSelectedListener { item ->
   when (item.itemId) {
       R.id.nav_queue -> {
           val action = MobileNavigationDirections.actionLibrary(0)
           navController.navigate(action)
       }
       R.id.nav_songs -> {
           val action = MobileNavigationDirections.actionLibrary(1)
           navController.navigate(action)
       }
   }
   binding.drawerLayout.closeDrawer(GravityCompat.START)
   true
}
binding.navView.setNavigationItemSelectedListener(onNavigationItemSelectedListener)
The above code uses a when block to define the appropriate response when a given navigation drawer item is selected. In this case, both the play queue and songs items will call the actionLibrary navigation action from the mobile_navigation.xml navigation graph; however, each item passes a different value to the nav_library destination’s position argument. Different positions are provided because the library fragment is split into two sections. A position value of 0 will load the play queue, while a position value of 1 will load the list of songs in the user’s music library. The navigation drawer must manually be closed by calling the closeDrawer method with an argument of GravityCompat.START, which closes the navigation drawer to the left with an animation.
Finally, add the following line of code to the bottom of the onCreate method:
binding.navView.itemIconTintList = null
The above code sets the NavigationView’s itemIconTintList property to null, which prevents Android from overriding the colour of the navigation drawer’s items. Otherwise, all the icons would appear grey (or a different colour depending on the theme).
Setting up the Library fragment
The first fragment that loads when the app is launched will be called LibraryFragment. The library fragment will help coordinate the play queue and songs fragments and allow the user to swipe between them using tabs and the ViewPager2 library. ViewPager2 is a tool that allows you to display content pages that the user may swipe through, much like pages in a book.
First, let’s create a layout resource file for the LibraryFragment fragment. Right-click the layout directory (Project > app > res) then select New > Layout Resource File. Name the file fragment_library and edit the layout’s code so it reads as follows:
The fragment_library layout comprises a TabLayout widget, which will contain the names of the different sections (Play Queue and Songs), and a ViewPager2 widget, which will display the content. The user can navigate between the different sections by pressing one of the TabLayout tabs or by swiping the ViewPager2 widget.
Next, let’s create the LibraryFragment class. Locate and right-click the library directory (Project > app > java > name of the project > ui) then select New > Kotlin Class/File. Name the file LibraryFragment and select Class from the list of options. Once the LibraryFragment.kt file opens in the editor, edit its code to the following:
import androidx.fragment.app.Fragment

class LibraryFragment : Fragment() {

   private var _binding: FragmentLibraryBinding? = null
   private val binding get() = _binding!!
   private var viewPagerPosition: Int? = null

   override fun onCreateView(
       inflater: LayoutInflater,
       container: ViewGroup?,
       savedInstanceState: Bundle?
   ): View {
       arguments?.let {
           val safeArgs = LibraryFragmentArgs.fromBundle(it)
           viewPagerPosition = safeArgs.position
       }

       _binding = FragmentLibraryBinding.inflate(inflater, container, false)

       val viewPagerAdapter = ViewPagerAdapter(this)
       binding.viewPager.adapter = viewPagerAdapter
       binding.viewPager.currentItem = viewPagerPosition ?: 0

       val navView: NavigationView = requireActivity().findViewById(R.id.nav_view)
       val pageChangeCallback = object : ViewPager2.OnPageChangeCallback() {
           override fun onPageSelected(position: Int) {
               when (position) {
                   0 -> navView.setCheckedItem(R.id.nav_queue)
                   1 -> navView.setCheckedItem(R.id.nav_songs)
               }
           }
       }
       binding.viewPager.registerOnPageChangeCallback(pageChangeCallback)

       val namesArray = arrayOf(getString(R.string.play_queue),getString(R.string.songs))
       TabLayoutMediator(binding.tabLayout, binding.viewPager) { tab, position ->
           tab.text = namesArray[position]
       }.attach()
       binding.tabLayout.tabGravity = TabLayout.GRAVITY_FILL

       return binding.root
   }

   override fun onDestroyView() {
       super.onDestroyView()
       _binding = null
   }
}
In the above code, the LibraryFragment class’s onCreateView method retrieves the integer that was supplied for the destination’s position argument, as defined in the mobile_navigation.xml navigation graph. The integer will equal either 0 or 1, with 0 representing the play queue fragment and 1 representing the songs fragment. By default, the value will be 1, as specified in the argument section of the nav_library item’s entry in the mobile_navigation navigation graph. Hence, the LibraryFragment will load the songs fragment unless advised otherwise.
The onCreate method proceeds to configure the ViewPager2 widget and set its current position to the value stored in the viewPagerPosition variable. Also, an OnPageChangeCallback object is assigned to the ViewPager2. The object contains a callback method called onPageSelected that monitors the active ViewPager2 page position and updates the active item in the navigation drawer accordingly. From the previous section, you may recall that the active navigation drawer item will have an overlay effect for emphasis, so it is important to ensure the active item is always correct. The remainder of the code initialises the TabLayout widget and populates two tabs called Play Queue and Songs. Also, the TabLayout widget’s gravity property is set to GRAVITY_FILL to ensure the TabLayout occupies the full width of the window.
To make the ViewPager2 and TabLayout widgets operational, we must create an adapter that will load the appropriate fragment when the user swipes through the ViewPager2 or clicks a tab in the TabLayout. Create a new Kotlin class in the library directory called ViewPagerAdapter and add the following code to the file:
import androidx.fragment.app.Fragment
import com.example.music.ui.playQueue.PlayQueueFragment
import com.example.music.ui.songs.SongsFragment

class ViewPagerAdapter(fragment: Fragment) : FragmentStateAdapter(fragment) {

   override fun getItemCount(): Int = 2

   override fun createFragment(position: Int): Fragment {
       return if (position == 0) PlayQueueFragment()
       else SongsFragment()
   }
}
The above code is quite simple. First, the number of items loaded into the adapter (as defined in the getItemCount method) is set to 2 because there will only be two fragments available (PlayQueueFragment and SongsFragment). Next, the createFragment method instructs the view pager to return the PlayQueueFragment when the user is at the first position (index 0) and SongsFragment if the user is at any other position (i.e. index 1). As the user swipes through the view pager from start to finish, they will be taken from the PlayQueue fragment to the Songs fragment.
Setting up the Songs fragment and layout
We’ll now design the SongsFragment fragment, which will contain a list of every song in the user’s music library. This fragment will require a layout, so right-click the layout directory (Project > app > res) then select New > Layout Resource File. Name the file fragment_songs then press OK. Once the fragment_songs.xml layout opens in the editor, switch to Code view and modify the file so it reads as follows:
The entirety of the fragment_songs layout is occupied by a RecyclerView widget, which will display the list of songs in the user’s music library. The RecyclerView widget is complemented by a fastscroller, which will help the user browse the list of songs. The RecyclerView fastscroller was built by myself. Further information about how to customise it and how it was built can be found in our dedicated RecyclerView scrollbar tutorial. Finally, there is a floating action button in the bottom right corner of the layout. The button uses the ic_shuffle drawable resource as its icon image because the button will play all the songs in the user’s music library in shuffle mode when clicked.
To make the Songs fragment operational, create a new Kotlin class by right-clicking the songs directory (Project > app > java > name of the project > ui) and then selecting New > Kotlin Class/File. Name the file SongsFragment and select Class from the list of options. Once the SongsFragment.kt file opens in the editor, modify its code so it reads as follows:
import androidx.fragment.app.Fragment

class SongsFragment : Fragment() {

   private var _binding: FragmentSongsBinding? = null
   private val binding get() = _binding!!
   private var isUpdating = false
   private var unhandledRequestReceived = false
   private lateinit var adapter: SongsAdapter
   private lateinit var musicViewModel: MusicViewModel
   private lateinit var mainActivity: MainActivity

   override fun onCreateView(
       inflater: LayoutInflater,
       container: ViewGroup?,
       savedInstanceState: Bundle?
   ): View {
       _binding = FragmentSongsBinding.inflate(inflater, container, false)
       mainActivity = activity as MainActivity
       musicViewModel = ViewModelProvider(mainActivity)[MusicViewModel::class.java]
       return binding.root
   }

   override fun onViewCreated(view: View, savedInstanceState: Bundle?) {
       super.onViewCreated(view, savedInstanceState)

       binding.recyclerView.itemAnimator = DefaultItemAnimator()

       binding.scrollbar.recyclerView = binding.recyclerView

       // TODO: Initialise the SongsAdapter class here

       musicViewModel.allSongs.observe(viewLifecycleOwner) {
           updateRecyclerView(it)
       }

       binding.recyclerView.addOnScrollListener(object: RecyclerViewScrollbar
       .OnScrollListener(binding.scrollbar) {
           override fun onScrolled(recyclerView: RecyclerView, dx: Int, dy: Int) {
               super.onScrolled(recyclerView, dx, dy)

               if (dy > 0 && binding.fab.visibility == View.VISIBLE) binding.fab.hide()
               else if (dy < 0 && binding.fab.visibility != View.VISIBLE) binding.fab.show()
           }
       })
   }
}
The core components of the SongsFragment fragment are initialised within the onCreateView and onViewCreated methods. For example, the onCreateView method initialises references to the MainActivity activity and MusicViewModel view model. The MainActivity activity is supplied in the MusicViewModel class constructor, which means the fragment will have access to the same instance of the view model as MainActivity and any associated data. Alternatively, we could have supplied ‘this’ in the constructor, which would have created a fresh instance of the view model that was owned by the fragment; however, this is unnecessary and may also create discrepancies between the data that MainActivity and the fragment have access to.
Next, in the onViewCreated method, an item animator is attached to the RecyclerView from the fragment_songs layout, which will create standard animations when items are inserted, removed or updated. An instance of the RecyclerView is then attached to the scrollbar, which is necessary for the scrollbar to know what RecyclerView it is meant to track. Next, the onViewCreated method registers an observer on MusicViewModel view model’s allSongs variable, which contains a list of every Song object in the user’s music library. Changes to the list of Song objects will be handled by a method called updateRecyclerView, which we’ll define shortly. Finally, an onScroll listener is attached to the RecyclerView. The onScroll listener is sourced from the RecyclerViewScrollbar class and features all the instructions needed to update the scrollbar following RecyclerView scroll events; however, we override the onScroll listener to provide additional instructions regarding the floating action button. Specifically, if the user scrolls down the RecyclerView, then the floating action button will be hidden. Likewise, if the user scrolls up, then the floating action button will be revealed.
The last thing we’ll do in this section is set the _binding variable back to null when the fragment is being destroyed. This helps prevent the fragment from accessing components of the layout in the event the layout has been closed but the fragment is not yet shut down. Add the following code below the onViewCreated method:
override fun onDestroyView() {
   super.onDestroyView()
   _binding = null
}
Part 2
Due to the length of this tutorial, it has been split into two parts. To proceed to the second part, click here.