How to create a Music application using Kotlin | Part 2
In this tutorial, we will finish creating a music Android application that allows the user to play the songs from their music library. If you have not yet completed part 1 of the tutorial, then click here. As a reminder, the example code for the Music application can be found here. The project was built using Android Studio Giraffe and targets Android 13 (API 33/SDK 33).
Displaying songs in the RecyclerView
In this section, we will design and implement an adapter that will load the list of Song objects that comprise the user’s music library into the RecyclerView widget from the fragment_songs.xml layout. To facilitate this, we need a layout that will hold the details of each song. Create a new layout resource file by right-clicking the layout directory (Project > app > res) and selecting New > Layout Resource File. Name the layout song_preview then press OK. Once the layout opens in the editor, switch to Code view and edit the file so it reads as follows:
<?xml version="1.0" encoding="utf-8"?>
<androidx.constraintlayout.widget.ConstraintLayout xmlns:android="http://schemas.android.com/apk/res/android"
   xmlns:app="http://schemas.android.com/apk/res-auto"
   android:layout_width="match_parent"
   android:layout_height="60dp"
   android:background="?attr/selectableItemBackground">

   <ImageView
       android:id="@+id/artwork"
       android:layout_width="60dp"
       android:layout_height="match_parent"
       app:layout_constraintStart_toStartOf="parent"
       android:contentDescription="@string/album_artwork" />

   <RelativeLayout
       android:layout_width="0dp"
       android:layout_height="wrap_content"
       android:paddingHorizontal="8dp"
       app:layout_constraintTop_toTopOf="parent"
       app:layout_constraintBottom_toBottomOf="parent"
       app:layout_constraintStart_toEndOf="@id/artwork"
       app:layout_constraintEnd_toStartOf="@+id/menu">

       <TextView
           android:id="@+id/title"
           android:layout_width="match_parent"
           android:layout_height="wrap_content"
           android:singleLine="true"
           android:textColor="?attr/colorOnSurface"
           android:textSize="16sp" />

       <TextView
           android:id="@+id/artist"
           android:layout_width="match_parent"
           android:layout_height="wrap_content"
           android:singleLine="true"
           android:textSize="14sp"
           android:textColor="@color/material_on_surface_emphasis_medium"
           android:layout_below="@id/title" />
   </RelativeLayout>

   <ImageButton
       android:id="@+id/menu"
       android:layout_width="25dp"
       android:layout_height="25dp"
       android:layout_marginEnd="8dp"
       android:src="@drawable/ic_more"
       app:layout_constraintBottom_toBottomOf="parent"
       app:layout_constraintEnd_toEndOf="parent"
       app:layout_constraintTop_toTopOf="parent"
       android:contentDescription="@string/options_menu"
       style="@style/Widget.AppCompat.ActionButton.Overflow" />
</androidx.constraintlayout.widget.ConstraintLayout>
The root element of the song_preview layout is a ConstraintLayout widget. The ConstraintLayout contains a background attribute set to selectableItemBackground, which means a ripple overlay effect will occur whenever the layout is pressed. The ripple will help show the user which song they have selected. Inside the layout, there is an ImageView widget that will display album artwork and two TextView widgets that will contain information about the song title and artist. There is also a menu icon ImageButton widget that the user can press to load an options menu for that item.
Moving on, we’ll now create an adapter class that will load the library of Song objects into the RecyclerView and handle user interactions. Right-click the songs directory then select New > Kotlin Class/File. Name the file SongsAdapter and select Class from the list of options. Once the SongsAdapter.kt file opens in the editor, edit its code so it reads as follows:
class SongsAdapter(private val activity: MainActivity):
RecyclerView.Adapter<SongsAdapter.SongsViewHolder>(), RecyclerViewScrollbar.ValueLabelListener {
val songs = mutableListOf<Song>()
override fun getValueLabelText(position: Int): String {
return if (songs[position].title.isNotEmpty()) {
songs[position].title[0].uppercase()
} else ""
}
inner class SongsViewHolder(itemView: View) :
RecyclerView.ViewHolder(itemView) {
internal var mArtwork = itemView.findViewById<View>(R.id.artwork) as ImageView
internal var mTitle = itemView.findViewById<View>(R.id.title) as TextView
internal var mArtist = itemView.findViewById<View>(R.id.artist) as TextView
internal var mMenu = itemView.findViewById<ImageButton>(R.id.menu)
init {
itemView.isClickable = true
itemView.setOnClickListener {
activity.playNewPlayQueue(songs, layoutPosition)
}
itemView.setOnLongClickListener{
// TODO: Open options dialog
return@setOnLongClickListener true
}
}
}
override fun onCreateViewHolder(parent: ViewGroup, viewType: Int): SongsViewHolder {
return SongsViewHolder(LayoutInflater.from(parent.context).inflate(R.layout.song_preview, parent, false))
}
override fun onBindViewHolder(holder: SongsViewHolder, position: Int) {
val current = songs[position]
activity.loadArtwork(current.albumId, holder.mArtwork)
holder.mTitle.text = current.title
holder.mArtist.text = current.artist
holder.mMenu.setOnClickListener {
// TODO: Open options dialog
}
}
override fun getItemCount() = songs.size
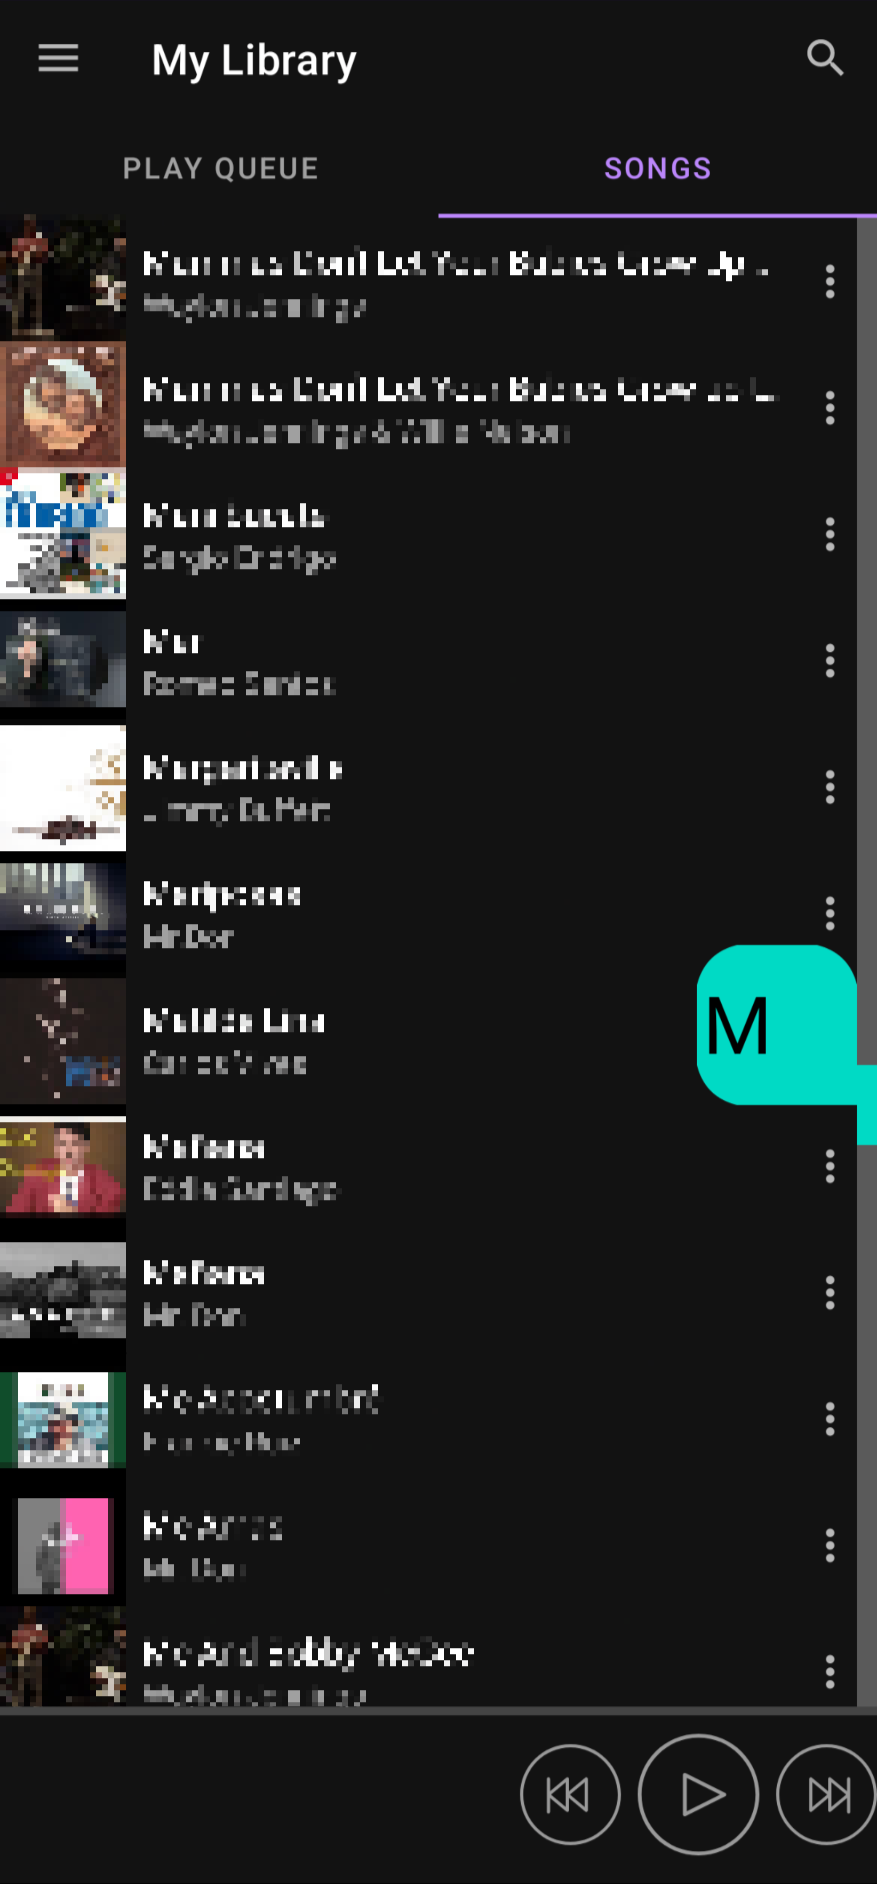
}The SongsAdapter class features a parameter called activity in its primary constructor. The activity parameter will hold a reference to the MainActivity class, and allow the adapter to reference its public data (i.e. methods and variables that are not labelled as private). In the body of the adapter, we define a variable called songs which will store the Song objects that comprise the user’s music library. A method called getValueLabelText is also defined. The getValueLabelText method will return the first letter of the title of the song associated with the user’s scroll position in the RecyclerView. This letter will be loaded into the scrollbar’s thumb to help the user find their position as they are scrolling through their music library. For example, the image below shows the letter M appearing on the thumb.
Next, an inner class called SongsViewHolder is established. This inner class will initialise the components of the song_preview.xml layout and define what actions will be performed if the user clicks or long clicks the layout. The adapter knows to use the song_preview.xml layout because this is the layout that is inflated by the onCreateViewHolder method. If the user clicks an item in the RecyclerView, then the list of Song objects loaded in the adapter and the index of the selected item are sent to the MainActivity class’s playNewPlayQueue method. The playNewPlayQueue method will then play the user’s music library, starting with the user’s selected song. Meanwhile, if the user long clicks an item (presses it for several seconds) then an options dialog will open. We’ll discuss the options dialog in greater depth in the next section. In brief, it will allow the user to perform actions such as adding the song to the play queue.
The adapter also contains a method called onBindViewHolder, which populates the data at each position in the RecyclerView. In this case, the onBindViewHolder method retrieves the Song object from the songs variable associated with the current position in the RecyclerView. It then uses the information from the Song object to load the album artwork into the artwork ImageView widget and load the song’s title and artist name into the two TextView widgets. The artwork image will be loaded by a method in the MainActivity class called loadArtwork. The last method in the adapter is called getItemCount and it will determine how many items are loaded into the RecyclerView. In this case, the number of items will equal the size of the user’s music library.
Album artwork will be rendered into the artwork ImageView widget by a MainActivity method called loadArtwork. To define the loadArtwork method, open the MainActivity.kt file (Project > app > java > name of the project) and add the following code below the setShuffleMode method:
fun loadArtwork(albumId: String?, view: ImageView) {
   var file: File? = null
   if (albumId != null) {
       val directory = ContextWrapper(application).getDir("albumArt", Context.MODE_PRIVATE)
       file = File(directory, "$albumId.jpg")
   }

   Glide.with(application)
       .load(file ?: R.drawable.ic_launcher_foreground)
       .transition(DrawableTransitionOptions.withCrossFade())
       .centerCrop()
       .signature(ObjectKey(file?.path + file?.lastModified()))
       .override(600, 600)
       .into(view)
}
When the user’s music library is built, the artwork for each album will be stored as a JPEG image in an internal directory called albumArt. Each artwork file will be named according to the album’s ID (e.g. 213.jpg), so the loadArtwork method begins by attempting to build a File object for the artwork image file. If the artwork for a given song is not available, then the file variable will remain null. Next, an image-rendering framework called Glide will insert the artwork into the ImageView widget that was supplied in the loadArtwork method’s view parameter. Glide will attempt to load the artwork image referenced in the File object; however, if the file variable is null then the ic_launcher_foreground drawable resource will be loaded instead.
Several further properties are applied to Glide to customise how images are handled. First, a crossfade transition is used to make images fade into the ImageView when loaded. Second, the centerCrop method is used to centrally position images within the ImageView. Next, a signature is generated for each image that is loaded. The signature will contain the file path of the image and the time the file was last modified. Using the signature will help Glide manage its cache, which contains the history of previously loaded images. If Glide is directed to reload an image, then it can retrieve the image from its cache, which requires significantly less working memory compared to loading the image file from scratch; however, if the image file has been updated then the cached version will not be suitable. This is where the signature comes in. The signature contains the time the image file was last modified and so if the underlying file has been changed then the signature will be different. A change in signature tells Glide that the image stored in its cache is outdated and must be reloaded. This feature will be especially useful if the user updates the artwork associated with an album.
Handling changes in the user’s music library
The user’s music library will regularly update as audio files are added, deleted or modified. Any changes to the music library will need to be reflected in the list of songs that are displayed in the songs fragment. To address this, open the SongsFragment.kt file (Project > app > java > name of the project > ui > songs) and replace the TODO comment in the onViewCreated method with the following code:
adapter = SongsAdapter(mainActivity)
binding.recyclerView.adapter = adapter
adapter.stateRestorationPolicy = RecyclerView.Adapter.StateRestorationPolicy.PREVENT_WHEN_EMPTY
The above code initialises an instance of the SongsAdapter and applies it to the RecyclerView widget. It also applies a state restoration policy of PREVENT_WHEN_EMPTY to the adapter. This restoration policy directs the adapter to refrain from restoring the RecyclerView until its content has been reloaded. In doing so, the restoration policy helps to preserve the user’s scroll position when they return to the songs fragment from elsewhere in the app. Without the restoration policy, the adapter would attempt to restore the user’s scroll position before any songs have been loaded into the RecyclerView. Invariably, the target scroll position would be unavailable and the user would always return to the top of the RecyclerView, which could be frustrating.
Moving on, we’ll now define a method called updateRecyclerView that will load Song objects into the SongsAdapter and handle changes in the user’s music library. To do this, add the following code below the onViewCreated method:
private fun updateRecyclerView(songs: List<Song>) {
   if (isUpdating) {
       unhandledRequestReceived = true
       return
   }
   isUpdating = true

   binding.fab.setOnClickListener {
       mainActivity.playNewPlayQueue(songs, shuffle = true)
   }

   adapter.processNewSongs(songs)

   isUpdating = false
   if (unhandledRequestReceived) {
       unhandledRequestReceived = false
       musicViewModel.allSongs.value?.let { updateRecyclerView(it) }
   }
}
The updateRecyclerView method will run whenever the observer that is registered to the MusicViewModel view model’s allSongs variable is updated. When the music library is being built for the first time, the allSongs variable will be updated very frequently and the updateRecyclerView method could be run multiple times simultaneously. If one instance of the updateRecyclerView method is run before a previous instance has finished, then this can distort the data that is being supplied to the SongsAdapter adapter. To resolve this, the above code sets a variable called isUpdating to true when it begins running and reverts the variable to false when it finishes. The main body of the updateRecyclerView method can only run when the value of the isUpdating variable is false, which prevents multiple instances of the updateRecyclerView method from running simultaneously and attempting to update the SongsAdapter class at the same time. If a request arrives while a previous request is in progress, then a variable called unhandledRequestReceived is set to true. If unhandledRequestReceived is set to true, then the updateRecyclerView method will run again at the next available opportunity to handle any unprocessed data.
In the body of the processSongs method, an onClick listener is assigned to the floating action button from the fragment_songs layout. If the user clicks the button, then the MainActivity class’s playNewPlayQueue method will play the user’s entire music library on shuffle. Next, the list of songs is processed by a method that we will define in the adapter called processNewSongs. To define the processNewSongs method, return to the SongsAdapter class and add the following code below the getItemCount method:
fun processNewSongs(newSongs: List<Song>) {
   for ((index, song) in newSongs.withIndex()) {
       when {
           songs.isEmpty() -> {
               songs.addAll(newSongs)
               notifyItemRangeInserted(0, newSongs.size)
           }
           index >= songs.size -> {
               songs.add(song)
               notifyItemInserted(index)
           }
           song.songId != songs[index].songId -> {
               // Check if the song is a new entry to the list
               val songIsNewEntry = songs.find { it.songId == song.songId } == null
               if (songIsNewEntry) {
                   songs.add(index, song)
                   notifyItemInserted(index)
                   continue
               }

               // Check if the song has been removed from the list
               fun songIdsDoNotMatchAtCurrentIndex(): Boolean {
                   return newSongs.find { it.songId == songs[index].songId } == null
               }

               if (songIdsDoNotMatchAtCurrentIndex()) {
                   var numberOfItemsRemoved = 0
                   do {
                       songs.removeAt(index)
                       ++numberOfItemsRemoved
                   } while (index < songs.size && songIdsDoNotMatchAtCurrentIndex())

                   when {
                       numberOfItemsRemoved == 1 -> notifyItemRemoved(index)
                       numberOfItemsRemoved > 1 -> notifyItemRangeRemoved(index,
                           numberOfItemsRemoved)
                   }

                   // Check if removing the song(s) has fixed the list
                   if (song.songId == songs[index].songId) continue
               }
           }
           song != songs[index] -> {
               songs[index] = song
               notifyItemChanged(index)
           }
       }
   }

   if (songs.size > newSongs.size) {
       val numberItemsToRemove = songs.size - newSongs.size
       repeat(numberItemsToRemove) { songs.removeLast() }
       notifyItemRangeRemoved(newSongs.size, numberItemsToRemove)
   }
}
In the above code, a for loop and Kotlin’s withIndex function are used to iterate through each song while recording the index of each song in the overall list. Next, a when block determines how best to update the RecyclerView. First, if the adapter is empty, then we simply add the incoming list of songs to the adapter and use the notifyItemRangeInserted method to notify the RecyclerView of the new songs to display. Alternatively, if the adapter does contain songs, but the index of the incoming song is greater than or equal to the size of the adapter’s song list, then the song is simply appended to the end of the list and the adapter’s notifyItemInserted method is used to update the RecyclerView. Alternatively, if the ID of the incoming song is different to the ID of the corresponding element in the adapter’s song list, then this means a song has either been added to, or removed from the list. If the song is a new addition to the list, then the incoming song’s ID will not be found in the adapter’s song list. In this case, the song is added to the list at the target index. Meanwhile, if the ID of the corresponding element is not found in the newly supplied list of songs, then that means one or more songs no longer exist. In this case, the songs are removed and the adapter’s notifyItemRemoved (for one song) or notifyItemRangeRemoved (for multiple songs) methods are used to update the RecyclerView.
The final condition in the when block assesses whether the incoming song object has different properties to the corresponding song object in the adapter. If this condition is true, then that means the metadata for an existing song has changed. In this case, the corresponding element in the adapter’s song list is updated and the adapter’s notifyItemChanged method refreshes the item in the RecyclerView. After the when block, an if condition assesses whether the adapter’s list of songs is larger than the incoming list of songs. In this case, the superfluous songs are removed using Kotlin’s removeLast function.
Handling user interactions with songs
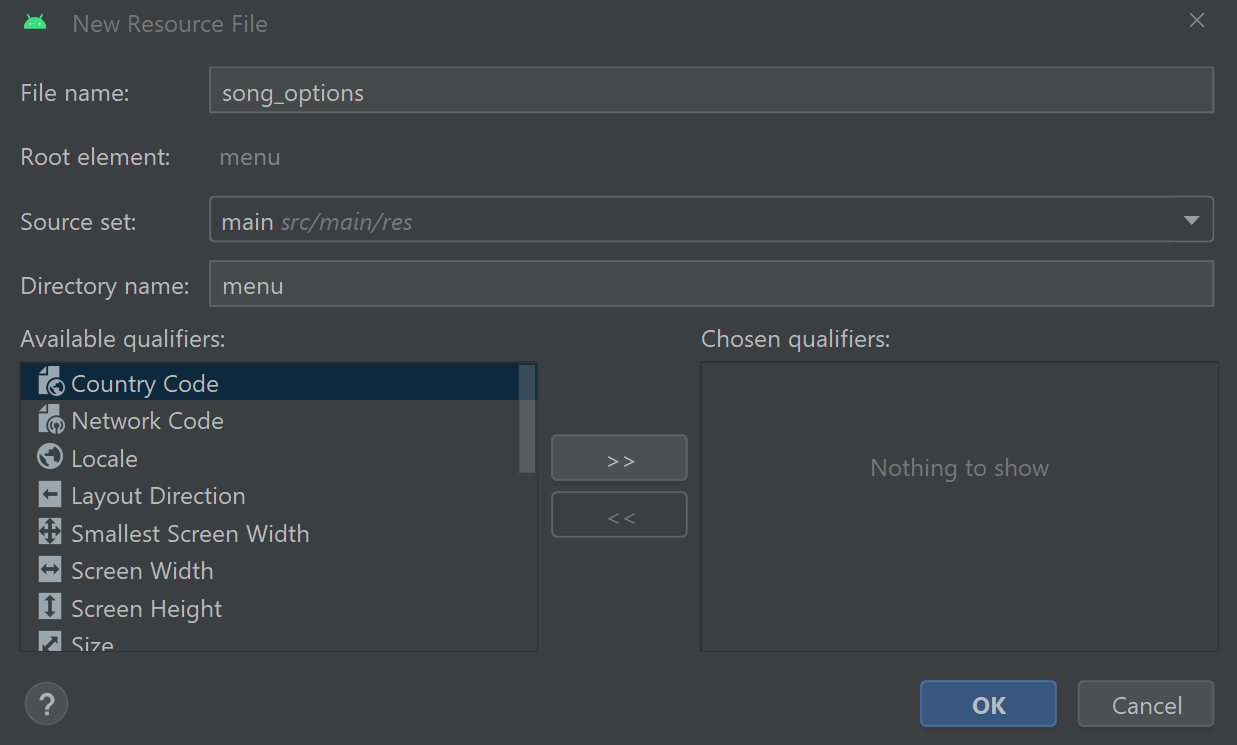
If the user long clicks an item in the songs fragment’s RecyclerView, a popup menu will invite the user to add the song to the play queue or edit its metadata. To define the contents of the popup menu, locate the menu directory (Project > app > res) then select New > Menu Resource File. Name the file song_options then click OK.
Open the song_options.xml resource file in Code view and add the following two items inside the menu element:
<item android:id="@+id/play_next"
   android:title="@string/play_next" />
<item android:id="@+id/edit_metadata"
   android:title="@string/edit_metadata" />
Each menu item contains an ID, which we can use to refer to the menu item, and a title, which displays text to the user. In this case, the two menu items will invite the user to play the selected song next or edit its metadata, respectively. To make the popup menu operational, open the MainActivity class (Project > app > java > name of the project) and add the following method below the loadArtwork method:
fun showSongPopup(view: View, song: Song) {
   PopupMenu(this, view).apply {
       inflate(R.menu.song_options)
       setOnMenuItemClickListener { menuItem ->
           when (menuItem.itemId) {
               R.id.play_next -> playNext(song)
               R.id.edit_metadata -> {
                   val action = MobileNavigationDirections.actionEditSong(song)
                   findNavController(R.id.nav_host_fragment).navigate(action)
               }
           }
           true
       }
       show()
   }
}
Note you may need to add the following import statement to the top of the file:
import android.widget.PopupMenuThe showSongPopup method possesses two parameters: the layout View that the popup menu will appear over (i.e. the RecyclerView item that the user has long pressed) and the Song object associated with the selected RecyclerView item. The showSongPopup method then inflates the song_options.xml menu resource using the PopupMenu class and applies an action to each menu item. If the play_music menu item is clicked, then the selected Song object is added to the next position in the play queue by a MainActivity method called playNext. Meanwhile, the edit_metadata menu item will transport the user to a fragment called EditSongFragment via an action called action_edit_song, which we defined in the mobile_navigation navigation graph. The user’s selected Song object is packaged in the action so it can be retrieved by the EditSongFragment class.
The song options popup menu is now complete; however, there is some extra code we need to write for it to open when the user long presses an item in the SongsFragment RecyclerView. First, open the SongsAdapter.kt file (Project > app > java > name of the project > ui > songs) and replace the TODO comment in the SongsViewHolder inner class with the following code:
activity.showSongPopup(it, songs[layoutPosition])Likewise, replace the TODO comment in the menu button’s onClick listener found in the onBindViewHolder method with the following code:
activity.showSongPopup(it, current)Now, if the user long presses an item in the RecyclerView or clicks the menu button for an item, the adapter will run the MainActivity class’s showSongPopup method to load the options menu and invite the user to queue the song or edit its metadata.
Setting up the EditSong fragment and layout
In this section, we’ll create a fragment that will enable the user to edit the metadata of the songs in their music library. The edit song fragment will require a layout. To create a new layout file, right-click the layout directory then select New > Layout Resource File. Name the file fragment_edit_song then press OK. Once the fragment_edit_song.xml layout opens in the editor, switch to Code view and modify the file so it reads as follows:
<?xml version="1.0" encoding="utf-8"?>
<ScrollView xmlns:android="http://schemas.android.com/apk/res/android"
   android:layout_height="match_parent"
   android:layout_width="match_parent"
   android:scrollbars="none">

   <RelativeLayout
       android:layout_width="match_parent"
       android:layout_height="wrap_content"
       android:paddingBottom="12dp" >

       <ImageView
           android:id="@+id/editSongArtwork"
           android:layout_width="match_parent"
           android:layout_height="300dp"
           android:clickable="true"
           android:contentDescription="@string/set_album_artwork"
           android:layout_alignParentTop="true" />

       <ImageView
           android:id="@+id/editSongArtworkIcon"
           android:layout_width="wrap_content"
           android:layout_height="wrap_content"
           android:src="@drawable/ic_edit"
           android:clickable="true"
           android:layout_margin="12dp"
           android:contentDescription="@string/set_album_artwork"
           android:layout_alignBottom="@id/editSongArtwork"
           android:layout_alignEnd="@id/editSongArtwork" />

       <TextView
           android:id="@+id/editSongInfo"
           android:layout_width="match_parent"
           android:layout_height="wrap_content"
           android:layout_margin="8dp"
           android:text="@string/edit_metadata"
           android:textSize="14sp"
           android:textColor="@color/design_default_color_primary"
           android:layout_below="@id/editSongArtwork"/>

       <TextView
           android:id="@+id/editSongTitleHeading"
           android:layout_width="match_parent"
           android:layout_height="wrap_content"
           android:layout_margin="8dp"
           android:text="@string/title"
           android:textSize="12sp"
           android:layout_below="@id/editSongInfo" />

       <EditText
           android:id="@+id/editSongTitle"
           android:layout_width="match_parent"
           android:layout_height="wrap_content"
           android:layout_marginHorizontal="8dp"
           android:textSize="16sp"
           android:inputType="text"
           android:maxLength="100"
           android:hint="@string/title"
           android:importantForAutofill="no"
           android:layout_below="@id/editSongTitleHeading" />

       <TextView
           android:id="@+id/editSongArtistHeading"
           android:layout_width="match_parent"
           android:layout_height="wrap_content"
           android:layout_margin="8dp"
           android:text="@string/artist"
           android:textSize="12sp"
           android:layout_below="@id/editSongTitle" />

       <EditText
           android:id="@+id/editSongArtist"
           android:layout_width="match_parent"
           android:layout_height="wrap_content"
           android:layout_marginHorizontal="8dp"
           android:textSize="16sp"
           android:inputType="text"
           android:maxLength="100"
           android:hint="@string/artist"
           android:importantForAutofill="no"
           android:layout_below="@id/editSongArtistHeading" />

       <TextView
           android:id="@+id/editSongDiscHeading"
           android:layout_width="60dp"
           android:layout_height="wrap_content"
           android:layout_margin="8dp"
           android:text="@string/disc"
           android:textSize="12sp"
           android:layout_below="@id/editSongArtist" />

       <EditText
           android:id="@+id/editSongDisc"
           android:layout_width="60dp"
           android:layout_height="wrap_content"
           android:layout_marginHorizontal="8dp"
           android:textSize="16sp"
           android:inputType="number"
           android:maxLength="1"
           android:hint="@string/disc"
           android:importantForAutofill="no"
           android:layout_below="@id/editSongDiscHeading" />

       <TextView
           android:id="@+id/editSongTrackHeading"
           android:layout_width="60dp"
           android:layout_height="wrap_content"
           android:layout_marginHorizontal="16dp"
           android:layout_marginVertical="8dp"
           android:text="@string/track"
           android:textSize="12sp"
           android:layout_below="@id/editSongArtist"
           android:layout_toEndOf="@id/editSongDiscHeading" />

       <EditText
           android:id="@+id/editSongTrack"
           android:layout_width="60dp"
           android:layout_height="wrap_content"
           android:textSize="16sp"
           android:inputType="number"
           android:maxLength="3"
           android:hint="@string/track"
           android:importantForAutofill="no"
           android:layout_below="@id/editSongTrackHeading"
           android:layout_alignStart="@id/editSongTrackHeading" />

       <TextView
           android:id="@+id/editSongYearHeading"
           android:layout_width="100dp"
           android:layout_height="wrap_content"
           android:layout_margin="8dp"
           android:text="@string/year"
           android:textSize="12sp"
           android:layout_below="@id/editSongArtist"
           android:layout_toEndOf="@id/editSongTrackHeading" />

       <EditText
           android:id="@+id/editSongYear"
           android:layout_width="100dp"
           android:layout_height="wrap_content"
           android:textSize="16sp"
           android:inputType="number"
           android:maxLength="4"
           android:hint="@string/year"
           android:importantForAutofill="no"
           android:layout_below="@id/editSongYearHeading"
           android:layout_alignStart="@id/editSongYearHeading" />
   </RelativeLayout>
</ScrollView>
The root element of the fragment_edit_song layout is a ScrollView widget that will allow the user to scroll down if the layout’s contents are too large to fit in the window. The ScrollView widget has a scrollbars attribute set to none, which means while the user can still scroll the layout’s content, no scrollbar will be visible. Inside the ScrollView widget, there is a RelativeLayout widget that will organise the various TextView, EditText and ImageView widgets that will help the user edit the song’s information. The EditText widgets will be populated with the song’s metadata. Each EditText widget is accompanied by a TextView widget that labels what data is being displayed (e.g. title, artist, album etc.).
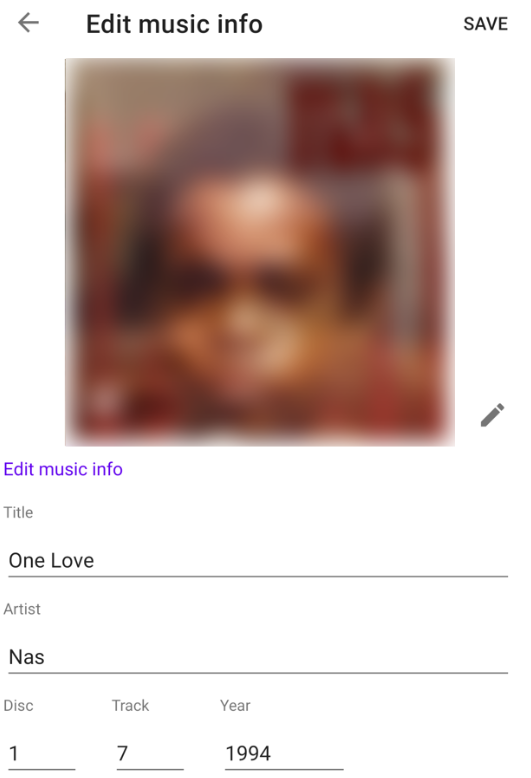
The user can edit the information in the EditText widgets if they wish. Some EditText widgets have extra attributes to restrict user input. For example, several EditText widgets feature a maxLength attribute of 100 to ensure the user can not enter values that are over 100 characters long, while others have an inputType of “number” which means users can only enter numeric values (e.g. for the song’s disc or track number). The song’s current album artwork is inserted into an ImageView widget at the top of the layout. A pen icon is superimposed over the bottom right corner of the artwork to signal to the user that they can change the artwork.
Changes in a song’s metadata will be handled by a dedicated fragment. Create a new Kotlin class by right-clicking the songs directory (Project > app > java > name of the project > ui > songs) and then selecting New > Kotlin Class/File. Name the file EditSongFragment and select Class from the list of options. Once the EditSongFragment.kt file opens in the editor, modify its code so it reads as follows:
import androidx.fragment.app.Fragment

class EditSongFragment : Fragment() {

   private var _binding: FragmentEditSongBinding? = null
   private val binding get() = _binding!!
   private var song: Song? = null
   private var newArtwork: Bitmap? = null
   private lateinit var mainActivity: MainActivity

   override fun onCreateView(
       inflater: LayoutInflater,
       container: ViewGroup?,
       savedInstanceState: Bundle?
   ): View {
       arguments?.let {
           val safeArgs = EditSongFragmentArgs.fromBundle(it)
           song = safeArgs.song
       }

       _binding = FragmentEditSongBinding.inflate(inflater, container, false)
       mainActivity = activity as MainActivity
       setupMenu()

       return binding.root
   }

   override fun onViewCreated(view: View, savedInstanceState: Bundle?) {
       super.onViewCreated(view, savedInstanceState)

       binding.editSongTitle.text = SpannableStringBuilder(song?.title)
       binding.editSongArtist.text = SpannableStringBuilder(song?.artist)
       binding.editSongDisc.text = SpannableStringBuilder(song?.track.toString().substring(0, 1))
       binding.editSongTrack.text = SpannableStringBuilder(song?.track.toString().substring(1, 4)
           .toInt().toString())
       binding.editSongYear.text = SpannableStringBuilder(song!!.year)

       mainActivity.loadArtwork(song?.albumId, binding.editSongArtwork)

       // TODO: Define edit song artwork action here
   }

   override fun onDestroyView() {
       super.onDestroyView()
       _binding = null
   }
}
In the above code, the onCreateView method retrieves the arguments which were supplied when the EditSongFragment was opened. Referring back to the mobile_navigation navigation graph, we can see the EditSongFragment fragment has an argument called song, and so we use that name to retrieve the user’s selected Song object from the fragment’s Safe Args class. The Song object is stored in a variable called song so it can be used elsewhere in the fragment.
The relevant details from the Song object are loaded into the fragment_edit_song layout’s EditText widgets via the layout’s binding class. To load text into an EditText widget, the text must first be converted to a SpannableStringBuilder instance, which is an editable String. Next, the album artwork is inserted into the ImageView widget using the MainActivity class’s loadArtwork method. If the user clicks the artwork ImageView or the pen icon ImageView that is superimposed in the bottom right corner of the artwork, then a window will appear allowing the user to search their device for a new image to use as the album artwork. To put this feature into effect, replace the TODO comment in the onViewCreated method with the following code:
binding.editSongArtwork.setOnClickListener {
   registerResult.launch(Intent(Intent.ACTION_PICK, MediaStore.Images.Media.INTERNAL_CONTENT_URI))
}

binding.editSongArtworkIcon.setOnClickListener {
   registerResult.launch(Intent(Intent.ACTION_PICK, MediaStore.Images.Media.INTERNAL_CONTENT_URI))
}
The above code assigns both ImageView widgets an onClick listener that will launch an intent with an action of ACTION_PICK. The ACTION_PICK action means that the intent expects the user to select a data item using the device’s document provider. The type of data is defined in the second parameter of the intent, which in this case is the URI associated with an image file on the user’s device. To respond to the user’s selection, add the following code below the list of variables at the top of the class:
private val registerResult = registerForActivityResult(ActivityResultContracts.StartActivityForResult()) { result ->
   if (result.resultCode == AppCompatActivity.RESULT_OK) {
       try {
           result.data?.data?.let { uri ->
               newArtwork = ImageDecoder.decodeBitmap(
                   ImageDecoder.createSource(requireActivity().contentResolver, uri)
               )
               Glide.with(this)
                   .load(uri)
                   .centerCrop()
                   .into(binding.editSongArtwork)
           }
       } catch (_: FileNotFoundException) {
       } catch (_: IOException) { }
   }
}
The registerResult variable defined above launches an intent using a method called registerForActivityResult. If the intent is executed successfully and the user selects an image, then the result of the request will be RESULT_OK. In this case, the URI of the selected image is retrieved from the intent result data. Next, the raw image data associated with the URI is converted to a Bitmap for storage purposes using the ImageDecoder class’s decodeBitmap method. Finally, the image rendering framework Glide replaces the artwork that was loaded into the artwork ImageView with the user’s selected image.
The user can save their changes to the song’s metadata by pressing a menu item in the app toolbar.

To display the save menu item, add the following code below the onViewCreated method:
private fun setupMenu() {
   (requireActivity() as MenuHost).addMenuProvider(object : MenuProvider {
       override fun onPrepareMenu(menu: Menu) {
           menu.findItem(R.id.search)?.isVisible = false
           menu.findItem(R.id.save)?.isVisible = true
       }

       override fun onCreateMenu(menu: Menu, menuInflater: MenuInflater) { }

       override fun onMenuItemSelected(menuItem: MenuItem): Boolean {
           return menuItemSelected(menuItem)
       }
   }, viewLifecycleOwner, Lifecycle.State.RESUMED)
}
Note you may need to add the following import statement to the top of the file:
import androidx.lifecycle.LifecycleThe setupMenu method configures a MenuProvider instance that the fragment can use to coordinate the contents of the app bar. First, the above code uses the MenuProvider class’s onPrepareMenu method to hide the search icon menu item and reveal the save menu item. Both menu items were defined earlier in the main.xml menu resource file. To make the save menu item operational and persist the user’s changes to the song’s metadata, we’ll define a separate method called menuItemSelected. For this purpose, add the following code below the setupMenu method:
private fun menuItemSelected(menuItem: MenuItem): Boolean {
   return when (menuItem.itemId) {
       R.id.save -> {
           val newTitle = binding.editSongTitle.text.toString()
           val newArtist = binding.editSongArtist.text.toString()
           val newDisc = binding.editSongDisc.text.toString()
           val newTrack = binding.editSongTrack.text.toString()
           val newYear = binding.editSongYear.text.toString()

           // Check no fields are blank
           if (newTitle.isNotEmpty() && newArtist.isNotEmpty() && newDisc.isNotEmpty() && newTrack.isNotEmpty() && newYear.isNotEmpty()) {
               val completeTrack = when (newTrack.length) {
                   3 -> newDisc + newTrack
                   2 -> newDisc + "0" + newTrack
                   else -> newDisc + "00" + newTrack
               }.toInt()

               // Check something has actually been changed
               if (newTitle != song!!.title || newArtist != song!!.artist || completeTrack != song!!.track || newYear != song!!.year || newArtwork != null) {

                   // Save the new artwork if the artwork has been changed
                   newArtwork?.let { artwork ->
                       mainActivity.saveImage(song?.albumId!!, artwork)
                   }

                   song!!.title = newTitle
                   song!!.artist = newArtist
                   song!!.track = completeTrack
                   song!!.year = newYear

                   mainActivity.updateSong(song!!)
               }

               Toast.makeText(activity, getString(R.string.details_saved), Toast.LENGTH_SHORT).show()
               requireView().findNavController().popBackStack()
           } else Toast.makeText(activity, getString(R.string.check_fields_not_empty), Toast.LENGTH_SHORT).show()
           true
       }
       else -> false
   }
}
The menuItemSelected method responds to clicks of the save menu item by retrieving the contents of all the EditText widgets in the fragment_edit_song layout. If any of the strings of text are empty, then a toast notification will advise the user that they need to provide the missing information. Next, the method proceeds to save the new album artwork image (if necessary) and update the Song object with the metadata values provided by the user. The updated Song object is sent to the database via a MainActivity method called updateSong. Finally, the user is transported back to the fragment that was open before the EditSongFragment fragment using the NavController class’s popBackStack method. The popBackstack method restores the previous destination in the user’s navigation history for a given navigation graph.
Saving changes to a song’s metadata
There are several methods we must add to the MainActivity class to save changes to a song’s metadata. The first method is called saveImage, which will write Bitmap images representing album artwork to the app’s internal storage. To define the saveImage method, open the MainActivity.kt file (Project > app > java > name of the project) and add the following code below the showSongPopup method:
fun saveImage(albumId: String, image: Bitmap) {
   val directory = ContextWrapper(application).getDir("albumArt", Context.MODE_PRIVATE)
   val path = File(directory, "$albumId.jpg")

   FileOutputStream(path).use {
       image.compress(Bitmap.CompressFormat.JPEG, 100, it)
   }
}
The saveImage method features parameters that accept a String detailing the album ID of the album the artwork is associated with, and a Bitmap representation of the image to save. The album ID will contribute to the filename. All artwork images are stored in an internal directory called albumArt. The albumArt directory is accessed using the getDir method, which will also create the directory if it does not already exist. The operating mode for the albumArt directory is set to MODE_PRIVATE, which means the directory and its contents will only be accessible to this application. A File object containing the details of the directory and the image’s filename is then stored in a variable called path.
The image Bitmap is written to the albumArt directory using an instance of the FileOutputStream class. The image writing is initiated using the Bitmap class’s compress method, which also specifies the format of the output image (JPEG in this instance) and the image quality (100 equals maximum quality, 0 equals minimum quality).
Moving on, let’s turn our attention to a method called updateSong, which will send updated Song objects to the Room database. To do this, the updateSong method will need to interact with the MusicViewModel view model, so add the following variable to the list of variables at the top of the MainActivity class:
private lateinit var musicViewModel: MusicViewModelInitialise the variable by adding the following code to the onCreate method:
musicViewModel = ViewModelProvider(this)[MusicViewModel::class.java]Once the musicViewModel variable has been initialised, define the updateSong method by adding the following code below the saveImage method:
fun updateSong(song: Song) {
   musicViewModel.updateSong(song)

   // All occurrences of the song need to be updated in the play queue
   val affectedQueueItems = playQueue.filter { it.description.mediaId == song.songId.toString() }
   if (affectedQueueItems.isEmpty()) return

   val metadataBundle = Bundle().apply {
       putString("album", song.album)
       putString("album_id", song.albumId)
       putString("artist", song.artist)
       putString("title", song.title)
   }
   for (queueItem in affectedQueueItems) {
       metadataBundle.putLong("queue_id", queueItem.queueId)
       mediaController.sendCommand("UPDATE_QUEUE_ITEM", metadataBundle, null)
   }
}
The updateSong method sends the updated Song object to the MusicViewModel view model, which in turn will update the entry for that song in the Room database. We also need to update areas of the app that might be using the song, such as the play queue. For this purpose, we use Kotlin’s filter function to find all the elements in the play queue that have a media ID equal to the ID of the updated song. If there are play queue items to update, then we generate a Bundle containing all the play queue item fields that could have been affected by the update including the song’s title, album and artist etc. Finally, we use the media controller’s sendCommand method to notify the media browser service about each queue item that needs updating.
To handle requests to update play queue items, we need to add some code to the media browser service. Open the MediaPlaybackService.kt file (Project > app > java > name of the project) and locate the onCommand callback method in the mediaSessionCallback variable. Replace the TODO comment with the following code:
"UPDATE_QUEUE_ITEM" -> {
   extras?.let {
       val queueItemId = it.getLong("queue_id")

       val index = playQueue.indexOfFirst { item ->
           item.queueId == queueItemId
       }

       if (index == -1) return

       val extrasBundle = Bundle().apply {
           putString("album", it.getString("album"))
           putString("album_id", it.getString("album_id"))
       }

       val mediaDescription = MediaDescriptionCompat.Builder()
           .setExtras(extrasBundle)
           .setMediaId(playQueue[index].description.mediaId)
           .setSubtitle(it.getString("artist"))
           .setTitle(it.getString("title"))
           .build()

       playQueue.removeAt(index)
       val updatedQueueItem = QueueItem(mediaDescription, queueItemId)
       playQueue.add(index, updatedQueueItem)

       if (queueItemId == currentlyPlayingQueueItemId) {
           setCurrentMetadata()
           refreshNotification()
       }
       setPlayQueue()
   }
}
The above code starts by finding the index of the queue item that has a queue item ID equal to the queue ID supplied in the bundle included with the command. If a matching queue item is found, then a new MediaDescriptionCompat object is built using the newly supplied metadata. The MediaDescriptionCompat object is then packaged in a QueueItem object and used to replace the target item in the play queue. If the affected queue item was the currently playing queue item, then we also refresh the currently playing song metadata and media service notification to reflect the new song data.
Setting up the PlayQueue fragment and layout
In this section, we will design the play queue fragment. The fragment will require a layout, so right-click the layout directory then select New > Layout Resource File. Name the file fragment_play_queue then press OK. Once the layout opens in the editor, switch to Code view and modify the file so it reads as follows:
<?xml version="1.0" encoding="utf-8"?>
<androidx.recyclerview.widget.RecyclerView xmlns:android="http://schemas.android.com/apk/res/android"
   xmlns:app="http://schemas.android.com/apk/res-auto"
   android:layout_width="match_parent"
   android:layout_height="match_parent"
   android:contentDescription="@null"
   app:layoutManager="androidx.recyclerview.widget.LinearLayoutManager" />
The fragment_play_queue layout is straightforward and simply contains a RecyclerView widget that will display the contents of the play queue. To make the play queue fragment operational, create a new Kotlin class by right-clicking the playQueue directory (Project > app > java > name of the project > ui) and then selecting New > Kotlin Class/File. Name the file PlayQueueFragment and select Class from the list of options. Once the PlayQueueFragment.kt file opens in the editor, modify its code so it reads as follows:
import androidx.fragment.app.Fragment

class PlayQueueFragment : Fragment() {

   private var _binding: FragmentPlayQueueBinding? = null
   private val binding get() = _binding!!
   private lateinit var mainActivity: MainActivity

   override fun onCreateView(
       inflater: LayoutInflater,
       container: ViewGroup?,
       savedInstanceState: Bundle?
   ): View {
       _binding = FragmentPlayQueueBinding.inflate(inflater, container, false)
       mainActivity = activity as MainActivity

       return binding.root
   }

   override fun onViewCreated(view: View, savedInstanceState: Bundle?) {
       super.onViewCreated(view, savedInstanceState)

       binding.root.itemAnimator = DefaultItemAnimator()

       // TODO: Initialise PlayQueueAdapter here
   }

   override fun onDestroyView() {
       super.onDestroyView()
       _binding = null
   }
}
In the above code, the onCreateView method initialises the fragment_play_queue layout’s binding class so the fragment can interact with the layout’s components. The only widget in the layout is a RecyclerView, and so the above code assigns the RecyclerView an item animator, which will provide a set of standard animations when RecyclerView items are added, removed or updated.
Displaying the play queue
In this section, we’ll design an adapter that will handle the user’s play queue. It will display the details of every song in the play queue and allow the user to rearrange the songs if they wish. To facilitate this, we need to create a layout that will display the details for a given play queue item. Create a new layout resource file in the usual way, by right-clicking the layout directory (Project > app > res) and then selecting New > Layout Resource File. Name the layout queue_item then press OK. Once the layout opens in the editor, switch to Code view and edit the file so it reads as follows:
<?xml version="1.0" encoding="utf-8"?>
<RelativeLayout xmlns:android="http://schemas.android.com/apk/res/android"
   xmlns:app="http://schemas.android.com/apk/res-auto"
   android:layout_width="match_parent"
   android:layout_height="wrap_content"
   android:background="?attr/selectableItemBackground"
   android:padding="12dp">

   <ImageView
       android:id="@+id/handle"
       android:layout_width="40dp"
       android:layout_height="match_parent"
       android:src="@drawable/ic_drag_handle"
       android:contentDescription="@string/handle_view_desc"
       android:layout_alignParentStart="true"
       android:layout_centerVertical="true"
       app:tint="@color/material_on_surface_emphasis_medium" />

   <LinearLayout
       android:layout_width="0dp"
       android:layout_height="wrap_content"
       android:orientation="vertical"
       android:layout_toEndOf="@id/handle"
       android:layout_toStartOf="@id/menu"
       android:layout_marginHorizontal="8dp"
       android:layout_centerVertical="true" >

       <TextView
           android:id="@+id/title"
           android:layout_width="match_parent"
           android:layout_height="wrap_content"
           android:singleLine="true"
           android:textSize="16sp" />

       <TextView
           android:id="@+id/artist"
           android:layout_width="match_parent"
           android:layout_height="wrap_content"
           android:singleLine="true"
           android:textSize="14sp"/>
   </LinearLayout>

   <ImageButton
       android:id="@+id/menu"
       android:layout_width="25dp"
       android:layout_height="25dp"
       android:src="@drawable/ic_more"
       android:contentDescription="@string/options_menu"
       android:layout_alignParentEnd="true"
       android:layout_centerVertical="true"
       style="@style/Widget.AppCompat.ActionButton.Overflow" />
</RelativeLayout>
The root element of the queue_item layout is a RelativeLayout widget. On the left-hand side of the layout, there is an ImageView widget containing an icon of a handle that will allow the user to drag and reorder items in the play queue. Meanwhile, on the right-hand side of the layout, there is an ImageButton widget that will open an options menu when clicked. The remainder of the layout is occupied by a LinearLayout widget containing two TextView widgets. The TextView widgets will contain the song’s title and artist name, respectively. Both widgets have a singleLine attribute set to true which will restrict each widget’s contents to a single line of text and help ensure each play queue item occupies the same amount of space.
Moving on, we’ll now create an adapter that will populate the RecyclerView and handle user interactions. Right-click the playQueue directory then select New > Kotlin Class/File. Name the file PlayQueueAdapter and select Class from the list of options. Once the PlayQueueAdapter.kt file opens in the editor, edit its code as follows:
import android.support.v4.media.session.MediaSessionCompat.QueueItem

class PlayQueueAdapter(private val activity: MainActivity, private val fragment: PlayQueueFragment): RecyclerView.Adapter<PlayQueueAdapter.PlayQueueViewHolder>() {
   var currentlyPlayingQueueId = -1L
   val playQueue = mutableListOf<QueueItem>()

   inner class PlayQueueViewHolder(itemView: View) :
       RecyclerView.ViewHolder(itemView) {

       internal var mTitle = itemView.findViewById<View>(R.id.title) as TextView
       internal var mArtist = itemView.findViewById<View>(R.id.artist) as TextView
       internal var mHandle = itemView.findViewById<ImageView>(R.id.handle)
       internal var mMenu = itemView.findViewById<ImageButton>(R.id.menu)

       init {
           itemView.isClickable = true
           itemView.setOnClickListener {
           activity.skipToAndPlayQueueItem(playQueue[layoutPosition].queueId)
           }
       }
   }

   override fun onCreateViewHolder(parent: ViewGroup, viewType: Int): PlayQueueViewHolder {
       return PlayQueueViewHolder(LayoutInflater.from(parent.context).inflate(R.layout.queue_item, parent, false))
   }

   @SuppressLint("ClickableViewAccessibility")
   override fun onBindViewHolder(holder: PlayQueueViewHolder, position: Int) {
       val currentQueueItemDescription = playQueue[position].description

       holder.mTitle.text = currentQueueItemDescription.title
       holder.mArtist.text = currentQueueItemDescription.subtitle

       val textColour = if (playQueue[position].queueId == currentlyPlayingQueueId) {
           MaterialColors.getColor(
               activity, com.google.android.material.R.attr.colorAccent, Color.CYAN
           )
       } else MaterialColors.getColor(
           activity, com.google.android.material.R.attr.colorOnSurface, Color.LTGRAY
       )

       holder.mTitle.setTextColor(textColour)
       holder.mArtist.setTextColor(textColour)

       holder.mHandle.setOnTouchListener { _, event ->
           // TODO: Handle the drag action here
           return@setOnTouchListener true
       }

       holder.mMenu.setOnClickListener {
           // TODO: Open the options menu here
       }
   }

   override fun getItemCount() = playQueue.size
}
Note you may need to add the following import statement to the top of the file:
import android.graphics.ColorThe PlayQueueAdapter class contains two variables in its primary constructor called activity and fragment. The variables will store instances of the MainActivity class and the PlayQueueFragment class, respectively. In the body of the adapter, a variable called currentlyPlayingQueueId will store the queue ID value of the currently playing queue item. The value of this variable will help distinguish the currently playing song from the rest of the play queue. Also, there is a variable called playQueue, which will store the complete list of QueueItem objects that form the play queue.
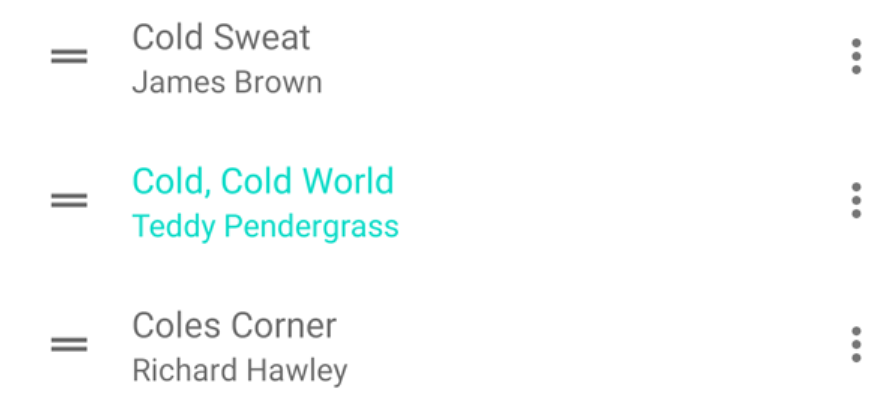
Next, an inner class called PlayQueueViewHolder is established. This inner class will initialise the components of the queue_item.xml layout and help handle user interactions. The adapter knows to use the queue_item layout because this is the layout that is inflated by the onCreateViewHolder method. The adapter also contains a method called onBindViewHolder, which is responsible for populating the data at each position in the RecyclerView. In this case, the onBindViewHolder retrieves the corresponding MediaDescriptionCompat object for the given position in the RecyclerView and play queue. It then uses the object’s information to populate the song’s title and artist name TextView widgets. The onBindViewHolder method also checks whether the ID of the queue item being displayed matches the ID of the currently playing queue item. If there is a match, then the text colour is set to the accent colour of the active theme to highlight the currently playing queue item. Otherwise, the regular onSurface colour is used, as shown below.
To ensure the play queue is up to date we must register an observer on the PlayQueueViewModel view model’s playQueue variable. To implement the observer, open the PlayQueueFragment.kt file (Project > app > java > name of the project > ui > playQueue) and add the following variables to the top of the class:
private val playQueueViewModel: PlayQueueViewModel by activityViewModels()
private lateinit var adapter: PlayQueueAdapter
The above variables will provide access to the PlayQueueViewModel class and the PlayQueueAdapter class, respectively. To initialise the adapter variable and apply it to the RecyclerView, replace the TODO comment in the onViewCreated method with the following code:
adapter = PlayQueueAdapter(mainActivity, this)
binding.root.adapter = adapter
Moving on, add the following code to the bottom of the onViewCreated method to register an observer to the PlayQueueViewModel’s playQueue variable:
playQueueViewModel.playQueue.observe(viewLifecycleOwner) { playQueue ->
   if (adapter.playQueue.isEmpty()) {
       adapter.playQueue.addAll(playQueue)
       adapter.notifyItemRangeInserted(0, playQueue.size)
   } else {
       adapter.processNewPlayQueue(playQueue)
   }
}
The above observer monitors changes in the contents of the playQueue variable. If an update arrives and the adapter is empty, then the full play queue is added to the adapter and the notifyItemRangeInserted method will load the items into the RecyclerView. Meanwhile, if the adapter already contains items, then further analysis is required to determine the appropriate changes to make. The analysis will be carried out by a method called processNewPlayQueue. To define the processNewPlayQueue method, return to the PlayQueueAdapter class and add the following code below the getItemCount method:
fun processNewPlayQueue(newPlayQueue: List<QueueItem>) {
    if (newPlayQueue.map { it.queueId } == playQueue.map { it.queueId }) {
        return
    }

    for ((index, queueItem) in newPlayQueue.withIndex()) {
        when {
            index >= playQueue.size -> {
                playQueue.add(queueItem)
                notifyItemInserted(index)
            }
            playQueue.find { it.queueId == queueItem.queueId } == null -> {
                playQueue.add(index, queueItem)
                notifyItemInserted(index)
            }
            newPlayQueue.find { it.queueId == playQueue[index].queueId } == null -> {
                var numberOfItemsRemoved = 0
                do {
                    playQueue.removeAt(index)
                    ++numberOfItemsRemoved
                } while (index < playQueue.size &&
                    newPlayQueue.find { it.queueId == playQueue[index].queueId } == null)

                when {
                    numberOfItemsRemoved == 1 -> notifyItemRemoved(index)
                    numberOfItemsRemoved > 1 -> notifyItemRangeRemoved(index,
                        numberOfItemsRemoved)
                }
            }
        }
    }

    if (playQueue.size > newPlayQueue.size) {
        val numberItemsToRemove = playQueue.size - newPlayQueue.size
        repeat(numberItemsToRemove) { playQueue.removeLast() }
        notifyItemRangeRemoved(newPlayQueue.size, numberItemsToRemove)
    }
}
The processNewPlayQueue method defined above first checks that the order of the incoming play queue item IDs is different to the existing play queue item IDs. If the sequences are the same, then no changes are required so a return statement exits the method. On the other hand, if the new play queue is different, then an iterator loops through each item in the new play queue list and determines the appropriate action to take. If the index of a queue item is greater than the size of the adapter’s play queue, then the queue item is simply added to the end of the list. Meanwhile, if the incoming queue item is not found in the existing play queue, then the above code determines that the incoming item is a new queue item that should be added to the list. Finally, if there are items that exist in the existing play queue but not in the incoming play queue, then the items are removed as they should no longer have a place in the play queue. Once all the necessary updates are complete, any superfluous items at the end of the adapter’s play queue list are removed using Kotlin’s removeLast function.
In addition to the play queue, the play queue fragment also must monitor the ID of the currently playing queue item. To register the second observer, add the following code below the play queue observer:
playQueueViewModel.currentQueueItemId.observe(viewLifecycleOwner) { position ->
   position?.let { adapter.changeCurrentlyPlayingQueueItemId(it) }
}
Whenever the currently playing queue item ID changes, the new queue ID will be sent to an adapter method called changeCurrentlyPlayingQueueItemId. To define the changeCurrentlyPlayingQueueItemId method, add the following code to the PlayQueueAdapter.kt file below the processNewPlayQueue method:
fun changeCurrentlyPlayingQueueItemId(newQueueId: Long) {
   val oldCurrentlyPlayingIndex = playQueue.indexOfFirst {
       it.queueId == currentlyPlayingQueueId
   }

   currentlyPlayingQueueId = newQueueId
   if (oldCurrentlyPlayingIndex != -1) notifyItemChanged(oldCurrentlyPlayingIndex)

   val newCurrentlyPlayingIndex = playQueue.indexOfFirst {
       it.queueId == currentlyPlayingQueueId
   }
   if (newCurrentlyPlayingIndex != -1) {
       notifyItemChanged(newCurrentlyPlayingIndex)
   }
}
The changeCurrentlyPlayingQueueItemId method finds the indices of the previous (if applicable) and new currently playing queue items. Next, it uses the adapter’s notifyItemChanged method to refresh both items. As mentioned previously, the onBindViewHolder method will change the text colour for the currently playing queue item to distinguish it from the rest of the play queue.
The final thing we will configure in this section is for the RecyclerView to automatically scroll to the currently playing queue item when the play queue fragment opens. To implement this feature, return to the PlayQueueFragment class and add the following code below the onViewCreated method:
override fun onResume() {
   super.onResume()

   val currentlyPlayingQueueItemIndex = adapter.playQueue.indexOfFirst {queueItem ->
       queueItem.queueId == adapter.currentlyPlayingQueueId
   }

   if (currentlyPlayingQueueItemIndex != -1) {
       (binding.root.layoutManager as LinearLayoutManager)
           .scrollToPositionWithOffset(currentlyPlayingQueueItemIndex, 0)
   }
}
The above code references the onResume stage of the fragment lifecycle. The onResume stage will run whenever the fragment becomes visible to the user, either when it is launched for the first time or if the user returns to the app after leaving the fragment open. In this case, we instruct the onResume method to find the index of the currently playing queue item. The RecyclerView layout manager’s scrollToPositionWithOffset method then scrolls to the queue item’s position. If the play queue is empty or the currently playing queue item cannot be found, then the value of the currentlyPlayingQueueItemIndex variable will equal -1 and no scroll event will occur.
Reordering items in the play queue
The user will be able to drag and reorder play queue items. To enable this functionality, open the PlayQueueFragment.kt file (Project > app > java > name of the project > ui > playQueue) and add the following variable to the top of the class:
private val itemTouchHelper by lazy {
   val simpleItemTouchCallback = object : ItemTouchHelper.SimpleCallback(UP or DOWN, 0) {
       var to: Int? = null
       var queueItem: QueueItem? = null

       override fun onSelectedChanged(viewHolder: RecyclerView.ViewHolder?, actionState: Int) {
           super.onSelectedChanged(viewHolder, actionState)

           if (actionState == ACTION_STATE_DRAG) viewHolder?.itemView?.alpha = 0.5f
       }

       override fun clearView(recyclerView: RecyclerView, viewHolder: RecyclerView.ViewHolder) {
           super.clearView(recyclerView, viewHolder)

           viewHolder.itemView.alpha = 1.0f

           if (to != null && queueItem != null) {
               mainActivity.notifyQueueItemMoved(queueItem!!.queueId, to!!)
               to = null
               queueItem = null
           }
       }

       override fun onMove(recyclerView: RecyclerView, viewHolder: RecyclerView.ViewHolder, target: RecyclerView.ViewHolder): Boolean {
           val from = viewHolder.layoutPosition
           to = target.layoutPosition
           if (from != to) {
               queueItem = adapter.playQueue[from]
               adapter.playQueue.removeAt(from)
               adapter.playQueue.add(to!!, queueItem!!)
               adapter.notifyItemMoved(from, to!!)
           }

           return true
       }

       override fun onSwiped(viewHolder: RecyclerView.ViewHolder, direction: Int) { }
   }
   ItemTouchHelper(simpleItemTouchCallback)
}
Note you may need to add the following import statement to the top of the file:
import android.support.v4.media.session.MediaSessionCompat.QueueItemThe above variable defines an ItemTouchHelper.SimpleCallback object that will handle user gesture interactions with items in the RecyclerView. In the SimpleCallback object’s primary constructor, you can define the drag directions and swipe directions that the item touch helper should respond to. In this case, the accepted drag directions are UP and DOWN, which will allow the user to move play queue items up and down. If you wanted the user to be able to drag items left and right as well then you could also add the drag directions LEFT and RIGHT. You can also specify swipe directions. In this case, the swipe directions parameter is set to 0, which disables the swipe feature.
The SimpleCallback object contains several callback methods that respond to user interactions. The first method is called onSelectedChanged and defines what happens when a RecyclerView item is selected. In this case, the method makes the selected item 50% transparent by altering the item’s alpha property. Once the item is released, the clearView method restores the selected item to full opacity. The clearView method also runs a MainActivity method called notifyQueueItemMoved, which will notify the media browser service of the change. Next, the onMove method tracks the movement of the RecyclerView items in real time. It determines the position the item moved to and updates the adapter accordingly. After each movement, the adapter’s notifyItemMoved method updates the RecyclerView and shows the user the reordered play queue.
To attach the item touch helper to the RecyclerView, add the following line of code to the bottom of the onViewCreated method:
itemTouchHelper.attachToRecyclerView(binding.root)Next, to direct the item touch helper to respond to drag motions on RecyclerView items, add the following method below the onResume method:
fun startDragging(viewHolder: RecyclerView.ViewHolder) = itemTouchHelper.startDrag(viewHolder)To run the startDragging method whenever the user touches the handle ImageView widget for a given RecyclerView item, return to the PlayQueueAdapter.kt file (Project > app > java > name of the project > ui > playQueue). Replace the TODO comment in the onTouch listener that is applied to handle ImageView in the onBindViewHolder method with the following code:
if (event.actionMasked == MotionEvent.ACTION_DOWN) fragment.startDragging(holder)The above code responds to ACTION_DOWN motion events. The ACTION_DOWN event occurs when the screen is first touched. In other words, as soon as the user presses the handle ImageView, the PlayQueueFragment class’s startDragging method will allow the user to drag the song to another position in the play queue.
For the final part of this section, we will notify the media browser service of the updated play queue order. To do this, open the MainActivity.kt file (Project > app > java > name of the project) and add the following code below the updateSong method:
fun notifyQueueItemMoved(queueId: Long, newIndex: Int) {
   val bundle = Bundle().apply {
       putLong("queueItemId", queueId)
       putInt("newIndex", newIndex)
   }

   mediaController.sendCommand("MOVE_QUEUE_ITEM", bundle, null)
}
The above method packages the queue ID of the affected queue item and the index of its new position in the play queue into a bundle. The bundle is then dispatched to the media browser service as a custom command called "MOVE_QUEUE_ITEM". To equip the media browser service to handle the "MOVE_QUEUE_ITEM" command, open the MediaPlaybackService.kt file (Project > app > java > name of the project) and add the following code to the when block in the onCommand callback method (found in the mediaSessionCallback variable):
"MOVE_QUEUE_ITEM" -> {
   extras?.let {
       val queueItemId = it.getLong("queueItemId", -1L)
       val newIndex = it.getInt("newIndex", -1)
       if (queueItemId == -1L || newIndex == -1 || newIndex >= playQueue.size) return@let

       val oldIndex = playQueue.indexOfFirst { queueItem -> queueItem.queueId == queueItemId }
       if (oldIndex == -1) return@let
       val queueItem = playQueue[oldIndex]
       playQueue.removeAt(oldIndex)
       playQueue.add(newIndex, queueItem)
       mediaSessionCompat.setQueue(playQueue)
   }
}
The above code extracts the queue ID and target index that were supplied in the extras bundle. Next, it uses those details to find the queue item and move it from its old index to the new index. Safeguards are in place to ensure that if the queue item cannot be found or the supplied index is invalid (e.g. when attempts to extract that information return -1) no action is taken.
Interacting with the play queue
There are several features of the play queue that we have not yet implemented. First, when the user clicks the overflow menu button for a play queue item, a popup menu should open and allow the user to remove the song from the play queue. To incorporate this feature, create a new menu resource file by right-clicking the menu directory (Project > app > res) and then selecting New > Menu Resource File. Name the file queue_item_menu then click OK. Once the queue_item_menu.xml menu resource file opens in the editor, switch the file to Code view and add the following item inside the menu element:
<item android:id="@+id/remove_item"
   android:title="@string/remove_from_queue" />
The above code defines a menu item with an ID of remove_item that will display the text “Remove from play queue”. To make the popup menu operational, return to the PlayQueueFragment.kt file (Project > app > java > name of the project > ui > playQueue) and add the following code below the startDragging method:
fun showPopup(view: View, queueId: Long) {
   PopupMenu(requireContext(), view).apply {
       inflate(R.menu.queue_item_menu)
       setOnMenuItemClickListener {
           if (it.itemId == R.id.remove_item) mainActivity.removeQueueItemById(queueId)
           true
       }
       show()
   }
}
Note you may need to add the following import statement to the top of the file:
import android.widget.PopupMenuThe above code defines a method called showPopup menu that accepts two parameters: the View that the popup menu should launch from (the menu ImageButton widget in this case) and the queue ID of the selected item. Next, the method uses the Popup class to inflate the queue_item_menu resource file. The queue_item_menu menu resource contains an item with an ID of remove_item. To define what action should occur when this item is pressed, the method implements an onMenuItemClick listener. If the selected menu item has the ID remove_item then a MainActivity method called removeQueueItemById will remove the selected item from the play queue.
To handle requests to remove items from the play queue, open the MainActivity.kt file (Project > app > java > name of the project) and add the following code below the notifyQueueItemMoved method:
fun removeQueueItemById(queueId: Long) {
   if (playQueue.isNotEmpty()) {
       val bundle = Bundle().apply {
           putLong("queueItemId", queueId)
       }

       mediaController.sendCommand("REMOVE_QUEUE_ITEM", bundle, null)
   }
}
The removeQueueItemById method packages the queue item ID into a bundle and dispatches it to the media browser service via a custom command called "REMOVE_QUEUE_ITEM". To handle the "REMOVE_QUEUE_ITEM" command, open the MediaPlaybackService.kt file (Project > app > java > name of the project) and add the following code to the when block in the onCommand callback method (found in the mediaSessionCallback variable):
"REMOVE_QUEUE_ITEM" -> {
   extras?.let {
       val queueItemId = extras.getLong("queueItemId", -1L)
       when (queueItemId) {
           -1L -> return@let
           currentlyPlayingQueueItemId -> onSkipToNext()
       }
       playQueue.removeIf { it.queueId == queueItemId }
       setPlayQueue()
   }
}
The above code extracts the queue ID of the item to be removed from the extras bundle. If the extracted queue ID is -1 then no further actions will occur. Also, if the extracted queue ID is that of the currently playing song, then the onSkipToNext method is called to skip to the next available queue item. Once this processing is done, the target queue item is removed from the play queue and the setPlayQueue method is called to dispatch a playback state update, thereby prompting MainActivity to refresh the play queue.
Returning to the MainActivity class, add the following code below the removeQueueItemById method to handle requests to add a new song to the play queue:
private fun playNext(song: Song) {
   val index = playQueue.indexOfFirst { it.queueId == currentQueueItemId } + 1

   val songDesc = buildMediaDescription(song)
   val mediaControllerCompat = MediaControllerCompat.getMediaController(this@MainActivity)
   mediaControllerCompat.addQueueItem(songDesc, index)

   Toast.makeText(this, getString(R.string.added_to_queue, song.title), Toast.LENGTH_SHORT).show()
}
The playNext method adds a given Song object to the next available position in the play queue. To do this, the above code finds the index of the currently playing song and then adds 1 to that number to get the next available index. Next, a MediaDescriptionCompat object for the supplied song is generated using the buildMediaDescription method and dispatched to the media browser service via the media controller’s addQueueItem method. The media browser service will then generate a QueueItem object and add it to the play queue at the provided index. Once this is done, a toast notification informs the user that the song has been successfully added to the play queue.
Let’s now integrate these new methods with the play queue fragment RecyclerView adapter. First, open the PlayQueueAdapter.kt file (Project > app > java > name of the project > ui > playQueue) and replace the TODO comment in the menu button’s onClick listener (defined in the onBindViewHolder method) with the following code:
fragment.showPopup(it, playQueue[position].queueId)The above code runs the PlayQueueFragment class’s showPopup method, which opens a popup options menu. The queue ID of the selected item is supplied as an argument when the method is invoked so the play queue item can be removed if the user selects the relevant menu option.
The last task in this section is to configure the MainActivity class to monitor the media browser service’s play queue and currently playing queue item ID because this data will be required for other processes. To process this data, return to the MainActivity class and replace the TODO comment in the controllerCallback variable with the following code:
val mediaControllerCompat = MediaControllerCompat.getMediaController(this@MainActivity)
playQueue = mediaControllerCompat.queue
playQueueViewModel.playQueue.postValue(playQueue)
if (state?.activeQueueItemId != currentQueueItemId) {
   currentQueueItemId = state?.activeQueueItemId ?: -1
   playQueueViewModel.currentQueueItemId.postValue(currentQueueItemId)
}
The above code resides in the onPlaybackStateChanged callback method, so will run whenever a playback state update is issued. In brief, it retrieves the play queue from the media controller and dispatches it to the PlayQueueViewModel view model. It also retrieves the active queue item ID from the playback state update, but the ID will only be dispatched to the view model if it differs from the already held current queue item ID.
Setting up the Search fragment and layout
The music app will allow the user to search their music library for songs. This functionality will be achieved by querying the database for entries that match the user’s search query and displaying the results in a dedicated fragment. The search results fragment will require a layout, so right-click the layout directory then select New > Layout Resource File. Name the file fragment_search then press OK. Once the fragment_search.xml layout opens in the editor, switch to Code view and modify the file so it reads as follows:
<?xml version="1.0" encoding="utf-8"?>
<androidx.constraintlayout.widget.ConstraintLayout xmlns:android="http://schemas.android.com/apk/res/android"
   xmlns:app="http://schemas.android.com/apk/res-auto"
   android:layout_width="match_parent"
   android:layout_height="match_parent"
   android:paddingVertical="8dp">

   <TextView
       android:id="@+id/noResults"
       android:layout_width="wrap_content"
       android:layout_height="wrap_content"
       android:text="@string/no_results"
       android:textSize="14sp"
       android:visibility="gone"
       app:layout_constraintTop_toTopOf="parent"
       app:layout_constraintStart_toStartOf="parent"
       app:layout_constraintEnd_toEndOf="parent" />

   <androidx.recyclerview.widget.RecyclerView
       android:id="@+id/recyclerView"
       android:layout_width="match_parent"
       android:layout_height="match_parent"
       android:contentDescription="@string/search_results"
       app:layoutManager="androidx.recyclerview.widget.LinearLayoutManager" />
</androidx.constraintlayout.widget.ConstraintLayout>
The root element of the fragment_search layout is a ConstraintLayout widget. The ConstraintLayout coordinates a RecyclerView widget, which will display the list of search results, and a TextView widget, which will advise that no search results were found. The TextView widget is hidden by default because its visibility attribute is set to gone; however, the widget will become visible whenever the query returns no results.
Moving on, let’s build the fragment which will handle the search results. Create a new Kotlin class by right-clicking the search ui directory (Project > app > java > name of the project > ui) and then selecting New > Kotlin Class/File. Name the file SearchFragment and select Class from the list of options. Once the SearchFragment.kt file opens in the editor, modify its code so it reads as follows:
import androidx.fragment.app.Fragment
import android.widget.SearchView

class SearchFragment : Fragment() {

   private var _binding: FragmentSearchBinding? = null
   private val binding get() = _binding!!
   private var musicDatabase: MusicDatabase? = null
   private var searchView: SearchView? = null
   private lateinit var adapter: SongsAdapter
   private lateinit var mainActivity: MainActivity

   override fun onCreateView(
       inflater: LayoutInflater,
       container: ViewGroup?,
       savedInstanceState: Bundle?
   ): View {
       _binding = FragmentSearchBinding.inflate(inflater, container, false)
       mainActivity = activity as MainActivity
       musicDatabase = MusicDatabase.getDatabase(requireContext())

       return binding.root
   }

   override fun onViewCreated(view: View, savedInstanceState: Bundle?) {
       super.onViewCreated(view, savedInstanceState)

       adapter = SongsAdapter(mainActivity)
       binding.recyclerView.adapter = adapter
       binding.recyclerView.itemAnimator = DefaultItemAnimator()

       setupMenu()
   }
}
The SearchFragment class’s onCreateView method initialises the fragment_search layout’s binding class so the fragment can interact with the layout’s components. An instance of the MusicDatabase class is also established so the search fragment can query the Room database and retrieve search results. You may also notice that the onViewCreated method creates an instance of the SongsAdapter adapter and applies it to the RecyclerView. We created the SongsAdapter adapter earlier for the songs fragment, but we can reuse it here as the search fragment will be displaying and handling song data in the same way. This is a great example of reusing code and saves us from having to create another adapter class.
Once the search fragment opens, it should expand the search icon in the app toolbar so the user can type their query. To enable this, add the following code below the onViewCreated method:
private fun setupMenu() {
   (requireActivity() as MenuHost).addMenuProvider(object : MenuProvider {
       override fun onPrepareMenu(menu: Menu) {
           val searchItem = menu.findItem(R.id.search)
           searchView = searchItem.actionView as SearchView

           val onQueryListener = object : SearchView.OnQueryTextListener {
               override fun onQueryTextChange(newText: String): Boolean {
                   search("%$newText%")
                   return true
               }
               override fun onQueryTextSubmit(query: String): Boolean = true
           }

           searchView?.apply {
               isIconifiedByDefault = false
               queryHint = getString(R.string.search_hint)
               setOnQueryTextListener(onQueryListener)
           }
       }

       override fun onCreateMenu(menu: Menu, menuInflater: MenuInflater) { }

       override fun onMenuItemSelected(menuItem: MenuItem): Boolean = false
   }, viewLifecycleOwner, Lifecycle.State.RESUMED)
}
Note you may need to add the following import statement to the top of the file:
import androidx.lifecycle.LifecycleThe setupMenu method creates a MenuProvider instance that coordinates the menu items in the app toolbar. In the above code, the onPrepareMenu callback method casts the search icon menu item as a SearchView widget and assigns it to a variable called searchView. The SearchView’s isIconifiedByDefault attribute is set to false, which expands the search box ready for the user to enter their query. Also, the SearchView’s search box will feature a query hint of “Search music” to indicate that the user can query their music library. Finally, an onQueryTextChange listener is applied to detect when the user is typing. Each time the query text changes, even just by a letter, a method called search will query the Room database.

Percentage symbol “wildcard” characters are appended before and after the user’s query to indicate that we are looking for results that contain the user’s search term at any position in the raw data. This is because the search query will ultimately be executed by the following SQL query in the MusicDao class (Project > app > java > name of the project; see the getSongsLikeSearch method):
SELECT * FROM music_library WHERE song_title LIKE :search OR song_artist LIKE :search OR song_album LIKE :searchThe above query searches the database for entries with a song title, artist or album that include the user’s search term. If the search term was sent without percentage symbols, then the SQL query would only return results that are an exact match. For example, if the user is looking for a song called “Somewhere Over The Rainbow” then they would have to type the full song name to return any results. Enclosing the search term in percentage symbols directs the database to return results that contain the term anywhere within the raw data. For example, if the user typed “over”, then the search term used in the database query would be “%over%”. The resultant query would return the song “Somewhere Over The Rainbow” even though it is just a partial match.
To run the user’s search query and load the results, add the following code below the setupMenu method:
private fun search(query: String) = lifecycleScope.launch(Dispatchers.IO) {
   binding.noResults.isGone = true
   val songs = musicDatabase!!.musicDao().getSongsLikeSearch(query).take(10)

   lifecycleScope.launch(Dispatchers.Main) {
       if (songs.isEmpty()) binding.noResults.isVisible = true
       adapter.processNewSongs(songs)
   }
}
The search method uses the MusicDao interface’s getSongsLikeSearch method to retrieve any Song objects that match the user’s search query. Room database queries cannot be run on the main thread, so the search method is launched using a lifecycleScope coroutine with IO dispatcher. If the list of returned Song objects is empty, then the ‘No results found’ TextView widget is displayed to the user. Meanwhile, the SongsAdapter class’s processNewSongs method will handle any changes to the RecyclerView. The number of songs that are sent to the adapter is capped at 10 using Kotlin’s take function to prevent an excessive amount of results from being displayed.
Handling user interactions with the Search fragment
In this section, we’ll finish implementing the search functionality by enabling the user to navigate to the search fragment and wrap up a few loose ends such as how to hide the keyboard when the user exits the search fragment. The user can navigate to the search fragment by clicking a search icon in the app toolbar. To set up this action, open the MainActivity.kt file (Project > app > java > name of the project) and add the following variable to the top of the class:
private lateinit var searchView: SearchViewNote you may need to add the following import statement to the top of the file:
import android.widget.SearchViewNext, locate the onCreateOptionsMenu method. The onCreateOptionsMenu method coordinates the menu items in the app toolbar, of which the search icon is a component. Modify the method’s code so it reads as follows:
override fun onCreateOptionsMenu(menu: Menu): Boolean {
   menuInflater.inflate(R.menu.main, menu)

   searchView = menu.findItem(R.id.search).actionView as SearchView
   searchView.setOnSearchClickListener {
       findNavController(R.id.nav_host_fragment).navigate(R.id.nav_search)
   }

   return super.onCreateOptionsMenu(menu)
}
The above code inflates the contents of the main.xml menu resource file and assigns an onSearchClick listener to the SearchView item. When the user clicks the search icon, the NavController class will navigate to the search fragment, which can be found under the ID nav_search in the mobile_navigation.xml navigation graph.
There are a couple of further measures we need to consider about the search fragment. First, when the user navigates to the search fragment the SearchView will be expanded by setting its isIconified property to false. This is necessary to expand the search box but when the user leaves the search fragment it is important to set the SearchView’s isIconfied property back to true. One way the user can leave the search fragment is by pressing the back button at the bottom of the device.

To check whether the SearchView is expanded and reset the SearchView’s isIconified property back to true if necessary, add the following code below the onCreateOptionsMenu method:
fun iconifySearchView() {
   if (!searchView.isIconified) {
       searchView.isIconified = true
       searchView.onActionViewCollapsed()
   }
}
The above iconifySearchView method collapses and iconifies the SearchView. To ensure the method is run when the back button is pressed from the search fragment, return to the SearchFragment.kt file (Project > app > java > name of the project > ui > search) and add the following variable to the top of the class:
private lateinit var onBackPressedCallback: OnBackPressedCallbackThe above variable will contain an instance of the OnBackPressedCallback class, which will handle interactions with the back button. To implement the onBackPressedCallback variable, add the following code to the onViewCreated method:
onBackPressedCallback = object : OnBackPressedCallback(true) {
   override fun handleOnBackPressed() {
       mainActivity.iconifySearchView()
       findNavController().popBackStack()
   }
}

mainActivity.onBackPressedDispatcher.addCallback(viewLifecycleOwner, onBackPressedCallback)
Note you may need to add the following import statement to the top of the file:
import androidx.navigation.fragment.findNavControllerThe above code implements an instance of the OnBackPressedCallback class and overrides its handleOnBackPressed callback method. The handleOnBackPressed method responds to onBackPressed events. In this case, we instruct the callback method to run MainActivity’s iconifySearchView method, thereby hiding the search box, and we pop the navigation controller back stack. Popping the back stack closes the search fragment and returns the user to their previous destination. The OnBackPressedCallback instance must be applied to MainActivity’s onBackPressedDispatcher as ultimately all onBackPressed events are handled by the open activity. We are simply defining custom behaviour for the search fragment.
Importantly, we must take care to also remove the OnBackPressedCallback instance once the search fragment is closed. To do this, add the following implementation of the onDestroyView method below the onViewCreated method:
override fun onDestroyView() {
   super.onDestroyView()
   _binding = null
   onBackPressedCallback.remove()
}
While the back button at the bottom of the device window is now properly configured, there is another back button we must consider. The app toolbar will also contain a back button in the top left corner that is referred to as the home as up button. If the user presses this button and the user is in the search fragment then we will need to collapse and iconify the SearchView as described above. To implement this, return to the MainActivity class, locate the onSupportNavigateUp method and modify its code so it reads as follows:
override fun onSupportNavigateUp(): Boolean {
   iconifySearchView()
   val navController = findNavController(R.id.nav_host_fragment)
   return navController.navigateUp(appBarConfiguration) || super.onSupportNavigateUp()
}
Now, if the user presses a back button while the SearchView is expanded then it will be collapsed and iconified as the user exits the search fragment.
In addition to collapsing the SearchView when the user exits the search fragment, it is also worth considering that the device’s keyboard may still be open. To address this, we must implement a method that closes the keyboard when it is no longer required. Add the following code below the playNext method:
fun hideKeyboard() {
   this.currentFocus?.let {
       val inputManager = this.getSystemService(Context.INPUT_METHOD_SERVICE) as InputMethodManager
       inputManager.hideSoftInputFromWindow(it.windowToken, InputMethodManager.HIDE_NOT_ALWAYS)
   }
}
The above code uses the hideSoftInputFromWindow method to remove the soft input keyboard, providing the app is currently in focus. We will need to call the hideKeyboard method when the SearchFragment fragment enters the onStop stage of its lifecycle, which occurs when the fragment is no longer active. To implement this, return to the SearchFragment class and add the following code below the onViewCreated method:
override fun onStop() {
   super.onStop()
   mainActivity.hideKeyboard()
}
The device’s keyboard will now automatically be hidden from view whenever the user navigates away from the search fragment.
The playback controls navigation graph
The songs, play queue and search fragments we have created so far are all components of the main mobile_navigation.xml navigation graph. The user can navigate from one destination to another but no two destinations can be active at the same time. In this section, we will create a second navigation graph that will be active on the screen simultaneously with the mobile_navigation navigation graph. The second navigation graph will contain the playback controls at the bottom of the screen and enable the user to navigate to a fragment where they can view the details of the currently playing song.
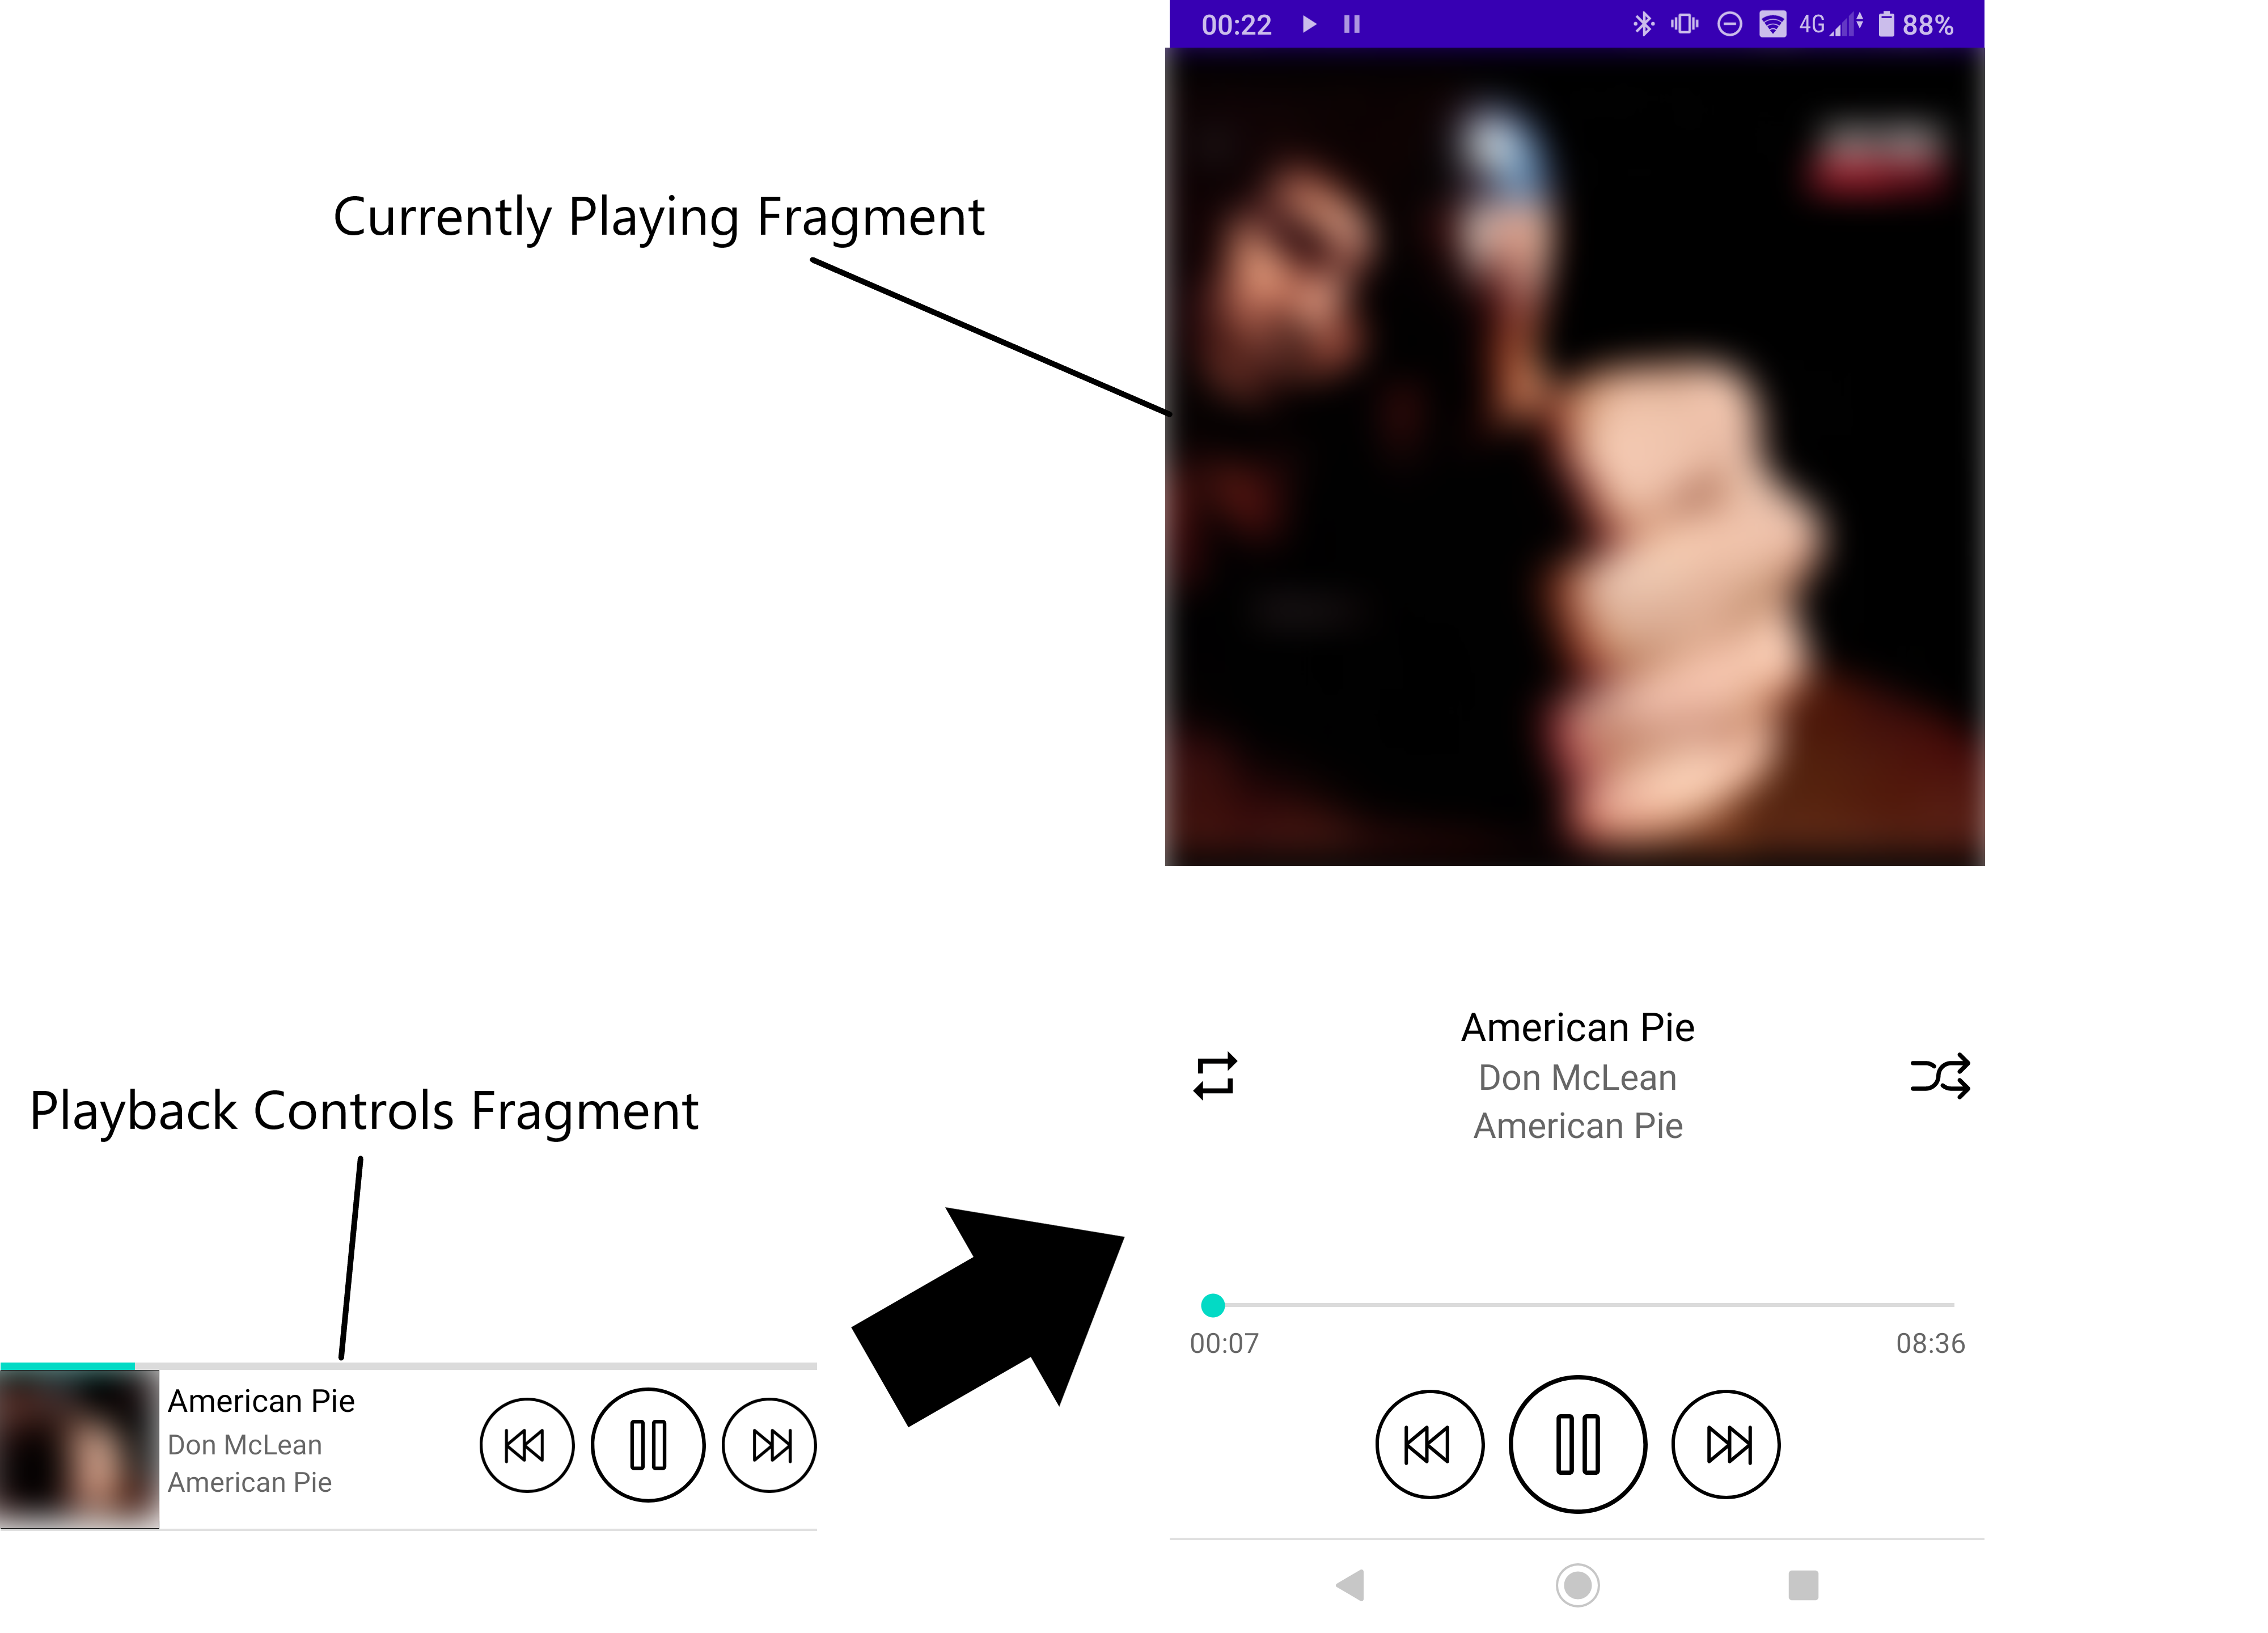
To create a new navigation graph, right-click the navigation folder (Project > app > res > navigation) then select New > Navigation Resource File. Name the file controls_navigation then press OK. Once the controls_navigation.xml file opens in the editor, switch to Code view and modify the file so it reads as follows:
<?xml version="1.0" encoding="utf-8"?>
<navigation xmlns:android="http://schemas.android.com/apk/res/android"
   xmlns:app="http://schemas.android.com/apk/res-auto"
   xmlns:tools="http://schemas.android.com/tools"
   app:startDestination="@+id/nav_controls">

   <fragment
       android:id="@+id/nav_controls"
       android:name="com.example.music.ui.controls.ControlsFragment"
       android:label=""
       tools:layout="@layout/fragment_controls" />

   <fragment
       android:id="@+id/nav_currently_playing"
       android:name="com.example.music.ui.currentlyPlaying.CurrentlyPlayingFragment"
       android:label=""
       tools:layout="@layout/fragment_currently_playing" />
</navigation>
The above navigation graph contains two destinations: a fragment called ControlsFragment that will contain the playback controls and a fragment called CurrentlyPlayingFragment that will occupy the full screen and display the details of the currently playing song. In the upcoming sections, we will design the fragments and their associated layouts.
Setting up the PlaybackControls fragment and layout
The playback controls will allow the user to pause and resume playback, skip tracks and more. The fragment containing the buttons will also display information about the currently playing song and enable the user to navigate to a dedicated currently playing song fragment that will occupy the full screen. The playback controls fragment will require a layout. To create a new layout file, right-click the layout directory then select New > Layout Resource File. Name the file fragment_controls then press OK. Once the fragment_controls.xml layout opens in the editor, switch to Code view and modify the file so it reads as follows:
<?xml version="1.0" encoding="utf-8"?>
<RelativeLayout xmlns:android="http://schemas.android.com/apk/res/android"
   android:layout_height="wrap_content"
   android:layout_width="match_parent"
   android:background="?attr/selectableItemBackground"
   android:layout_gravity="bottom">

   <ProgressBar
       android:id="@+id/songProgressBar"
       android:layout_width="match_parent"
       android:layout_height="4dp"
       style="?android:attr/progressBarStyleHorizontal" />

   <ImageView
       android:id="@+id/artwork"
       android:layout_width="80dp"
       android:layout_height="80dp"
       android:contentDescription="@string/set_album_artwork"
       android:transitionName="@string/transition_image"
       android:layout_below="@id/songProgressBar"
       android:layout_alignParentStart="true" />

   <LinearLayout
       android:layout_width="0dp"
       android:layout_height="wrap_content"
       android:padding="4dp"
       android:orientation="vertical"
       android:layout_alignTop="@id/artwork"
       android:layout_alignBottom="@id/artwork"
       android:layout_toEndOf="@id/artwork"
       android:layout_toStartOf="@id/btnBackward" >

       <TextView
           android:id="@+id/title"
           android:layout_width="wrap_content"
           android:layout_height="wrap_content"
           android:transitionName="@string/transition_title"
           android:layout_marginBottom="2dp"
           android:singleLine="true"
           android:textSize="16sp"
           android:textColor="?attr/colorOnSurface" />

       <TextView
           android:id="@+id/artist"
           android:layout_width="wrap_content"
           android:layout_height="wrap_content"
           android:transitionName="@string/transition_subtitle"
           android:singleLine="true"
           android:textSize="14sp"
           android:textColor="@color/material_on_surface_emphasis_medium" />

       <TextView
           android:id="@+id/album"
           android:layout_width="wrap_content"
           android:layout_height="wrap_content"
           android:transitionName="@string/transition_subtitle2"
           android:singleLine="true"
           android:textSize="14sp"
           android:textColor="@color/material_on_surface_emphasis_medium" />
   </LinearLayout>

   <ImageButton
       android:id="@+id/btnBackward"
       android:layout_width="48dp"
       android:layout_height="48dp"
       android:src="@drawable/ic_back"
       android:transitionName="@string/transition_back"
       android:contentDescription="@string/skip_back"
       android:layout_centerVertical="true"
       android:layout_toStartOf="@id/btnPlay"
       style="@style/Widget.Custom.Button" />

   <ImageButton
       android:id="@+id/btnPlay"
       android:layout_width="58dp"
       android:layout_height="58dp"
       android:layout_marginHorizontal="8dp"
       android:src="@drawable/ic_play"
       android:transitionName="@string/transition_play"
       android:contentDescription="@string/play_or_pause_current_track"
       android:layout_centerVertical="true"
       android:layout_toStartOf="@id/btnForward"
       style="@style/Widget.Custom.Button" />

   <ImageButton
       android:id="@+id/btnForward"
       android:layout_width="48dp"
       android:layout_height="48dp"
       android:src="@drawable/ic_next"
       android:transitionName="@string/transition_forward"
       android:contentDescription="@string/skip_ahead"
       android:layout_centerVertical="true"
       android:layout_alignParentEnd="true"
       style="@style/Widget.Custom.Button" />
</RelativeLayout>
The root element of the fragment_controls layout is a RelativeLayout widget, which will coordinate the majority of the layout’s widgets. The first widget is a ProgressBar, which will show the progress of playback through the currently playing song. The layout also contains an ImageView widget, which will display the artwork of the currently playing song; several TextView widgets that will display the song’s title, artist name and album name, respectively; and multiple ImageButton widgets that will comprise the playback controls. The three TextView widgets will be stacked vertically inside a LinearLayout widget that is positioned centrally between the artwork ImageView widget and the playback control buttons.
You may notice several of the widgets include a transitionName attribute. The transitionName attributes will allow us to apply an animation when the user navigates between the playback controls and currently playing fragments. In brief, both fragments will share corresponding widgets with matching transition names. For example, both fragment layouts will contain a TextView widget displaying the title of the song and a transitionName attribute set to transition_title. The contents of the complementary widgets will merge when the user navigates from one fragment to another and this will help create a neat transition animation.
To make the playback controls fragment operational, create a new Kotlin class by right-clicking the controls ui directory (Project > app > java > name of the project > ui) and then selecting New > Kotlin Class/File. Name the file ControlsFragment and select Class from the list of options. Once the ControlsFragment.kt file opens in the editor, modify its code so it reads as follows:
import androidx.fragment.app.Fragment
import androidx.fragment.app.activityViewModels

class ControlsFragment : Fragment() {

   private var _binding: FragmentControlsBinding? = null
   private val binding get() = _binding!!
   private var fastForwarding = false
   private var fastRewinding = false
   private val playQueueViewModel: PlayQueueViewModel by activityViewModels()
   private lateinit var mainActivity: MainActivity

   override fun onCreateView(
       inflater: LayoutInflater,
       container: ViewGroup?,
       savedInstanceState: Bundle?
   ): View {
       _binding = FragmentControlsBinding.inflate(inflater, container, false)
       mainActivity = activity as MainActivity
       return binding.root
   }

   override fun onDestroyView() {
       super.onDestroyView()
       _binding = null
   }

   override fun onResume() {
       super.onResume()

       binding.songProgressBar.max = playQueueViewModel.playbackDuration.value ?: 0
       binding.songProgressBar.progress = playQueueViewModel.playbackPosition.value ?: 0
   }
}
The ControlsFragment class contains several variables including a binding variable that provides access to the fragment_controls layout via its binding class, variables that provide access to the PlayQueueViewModel and MainActivity classes and their data, and two variables called fastForwarding and fastRewinding that contain boolean values currently set to false. The fastForwarding and fastRewinding variables will record whether the user is actively fast-forwarding or rewinding the current song.
Next, the onCreateView method initialises the binding and mainActivity variables. The onDestroyView method later sets the binding variable back to null when the fragment is in the process of shutting down and the fragment_controls layout is no longer accessible. Finally, the onResume method, which runs whenever the user launches or returns to the fragment, loads the current playback position and duration of the currently playing song into the fragment_controls layout’s ProgressBar widget. The ProgressBar will use this data to update its progress indicator.
Moving on, we’ll now write the code that populates the fragment_controls layout’s widgets with the details of the currently playing song. Add the following code below the onCreateView method:
override fun onViewCreated(view: View, savedInstanceState: Bundle?) {
   super.onViewCreated(view, savedInstanceState)

   playQueueViewModel.currentlyPlayingSongMetadata.observe(viewLifecycleOwner) {
       updateCurrentlyDisplayedMetadata(it)
   }

   binding.root.setOnClickListener {
       playQueueViewModel.currentlyPlayingSongMetadata.value?.let {
           val extras = FragmentNavigatorExtras(
               binding.artwork to binding.artwork.transitionName,
               binding.title to binding.title.transitionName,
               binding.album to binding.album.transitionName,
               binding.artist to binding.artist.transitionName,
               binding.btnPlay to binding.btnPlay.transitionName,
               binding.btnBackward to binding.btnBackward.transitionName,
               binding.btnForward to binding.btnForward.transitionName
           )
           findNavController().navigate(R.id.nav_currently_playing, null, null, extras)
       }
   }

   playQueueViewModel.playbackState.observe(viewLifecycleOwner) { state ->
       if (state == PlaybackStateCompat.STATE_PLAYING) binding.btnPlay.setImageResource(R.drawable.ic_pause)
       else binding.btnPlay.setImageResource(R.drawable.ic_play)
   }

   playQueueViewModel.playbackPosition.observe(viewLifecycleOwner) {
       binding.songProgressBar.progress = it
   }

   playQueueViewModel.playbackDuration.observe(viewLifecycleOwner) {
       binding.songProgressBar.max = it
   }

   // TODO: Respond to the playback controls here
}
Note you may need to add the following import statement to the top of the file:
import androidx.navigation.fragment.findNavControllerThe onViewCreated method registers an observer on the PlayQueueViewModel view model’s currentlyPlayingSongMetadata variable, which contains the metadata associated with the currently playing song. The metadata will be used to populate the artwork ImageView widget and song details TextView widgets by a method called updateCurrentlyDisplayedMetadata, which we will define shortly.
Next, we set an onClick listener to the RelativeLayout root element. Whenever the user clicks the layout (except the playback control buttons) they will navigate to the CurrentlyPlayingFragment fragment. The navigation event contains an extras bundle detailing all the shared elements between the user’s current location and their target destination. In this instance, the shared elements are those that contain a transitionName attribute because they will be used for the transition animation. Also, note the navigation action is enclosed in a let block that is applied to the view model’s currentlyPlayingSongMetadata variable. The let block ensures the navigation event will only occur if the metadata variable is not null, thereby ensuring the user can only access the currently playing fragment if a song is playing.
There are also some other observers in the fragment. For example, there is an observer on the view model’s playbackState variable. The observer alternates the image in the play/pause ImageButton widget between a play symbol and pause symbol as appropriate, based on whether the playback state is STATE_PLAYING or another value. The next two observers monitor the view model’s playbackPosition and playbackDuration variables, respectively. The playback position observer updates the ProgressBar widget’s progress indicator during playback. Meanwhile, the playback duration variable sets the maximum value for the ProgressBar widget to the length of the song, which helps calibrate the playback position progress updates.
Finally, to populate the TextView and ImageView widgets based on the currently playing song’s metadata, add the following code below the onResume method:
private fun updateCurrentlyDisplayedMetadata(metadata: MediaMetadataCompat?) {
   binding.title.text = metadata?.getString(MediaMetadataCompat.METADATA_KEY_TITLE)
   binding.artist.text = metadata?.getString(MediaMetadataCompat.METADATA_KEY_ARTIST)
   binding.album.text = metadata?.getString(MediaMetadataCompat.METADATA_KEY_ALBUM)

   if (metadata != null) {
       val albumId = metadata.getString(MediaMetadataCompat.METADATA_KEY_ALBUM_ART_URI)
       mainActivity.loadArtwork(albumId, binding.artwork)
   } else {
       Glide.with(mainActivity)
           .clear(binding.artwork)
   }
}
The updateCurrentlyDisplayedMetadata method defined above extracts the song’s title, artist and album name from the supplied MediaMetadataCompat object and uses the values to populate the relevant TextView widgets in the fragment_controls layout. If the MediaMetadataCompat object is null or does not contain a given bit of information, then the TextView widget’s text will also be null, which will appear blank to the user. Finally, the album artwork is loaded into the artwork ImageView using MainActivity’s loadArtwork method. If the MediaMetadataCompat object is null, then this means no song is currently playing. In this case, the artwork ImageView is cleared using Glide.
Responding to the playback controls
Continuing with the ControlsFragment class, we will now write the code that responds to user interactions with the playback control buttons. First, locate the onViewCreated method and replace the TODO comment with the following code:
binding.btnPlay.setOnClickListener {
   mainActivity.playPauseControl()
}

binding.btnBackward.setOnClickListener{
   if (fastRewinding) fastRewinding = false
   else mainActivity.skipBack()
}

binding.btnBackward.setOnLongClickListener {
   fastRewinding = true
   lifecycleScope.launch {
       do {
           mainActivity.fastRewind()
           delay(500)
       } while (fastRewinding)
   }
   return@setOnLongClickListener false
}


binding.btnForward.setOnClickListener{
   if (fastForwarding) fastForwarding = false
   else mainActivity.skipForward()
}

binding.btnForward.setOnLongClickListener {
   fastForwarding = true
   lifecycleScope.launch {
       do {
           mainActivity.fastForward()
           delay(500)
       } while (fastForwarding)
   }
   return@setOnLongClickListener false
}
Note you may need to add the following import statement to the top of the file:
import kotlinx.coroutines.delayThe above code registers onClick and onLongClick listeners to the ImageButton widgets that comprise the playback controls. The play button will pause and unpause the currently playing song when clicked. Meanwhile, the skip back and skip forward buttons will iterate through the songs in the play queue. The skip back and skip forward buttons also contain onLongClick listeners that will fast forward or rewind playback. The fast forward and fast rewind actions are wrapped in a do/while block which means the actions will repeat for as long as the fastForwarding (or fastRewinding) variable is true. There will be a 500 ms interval between repetitions, as specified using the delay method. Unless directed otherwise, the delay method will block the current worker thread until the time has elapsed. For this reason, the above code uses a coroutine scope to delegate the task to an alternative thread so it does not block other processes.
We’ll discuss the mechanics of the fastForward and fastRewind methods shortly. In brief, both methods will adjust the playback position by 5000 ms. In other words, for every 500 ms that the skip forward button is pressed, the playback progress will jump forward by 5000 ms. This equates to a 10x increase in playback speed. The same rule applies when the skip backward button is pressed, except playback will reverse.
An important consideration with the fast forward and rewind buttons is that playback must return to normal once the user releases the button. By default, the do/while loop would continue regardless and continue altering the playback position. For this reason, the onLongClick listeners return a value of false, which signals that the onLongClick listener alone cannot completely handle the click event. This means once the user releases the button and the onLongClick event ends, the regular onClick event will run. The onClick listeners use the boolean values stored in the fastForwarding and fastRewinding variables to determine whether the user is actively fast-forwarding or rewinding the current song. If this is the case, then the onClick listeners set the fastForwarding and fastRewinding variables back to false, which terminates the do/while loop that was powering the fast forward or rewind feature, thereby returning playback to its regular speed.
The playback control actions will be relayed to the media browser service via dedicated methods in the MainActivity class. To respond to the play/pause button, open the MainActivity.kt file (Project > app > java > name of the project) and add the following method below the hideKeyboard method:
fun playPauseControl() {
   when (mediaController.playbackState?.state) {
       PlaybackState.STATE_PAUSED -> mediaController.transportControls.play()
       PlaybackState.STATE_PLAYING -> mediaController.transportControls.pause()
       else -> {
           // Load and play the user's music library if the play queue is empty
           if (playQueue.isEmpty()) {
               playNewPlayQueue(musicViewModel.allSongs.value ?: return)
           }
           else {
               // It's possible a queue has been built without ever pressing play.
               // In this case, commence playback
               mediaController.transportControls.prepare()
               mediaController.transportControls.play()
           }
       }
   }
}
The playPauseControl method uses a when block to respond to the different playback states. If a song is currently paused or playing, then the method toggles the playback state as appropriate. On the other hand, if no song is currently paused or playing, then the method initiates playback of the play queue or the entire music library if the play queue is empty.
Next, add the following methods below the playPauseControl method to handle requests to skip back or skip forward in the play queue:
fun skipBack() = mediaController.transportControls.skipToPrevious()

fun skipForward() = mediaController.transportControls.skipToNext()
The skipBack and skipForward methods use the relevant media browser service methods to change the song. If the user presses the skip back button less than five seconds into the currently playing song, then the current song will restart rather than skip back a track. For more information on these methods, refer back to the ‘The media browser service - part 2’ section.
Next, add the following methods below the skipForward method to send requests to fast forward or rewind the currently playing song to the media browser service:
fun fastRewind() = mediaController.transportControls.rewind()

fun fastForward() = mediaController.transportControls.fastForward()
To handle requests to rewind or fast-forward the current song, we must add a little more code to the media browser service. Open the MediaPlaybackService.kt file (Project > app > java > name of the project) and add the following methods to the MediaSessionCompat.Callback object stored in the mediaSessionCallback variable:
override fun onFastForward() {
   super.onFastForward()

   val newPlaybackPosition = mediaPlayer?.currentPosition?.plus(5000) ?: return
   if (newPlaybackPosition > (mediaPlayer?.duration ?: return)) onSkipToNext()
   else onSeekTo(newPlaybackPosition.toLong())
}

override fun onRewind() {
   super.onRewind()

   val newPlaybackPosition = mediaPlayer?.currentPosition?.minus(5000) ?: return
   if (newPlaybackPosition < 0) onSkipToPrevious()
   else onSeekTo(newPlaybackPosition.toLong())
}
The onFastForward and onRewind callback methods defined above skip the playback position forward 5000 ms and back 5000 ms, respectively. If either method detects that the user has reached the start or the end of the current song, then it will run the relevant onSkipToNext or onSkipToPrevious callback method to change to a new song.
Setting up the Currently Playing fragment and layout
In this section, we’ll design a fragment that will display information about the currently playing song as well as feature several playback control buttons. The currently playing fragment will require a layout, so right-click the layout directory (Project > app > res) and create a new layout called fragment_currently_playing. Once the fragment_currently_playing.xml file opens in the editor add the following code:
<?xml version="1.0" encoding="utf-8"?>
<androidx.constraintlayout.widget.ConstraintLayout xmlns:android="http://schemas.android.com/apk/res/android"
   xmlns:app="http://schemas.android.com/apk/res-auto"
   android:layout_width="match_parent"
   android:layout_height="match_parent"
   android:paddingBottom="24dp"
   android:background="?attr/colorSurface">

   <ImageView
       android:id="@+id/artwork"
       android:layout_width="match_parent"
       android:layout_height="0dp"
       android:clickable="true"
       android:transitionName="@string/transition_image"
       android:contentDescription="@string/album_artwork"
       app:layout_constraintTop_toTopOf="parent"
       app:layout_constraintDimensionRatio="1:1" />

   <ImageButton
       android:id="@+id/currentClose"
       android:layout_width="30dp"
       android:layout_height="30dp"
       android:layout_marginStart="14dp"
       android:layout_marginTop="36dp"
       android:src="@drawable/ic_down"
       android:translationZ="200dp"
       android:contentDescription="@string/close_currently_playing"
       app:layout_constraintStart_toStartOf="parent"
       app:layout_constraintTop_toTopOf="parent"
       style="@style/Widget.Custom.Button" />

   <ImageButton
       android:id="@+id/currentButtonRepeat"
       android:layout_width="30dp"
       android:layout_height="30dp"
       android:layout_marginStart="8dp"
       android:src="@drawable/ic_repeat"
       android:contentDescription="@string/repeat_current_playlist"
       app:layout_constraintTop_toBottomOf="@id/artwork"
       app:layout_constraintBottom_toTopOf="@id/currentSeekBar"
       app:layout_constraintStart_toStartOf="parent"
       style="@style/Widget.Custom.Button" />

   <ImageButton
       android:id="@+id/currentButtonShuffle"
       android:layout_width="30dp"
       android:layout_height="30dp"
       android:layout_marginEnd="8dp"
       android:src="@drawable/ic_shuffle"
       android:contentDescription="@string/shuffle_play_queue"
       app:layout_constraintTop_toBottomOf="@id/artwork"
       app:layout_constraintBottom_toTopOf="@id/currentSeekBar"
       app:layout_constraintEnd_toEndOf="parent"
       style="@style/Widget.Custom.Button" />

   <TextView
       android:id="@+id/title"
       android:layout_width="wrap_content"
       android:layout_height="wrap_content"
       android:transitionName="@string/transition_title"
       android:singleLine="true"
       android:textSize="20sp"
       android:textColor="?attr/colorOnSurface"
       app:layout_constraintEnd_toStartOf="@id/currentButtonShuffle"
       app:layout_constraintStart_toEndOf="@id/currentButtonRepeat"
       app:layout_constraintBottom_toTopOf="@id/artist" />

   <TextView
       android:id="@+id/artist"
       android:layout_width="wrap_content"
       android:layout_height="wrap_content"
       android:transitionName="@string/transition_subtitle"
       android:layout_margin="5dp"
       android:singleLine="true"
       android:textSize="18sp"
       android:textColor="@color/material_on_surface_emphasis_medium"
       app:layout_constraintEnd_toStartOf="@id/currentButtonShuffle"
       app:layout_constraintStart_toEndOf="@id/currentButtonRepeat"
       app:layout_constraintTop_toBottomOf="@id/artwork"
       app:layout_constraintBottom_toTopOf="@id/currentSeekBar" />

   <TextView
       android:id="@+id/album"
       android:layout_width="wrap_content"
       android:layout_height="wrap_content"
       android:transitionName="@string/transition_subtitle2"
       android:singleLine="true"
       android:textSize="18sp"
       android:textColor="@color/material_on_surface_emphasis_medium"
       android:layout_centerHorizontal="true"
       app:layout_constraintEnd_toStartOf="@id/currentButtonShuffle"
       app:layout_constraintStart_toEndOf="@id/currentButtonRepeat"
       app:layout_constraintTop_toBottomOf="@id/artist" />

   <SeekBar
       android:id="@+id/currentSeekBar"
       android:layout_width="match_parent"
       android:layout_height="wrap_content"
       android:layout_marginVertical="26dp"
       app:layout_constraintBottom_toTopOf="@id/btnPlay" />

   <TextView
       android:id="@+id/currentPosition"
       android:layout_width="wrap_content"
       android:layout_height="wrap_content"
       android:layout_marginStart="10dp"
       android:textSize="14sp"
       android:textColor="@color/material_on_surface_emphasis_medium"
       app:layout_constraintTop_toBottomOf="@id/currentSeekBar"
       app:layout_constraintStart_toStartOf="parent" />

   <TextView
       android:id="@+id/currentMax"
       android:layout_width="wrap_content"
       android:layout_height="wrap_content"
       android:layout_marginEnd="10dp"
       android:textSize="14sp"
       android:textColor="@color/material_on_surface_emphasis_medium"
       app:layout_constraintTop_toBottomOf="@id/currentSeekBar"
       app:layout_constraintEnd_toEndOf="parent" />

   <ImageButton
       android:id="@+id/btnBackward"
       android:layout_width="55dp"
       android:layout_height="55dp"
       android:layout_marginHorizontal="12dp"
       android:src="@drawable/ic_back"
       android:transitionName="@string/transition_back"
       android:contentDescription="@string/skip_back"
       app:layout_constraintTop_toTopOf="@id/btnPlay"
       app:layout_constraintBottom_toBottomOf="@id/btnPlay"
       app:layout_constraintEnd_toStartOf="@id/btnPlay"
       style="@style/Widget.Custom.Button" />

   <ImageButton
       android:id="@+id/btnPlay"
       android:layout_width="70dp"
       android:layout_height="70dp"
       android:layout_marginBottom="12dp"
       android:src="@drawable/ic_play"
       android:transitionName="@string/transition_play"
       android:contentDescription="@string/play_or_pause_current_track"
       app:layout_constraintEnd_toEndOf="parent"
       app:layout_constraintStart_toStartOf="parent"
       app:layout_constraintBottom_toBottomOf="parent"
       style="@style/Widget.Custom.Button" />

   <ImageButton
       android:id="@+id/btnForward"
       android:layout_width="55dp"
       android:layout_height="55dp"
       android:layout_marginHorizontal="12dp"
       android:src="@drawable/ic_next"
       android:transitionName="@string/transition_forward"
       android:contentDescription="@string/skip_ahead"
       app:layout_constraintTop_toTopOf="@id/btnPlay"
       app:layout_constraintBottom_toBottomOf="@id/btnPlay"
       app:layout_constraintStart_toEndOf="@id/btnPlay"
       style="@style/Widget.Custom.Button" />
</androidx.constraintlayout.widget.ConstraintLayout>
At the top of the fragment_currently_playing layout, an ImageView widget will display the currently playing song’s album artwork. The ImageView will occupy the maximum possible width. Its height attribute is set to 0dp which means the height will be the maximum possible value afforded by its constraints. In this case, the ImageView has a constraint dimension ratio of 1:1, which means the height of the ImageView will equal its width. In this way, we ensure the artwork appears as a perfect square, regardless of the screen size. In the top left corner of ImageView, there will be a small down arrow ImageButton widget. This ImageButton will allow the user to close the currently playing fragment when clicked. To ensure the ImageButton is not obscured by the artwork ImageView, the ImageButton features a translationZ attribute set to a value high enough to elevate it above the ImageView.
Below the artwork ImageView, several TextView widgets will display information about the currently playing song (e.g. its title, artist and album). There is also an ImageButton widget on either side of the TextView widgets that will allow the user to toggle the repeat mode and toggle the shuffle mode, respectively. The next widget is a SeekBar. SeekBar widgets behave similarly to ProgressBar widgets but also contain a draggable thumb. In this case, the SeekBar thumb will allow the user to change the playback position. Lastly, the layout defines several ImageButton widgets that will facilitate the play/pause, skip back and skip forward playback controls. Throughout the layout, you may notice multiple widgets feature transitionName attributes, which link them with a corresponding widget in the fragment_controls layout. The transition names will facilitate a transition animation where the contents of each widget merge into their counterpart as the user navigates from one fragment to another.
To make the currently playing fragment operational, create a new Kotlin class by right-clicking the currentlyPlaying directory (Project > app > java > name of the project > ui) and then selecting New > Kotlin Class/File. Name the file CurrentlyPlayingFragment and select Class from the list of options. Once the CurrentlyPlayingFragment.kt file opens in the editor, modify its code as follows:
import androidx.fragment.app.Fragment
import android.transition.TransitionInflater

class CurrentlyPlayingFragment : Fragment() {

   private val playQueueViewModel: PlayQueueViewModel by activityViewModels()
   private var _binding: FragmentCurrentlyPlayingBinding? = null
   private val binding get() = _binding!!
   private var fastForwarding = false
   private var fastRewinding = false
   private lateinit var mainActivity: MainActivity

   override fun onCreate(savedInstanceState: Bundle?) {
       super.onCreate(savedInstanceState)
       sharedElementEnterTransition = TransitionInflater.from(context).inflateTransition(android.R.transition.move)
       sharedElementReturnTransition = TransitionInflater.from(context).inflateTransition(android.R.transition.move)
   }

   override fun onCreateView(
       inflater: LayoutInflater,
       container: ViewGroup?,
       savedInstanceState: Bundle?
   ): View {
       _binding = FragmentCurrentlyPlayingBinding.inflate(inflater, container, false)
       mainActivity = activity as MainActivity
       return binding.root
   }
}
In the above code, the onCreate method helps process the animation that occurs as the controls fragment transitions to the currently playing fragment and vice versa. In both instances, the animation is set to move, which means every widget in the corresponding fragment layouts with a transitionName attribute will move to the location of their counterpart widget, thereby creating a transition animation. The next method in the fragment is called onCreateView, which initialises the fragment_currently_playing layout’s binding class, and the mainActivity variable that will grant access to the MainActivity class and its data.
Moving on, let’s now define the onViewCreated method, which will handle user interactions with the fragment’s components. Add the following code below the onCreateView method:
@SuppressLint("ClickableViewAccessibility")
override fun onViewCreated(view: View, savedInstanceState: Bundle?) {
   super.onViewCreated(view, savedInstanceState)

   // The currently playing fragment will overlay the active fragment from the
   // mobile_navigation navigation graph. We need to intercept touch events
   // that would otherwise reach the underlying fragment
   binding.root.setOnTouchListener { _, _ ->
       return@setOnTouchListener true
   }

   playQueueViewModel.currentlyPlayingSongMetadata.observe(viewLifecycleOwner) {
       updateCurrentlyDisplayedMetadata(it)
   }

   playQueueViewModel.playbackState.observe(viewLifecycleOwner) { state ->
       if (state == PlaybackStateCompat.STATE_PLAYING) binding.btnPlay.setImageResource(R.drawable.ic_pause)
       else binding.btnPlay.setImageResource(R.drawable.ic_play)
   }

   playQueueViewModel.playbackDuration.observe(viewLifecycleOwner) { duration ->
       duration?.let {
           binding.currentSeekBar.max = it
           binding.currentMax.text = SimpleDateFormat("mm:ss", Locale.UK).format(it)
       }
   }

   playQueueViewModel.playbackPosition.observe(viewLifecycleOwner) { position ->
       position?.let {
           binding.currentSeekBar.progress = position
           binding.currentPosition.text = SimpleDateFormat("mm:ss", Locale.UK).format(it)
       }
   }

   binding.btnPlay.setOnClickListener { mainActivity.playPauseControl() }

   binding.btnBackward.setOnClickListener{
       if (fastRewinding) fastRewinding = false
       else mainActivity.skipBack()
   }

   binding.btnBackward.setOnLongClickListener {
       fastRewinding = true
       lifecycleScope.launch {
           do {
               mainActivity.fastRewind()
               delay(500)
           } while (fastRewinding)
       }
       return@setOnLongClickListener false
   }

   binding.btnForward.setOnClickListener{
       if (fastForwarding) fastForwarding = false
       else mainActivity.skipForward()
   }

   binding.btnForward.setOnLongClickListener {
       fastForwarding = true
       lifecycleScope.launch {
           do {
               mainActivity.fastForward()
               delay(500)
           } while (fastForwarding)
       }
       return@setOnLongClickListener false
   }
}
Note you may need to add the following import statements to the top of the file:
import java.text.SimpleDateFormat
import kotlinx.coroutines.delay
import java.util.Locale
The onViewCreated method runs once the fragment layout’s view hierarchy has been established. In the above code, the method registers observers on several PlayQueueViewModel view model variables, starting with the currentlyPlayingSongMetadata variable which contains the metadata associated with the currently playing song. The metadata will populate the fragment_currently_playing layout’s TextView and ImageView widgets via a method called updateCurrentlyDisplayedMetadata, which we will define shortly. The next observer monitors the view model’s playbackState variable. If the playback state is set to STATE_PLAYING, then the btnPlay ImageButton will display a pause icon, while any other playback state will elicit a play icon instead. Observers are also registered on the playbackDuration and playbackPosition variables, and their values are loaded into the SeekBar widget so the user can see the playback progress through the current song. Two TextView widgets will also display the current playback position and currently playing song duration. For the playback position and duration values to be displayed correctly, the SimpleDateFormat class converts the time values to mm:ss (minute : seconds) format. For example, if a song is three minutes and twenty seconds long then the duration will be displayed as ‘03:20’.
The code then proceeds to assign an onClick listener to the btnPlay ImageButton. The onClick listener will run the MainActivity class’s playPauseControl method to pause/resume playback as appropriate. Next, the actions for the skip forward and skip back buttons are defined. If either button is clicked, then the MainActivity class’s skipForward or skipBack will change the currently playing song. Meanwhile, if either button is long pressed, then the MainActivity class’s fastForward or fastRewind method will run every 500 milliseconds until the button is released.
To define the updateCurrentlyDisplayedMetadata, which populates the fragment display based on the currently playing song’s metadata, add the following code below the onViewCreated method:
private fun updateCurrentlyDisplayedMetadata(metadata: MediaMetadataCompat?) = lifecycleScope.launch(Dispatchers.Main) {
   binding.title.text = metadata?.getString(MediaMetadataCompat.METADATA_KEY_TITLE)
   binding.artist.text = metadata?.getString(MediaMetadataCompat.METADATA_KEY_ARTIST)
   binding.album.text = metadata?.getString(MediaMetadataCompat.METADATA_KEY_ALBUM)

   if (metadata != null) {
       val albumId = metadata.getString(MediaMetadataCompat.METADATA_KEY_ALBUM_ART_URI)
       mainActivity.loadArtwork(albumId, binding.artwork)
   } else {
       Glide.with(mainActivity)
           .clear(binding.artwork)
   }
}
The updateCurrentlyDisplayedMetadata method defined above is identical to the method we added to the ControlsFragment class. It uses the song title, artist name and album name to populate the layout’s TextView widget, and uses the song’s album ID to load the album art. If the supplied MediaMetadataCompat object is null, then this means no song is playing. In this case, any previously loaded song data is cleared.
There are still some additional components to the fragment_currently_playing layout that we must configure. To address this, add the following code to the bottom of the onViewCreated method:
val accent = MaterialColors.getColor(mainActivity, com.google.android.material.R.attr.colorAccent, Color.CYAN)
val onSurface = MaterialColors.getColor(mainActivity, com.google.android.material.R.attr.colorOnSurface, Color.LTGRAY)
val onSurface60 = MaterialColors.compositeARGBWithAlpha(onSurface, 153)

if (mainActivity.getShuffleMode() == SHUFFLE_MODE_ALL) {
   binding.currentButtonShuffle.setColorFilter(accent)
}

binding.currentButtonShuffle.setOnClickListener{
   if (mainActivity.toggleShuffleMode()) binding.currentButtonShuffle.setColorFilter(accent)
   else binding.currentButtonShuffle.setColorFilter(onSurface60)
}

when (mainActivity.getRepeatMode()) {
   REPEAT_MODE_ALL -> binding.currentButtonRepeat.setColorFilter(accent)
   REPEAT_MODE_ONE -> {
       binding.currentButtonRepeat.setColorFilter(accent)
       binding.currentButtonRepeat.setImageDrawable(ContextCompat.getDrawable(requireActivity(), R.drawable.ic_repeat_one))
   }
}

binding.currentButtonRepeat.setOnClickListener {
   when (mainActivity.toggleRepeatMode()) {
       REPEAT_MODE_NONE -> {
           binding.currentButtonRepeat.setImageDrawable(ContextCompat.getDrawable(requireActivity(), R.drawable.ic_repeat))
           binding.currentButtonRepeat.setColorFilter(onSurface60)
       }
       REPEAT_MODE_ALL -> {
           binding.currentButtonRepeat.setColorFilter(accent)
       }
       REPEAT_MODE_ONE -> {
           binding.currentButtonRepeat.setImageDrawable(ContextCompat.getDrawable(requireActivity(), R.drawable.ic_repeat_one))
       }
   }
}

binding.currentClose.setOnClickListener {
   findNavController().popBackStack()
}

binding.artwork.setOnClickListener {
   showPopup()
}

binding.currentSeekBar.setOnSeekBarChangeListener(object : SeekBar.OnSeekBarChangeListener {
   override fun onStopTrackingTouch(seekBar: SeekBar) {}
   override fun onStartTrackingTouch(seekBar: SeekBar) {}
   override fun onProgressChanged(seekBar: SeekBar?, progress: Int, fromUser: Boolean) {
       if (fromUser) mainActivity.seekTo(progress)
   }
})
Note you may need to add the following import statements to the top of the file:
import androidx.navigation.fragment.findNavController
import android.graphics.Color
The above code begins by defining several colour resources that will be useful for the subsequent processing. Specifically, the code attempts to extract the accent and onSecondary colours from the active theme. If either colour is unavailable, then cyan and light grey fallback colours will be used instead. A 60% opacity is applied to onSecondary colour to create a faded inactive effect.
Next, we use a MainActivity method called getShuffleMode which we will define shortly to determine whether the current play queue is shuffled. If the play queue is shuffled, then the accent colour associated is applied to the shuffle ImageButton to indicate that shuffle mode is currently active.

Whenever the user clicks the shuffle button, a MainActivity method called toggleShuffleMode will shuffle or unshuffle the play queue as required. If the play queue is shuffled, then the toggleShuffleMode method will return a value of true, which the onClick listener will use as a signal to apply the accent colour filter to the shuffle button. On the other hand, if the play queue is unshuffled and the toggleShuffleMode method returns a value of false, then the onClick listener will apply the regular on-surface colour filter to the button.
A similar approach is taken with the repeat button. There are three different states the repeat button will cycle through when clicked: REPEAT_MODE_ALL, which will repeat the play queue; REPEAT_MODE_ONE, which will loop the current song; and REPEAT_MODE_NONE, which will deactivate the repeat mode. Different repeat icon drawable resources are used for each repeat mode state. The active theme’s accent colour is also applied to the two active repeat mode state icons, while the regular on-surface colour filter is used when the repeat mode is inactive. Changes to the repeat mode will be handled by a MainActivity method called toggleRepeatMode.
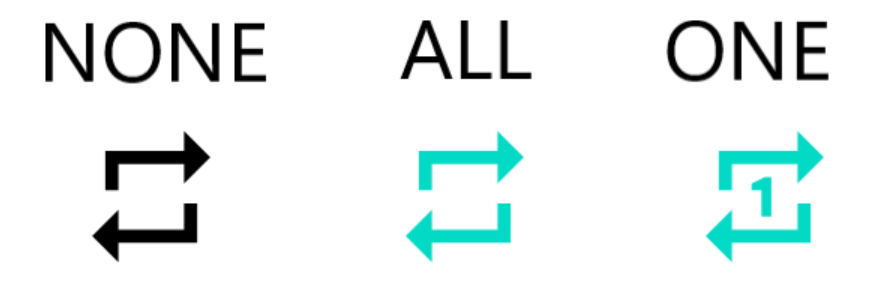
In the top left corner of the layout, there is a down arrow button that will allow the user to exit the currently playing fragment. This is achieved via the NavController class’s popBackStack method, which will close the currently playing fragment and restore the controls fragment at the bottom of the screen. The navigation transition animation will occur as the currently playing fragment is closed.
If the user clicks the artwork ImageView then a popup menu will invite the user to open the search fragment or view the play queue. We will enable this functionality in the next section. Finally, an OnSeekBarChangeListener instance is applied to the SeekBar widget to detect when the user drags the thumb. The listener contains several callback methods but the only one we will use is called onProgressChanged. The onProgressChanged method records the new position of the thumb after any drag events. The new position is sent to a MainActivity method called seekTo, which will update the playback position accordingly.
To define the getShuffleMode and getRepeatMode methods that are referenced above, return to the MainActivity class and add the following code below the fastForward method:
fun getShuffleMode(): Int {
   val mediaControllerCompat = MediaControllerCompat.getMediaController(this@MainActivity)
   return mediaControllerCompat.shuffleMode
}

fun getRepeatMode(): Int {
   val mediaControllerCompat = MediaControllerCompat.getMediaController(this@MainActivity)
   return mediaControllerCompat.repeatMode
}
Both methods simply obtain an instance of the media controller so that they can request the active shuffle/repeat mode from the media browser service. The resultant value is then returned by the method for further processing by the currently playing fragment.
Handling user interactions with the CurrentlyPlaying fragment
There are several additional methods we must define to handle all of the user’s interactions with the currently playing fragment. First, when the user clicks the artwork ImageView widget in the fragment_currently_playing layout, a popup menu will open and invite the user to search their music library and view the play queue. The popup menu will require a menu resource file. To create a menu resource file, locate and right-click the menu directory (Project > app > res), then select New > Menu Resource File. Name the file currently_playing_menu and once it opens in the editor modify the file’s code so it reads as follows:
<?xml version="1.0" encoding="utf-8"?>
<menu xmlns:android="http://schemas.android.com/apk/res/android"
   xmlns:app="http://schemas.android.com/apk/res-auto">

   <item android:id="@+id/search"
       android:title="@string/search_hint"
       android:icon="@drawable/ic_search"
       app:actionViewClass="android.widget.SearchView" />

   <item android:id="@+id/queue"
       android:title="@string/play_queue"
       android:icon="@drawable/ic_queue" />
</menu>
Each menu item contains a title attribute and an icon attribute that will appear as shown below.
To make the popup menu operational, return to the CurrentlyPlayingFragment class (Project > app > java > name of the project > ui > currentlyPlaying) and add the following code below the updateCurrentlyDisplayedMetadata method:
private fun showPopup() {
   PopupMenu(this.context, binding.currentClose).apply {
       inflate(R.menu.currently_playing_menu)

       setForceShowIcon(true)

       setOnMenuItemClickListener { menuItem ->
           when (menuItem.itemId) {
               R.id.search -> {
                   findNavController().popBackStack()
                   mainActivity.findNavController(R.id.nav_host_fragment).navigate(R.id.nav_search)
               }
               R.id.queue -> {
                   findNavController().popBackStack()
                   mainActivity.findNavController(R.id.nav_host_fragment).navigate(R.id.nav_queue)
               }
           }
           true
       }
       show()
   }
}
Note you may need to add the following import statements to the top of the file:
import android.widget.PopupMenuThe showPopup method uses the Popup menu class to inflate the currently_playing_menu menu resource file. Each menu item also contains an icon image; however, by default, the icon will be hidden and only the item title will be displayed. To display both the icon and the title, we must use the Popup class’s setForceShowIcon method. Finally, an onMenuItemClick listener associates actions with each menu item. If either the search or play queue items are selected, the NavController class’s popBackStack method will close the currently playing fragment and restore the playback controls fragment at the bottom of the screen. The onMenuItemClick listener also accesses the NavController that coordinates the destinations in the mobile_navigation.xml navigation graph and navigates to either the search fragment or play queue fragment based on which menu item was selected. Altogether, the navigation events close the currently playing fragment and load the user’s chosen destination.
To conclude the currently playing fragment, add the following methods below the onViewCreated method:
override fun onResume() {
   super.onResume()
   mainActivity.hideStatusBars(true)
}

override fun onDestroyView() {
   super.onDestroyView()
   _binding = null
   mainActivity.hideStatusBars(false)
}
In the above code, the onResume method defined above uses a MainActivity method called hideStatusBars (that we will define shortly) to enter fullscreen mode and create a fully immersive environment for the currently playing fragment. The onResume method ensures the fullscreen mode is activated whenever the user launches the currently playing fragment or returns to the app from elsewhere on the device. In contrast, the onDestroyView method uses the hideStatusBars method to exit fullscreen mode whenever the fragment is closed. This returns the app to its regular view and allows the user to continue to browse the app as normal.
Let’s now define the hideStatusBars method itself. Open the MainActivity.kt file (Project > app > java > name of the project) and add the following code below the getRepeatMode method:
fun hideStatusBars(hide: Boolean) {
   val windowInsetsController = WindowCompat.getInsetsController(window, window.decorView)
   if (hide) {
       supportActionBar?.setDisplayShowTitleEnabled(false)
       windowInsetsController.systemBarsBehavior =
           WindowInsetsControllerCompat.BEHAVIOR_SHOW_TRANSIENT_BARS_BY_SWIPE
       windowInsetsController.hide(WindowInsetsCompat.Type.statusBars())

       // Hide the toolbar to prevent the SearchView keyboard inadvertently popping up
       binding.toolbar.isGone = true
   } else {
       supportActionBar?.setDisplayShowTitleEnabled(true)
       windowInsetsController.systemBarsBehavior =
           WindowInsetsControllerCompat.BEHAVIOR_DEFAULT
       windowInsetsController.show(WindowInsetsCompat.Type.statusBars())

       binding.toolbar.isVisible = true
   }
}
The hideStatusBars method accepts a boolean value indicating whether the status bars should be hidden. If the status bars are hidden, then the application will enter fullscreen immersive mode. To achieve this, the WindowInsetsControllerCompat class’s hide and show methods toggle the system bars visibility as required. The above code also determines how the system bars should respond to user interactions by applying a value to the WindowInsetsControllerCompat instance’s systemBarsBehavior property. Available behaviours include:
- BEHAVIOR_DEFAULT - The system bars will be revealed whenever the user touches the corresponding display or swipes from the edge of the screen where the bar is hidden.
- BEHAVIOR_SHOW_TRANSIENT_BARS_BY_SWIPE - The system bars will be temporarily revealed when the user swipes from the edge of the screen where the bar is hidden. After a short timeout, the bar will be hidden again.
In the above code, we set the system bars to be revealed using swipe gestures; however, the reveal will be transient if the app is in fullscreen mode. Also, the above code hides the app’s toolbar when fullscreen mode is active. Otherwise, menu items, navigational destination titles and other distractions may interfere with the currently playing fragment. If the hideStatusBars method is called with a value of false passed as the hide argument, then the system bars and app toolbar will become visible and behave normally again.
With the transition to and from full-screen mode now taken care of, let’s turn our attention to the other methods that are required to handle the user’s interactions with the playback controls. First, add the following method below the hideStatusBars method to handle requests to shuffle and unshuffle the play queue:
fun toggleShuffleMode(): Boolean {
   val newShuffleMode = if (getShuffleMode() == SHUFFLE_MODE_NONE) {
       SHUFFLE_MODE_ALL
   } else SHUFFLE_MODE_NONE

   setShuffleMode(newShuffleMode)

   return newShuffleMode == SHUFFLE_MODE_ALL
}
The toggleShuffleMode method retrieves active shuffle mode using the getShuffleMode method. If the active value is SHUFFLE_MODE_NONE then it will be toggled to SHUFFLE_MODE_ALL, and vice versa. The new shuffle mode is sent to the setShuffleMode method, which will instruct the media browser service to shuffle or unshuffle the play queue. Once this processing is complete, the method will return a value of true if the new shuffle mode is SHUFFLE_MODE_ALL, and false otherwise.
Moving on, add the following code below the toggleShuffleMode method to define a method called toggleRepeatMode that will handle changes to the repeat mode:
fun toggleRepeatMode(): Int {
   val newRepeatMode = when (getRepeatMode()) {
       REPEAT_MODE_NONE -> REPEAT_MODE_ALL
       REPEAT_MODE_ALL -> REPEAT_MODE_ONE
       else -> REPEAT_MODE_NONE
   }

   val bundle = Bundle().apply {
       putInt("REPEAT_MODE", newRepeatMode)
   }
   mediaController.sendCommand("SET_REPEAT_MODE", bundle, null)

   return newRepeatMode
}
The toggleRepeatMode method will iterate the repeat mode through a cycle of REPEAT_MODE_ALL (repeat the entire play queue), REPEAT_MODE_ONE (repeat the current song) and REPEAT_MODE_NONE (neither the play queue nor the current song will repeat). The numbers representing the different repeat modes can be found in the Android documentation: https://developer.android.com/reference/kotlin/android/support/v4/media/session/PlaybackStateCompat#repeat_mode_all. For example, REPEAT_MODE_ONE equals 1. The new repeat mode is then packaged in a bundle that can be sent to the media browser service. To handle changes in the repeat mode, we must define a custom media browser service command. To do this, open the MediaPlaybackService.kt file (Project > app > java > name of the project) and add the following code to the when block in the onCommand callback method (found in the mediaSessionCallback variable):
"SET_REPEAT_MODE" -> {
   extras?.let {
       val repeatMode = extras.getInt("REPEAT_MODE", REPEAT_MODE_NONE)
       mediaSessionCompat.setRepeatMode(repeatMode)
   }
}
The above code defines a custom command called "SET_REPEAT_MODE" that extracts the repeat mode from the extras bundle and sets it as the active repeat mode for the media session.
Returning to the MainActivity class, the last method we will add is called seekTo, which will update the playback position whenever the user changes the position of the SeekBar thumb in the currently playing fragment:
fun seekTo(position: Int) = mediaController.transportControls.seekTo(position.toLong())The seekTo method forwards the new position to the media browser service, which adjusts the playback position in the media stream accordingly.
Building the music library
All fragments that the app requires are now configured. To finalise the app, we simply need to maintain the music library. Let’s start by defining the methods that will scan the user’s device for music. Open the MainActivity.kt file (Project > app > java > name of the project) and add the following code below the seekTo method:
private fun getMediaStoreCursor(selection: String = MediaStore.Audio.Media.IS_MUSIC,
                               selectionArgs: Array? = null): Cursor? {
   val projection = arrayOf(
       MediaStore.Audio.Media._ID,
       MediaStore.Audio.Media.TRACK,
       MediaStore.Audio.Media.TITLE,
       MediaStore.Audio.Media.ARTIST,
       MediaStore.Audio.Media.ALBUM,
       MediaStore.Audio.Media.ALBUM_ID,
       MediaStore.Audio.Media.YEAR
   )
   val sortOrder = MediaStore.Audio.Media.TITLE + " ASC"
   return contentResolver.query(
       MediaStore.Audio.Media.EXTERNAL_CONTENT_URI,
       projection,
       selection,
       selectionArgs,
       sortOrder
   )
}
The getMediaStoreCursor method defined above generates a Cursor interface that will contain a table detailing every music audio file on the user’s device. The Cursor is populated using a content query, which searches the device for media matching a given criteria. In the above code, the content query comprises the following components:
- uri - The target content URI schema. In this case, we use the schema for audio media.
- projection - The media store data fields that we wish to extract for each item. Each field will be a separate column in the Cursor table. In the above code, we request several fields of metadata including the song’s track number, album title, artist name and more. For further details on what information you can request then see the official Android documentation.
- selection - A selection filter for narrowing down the results. It is formatted similarly to a WHERE clause in a SQL query. In this case, we use a readymade constant called IS_MUSIC, which will return music audio files only; however, there is an instance that we will discuss later where we will need to use a different selection filter. Hence, the above code defines the selection argument as a customisable method parameter.
- selectionArgs - It is possible to include parameters (represented by a ? symbol) in the selection filter. If selection parameters are required, then you can supply their values in this selectionArgs field. In this way, you can build dynamic content queries. We will discuss an example of this in the next section.
- sortOrder - Similar to a SQL ORDER BY clause, the sortOrder parameter allows you to sort the Cursor results. In this case, we sort the results in alphabetical order according to the song’s title. This means when the user is watching their music library being built they will notice songs with a title beginning with ‘A’ appear before songs with a title beginning with ‘Z’.
Let’s now write the code that processes the results in the Cursor and builds the user’s music library. Add the following code below the getMediaStoreCursor method:
private fun refreshMusicLibrary() = lifecycleScope.launch(Dispatchers.Default) {
   getMediaStoreCursor()?.use { cursor ->
       val idColumn = cursor.getColumnIndexOrThrow(MediaStore.Audio.Media._ID)
       val songIds = mutableListOf()
       while (cursor.moveToNext()) {
           val songId = cursor.getLong(idColumn)
           songIds.add(songId)
           val existingSong = musicViewModel.getSongById(songId)
           if (existingSong == null) {
               val song = createSongFromCursor(cursor)
               musicViewModel.insertSong(song)
           }
       }

       // TODO: Handle deleted songs here
   }
}
The refreshMusicLibrary method begins by using the getMediaStoreCursor method to generate a Cursor detailing every song on the user’s device. We use Kotlin’s use function to interact with the Cursor because the use function ensures that the Cursor is safely closed once all tasks are complete. Next, a while block iterates through each row in the table of results using the Cursor’s moveToNext method and assembles a Song object for each item. The constructed Song object is then saved to the app database via the MusicViewModel view model.
It is important not to spend time creating Song objects for songs that already exist in the user’s music library. For this reason, the above code checks whether the music library already contains a Song object associated with the song ID of each Cursor entry using the MusicViewModel view model’s getSongById method. If a match is found, then that Cursor entry will be skipped.
The method that will assemble Song objects from the data in the Cursor is called createSongFromCursor. To define the createSongFromCursor method, add the following code below the refreshMusicLibrary method:
private fun createSongFromCursor(cursor: Cursor): Song {
   val idColumn = cursor.getColumnIndexOrThrow(MediaStore.Audio.Media._ID)
   val trackColumn = cursor.getColumnIndexOrThrow(MediaStore.Audio.Media.TRACK)
   val titleColumn = cursor.getColumnIndexOrThrow(MediaStore.Audio.Media.TITLE)
   val artistColumn = cursor.getColumnIndexOrThrow(MediaStore.Audio.Media.ARTIST)
   val albumColumn = cursor.getColumnIndexOrThrow(MediaStore.Audio.Media.ALBUM)
   val albumIDColumn = cursor.getColumnIndexOrThrow(MediaStore.Audio.Media.ALBUM_ID)
   val yearColumn = cursor.getColumnIndexOrThrow(MediaStore.Audio.Media.YEAR)

   val id = cursor.getLong(idColumn)
   var trackString = cursor.getString(trackColumn) ?: "1001"

   // The Track value will be stored in the format 1xxx where the first digit is the disc number
   val track = try {
       when (trackString.length) {
           4 -> trackString.toInt()
           in 1..3 -> {
               val numberNeeded = 4 - trackString.length
               trackString = when (numberNeeded) {
                   1 -> "1$trackString"
                   2 -> "10$trackString"
                   else -> "100$trackString"
               }
               trackString.toInt()
           }
           else -> 1001
       }
   } catch (_: NumberFormatException) {
       // If the Track value is unusual (e.g. you can get stuff like "12/23") then use 1001
       1001
   }

   val title = cursor.getString(titleColumn) ?: "Unknown song"
   val artist = cursor.getString(artistColumn) ?: "Unknown artist"
   val album = cursor.getString(albumColumn) ?: "Unknown album"
   val year = cursor.getString(yearColumn) ?: "2000"
   val albumId = cursor.getString(albumIDColumn) ?: "unknown_album_id"
   val uri = ContentUris.withAppendedId(MediaStore.Audio.Media.EXTERNAL_CONTENT_URI, id)

   val directory = ContextWrapper(application).getDir("albumArt", Context.MODE_PRIVATE)
   if (!File(directory, "$albumId.jpg").exists()) {
       val albumArt = try {
           contentResolver.loadThumbnail(uri, Size(640, 640), null)
       } catch (_: FileNotFoundException) { null }
       albumArt?.let {
           saveImage(albumId, albumArt)
       }
   }

   return Song(id, track, title, artist, album, albumId, year)
}
Note you may need to add the following import statement to the top of the file:
import android.util.SizeTo construct a Song object from the data in the Cursor, the createSongFromCursor method starts by identifying the relevant column for each piece of data using the Cursor’s getColumnIndexOrThrow method. The data in each column is then processed so it is usable by the app. First, the track value for the song is retrieved. In song metadata, the track value uses the format 1xxx, where 1 is the disc number and xxx is the track number. For example, a track value of 2004 would represent the fourth track on disc 2. Sometimes, the song’s metadata omits the disc number (e.g. 2 rather than 1002). For this reason, the above code uses a when block to check whether the length of the song’s track number metadata is between 1 and 3 digits, which could indicate the disc number has been omitted. In this case, the when block will attempt to supply the missing values and assign the song to disc 1. For instance, the when block would convert a track number of 1 to 1001. If there is a problem interpreting the song’s metadata (e.g. sometimes the track number can appear in an unexpected format like ‘11/23’), then a number format exception may be thrown. In this case, a catch block intercepts the exception and sets the track property to 1001, which represents track 1 of disc 1. The user can rectify the track value via the edit song fragment.
Further metadata attributes retrieved from the Cursor interface columns include the song’s title, artist name, album name, release year and album ID. An Elvis operator ?: is included with each attribute to define the default value that should be used if a given field is missing. For example, if the artist column for a given song is null, then the value on the right-hand side of the Elvis operator “Unknown artist" will be used instead.
The Song object for each song in the user’s music library will also contain a content URI, which contains the location of the audio file in the media store (e.g. content://media/external/audio/media/) and the song’s ID. So the complete content URI will look like this content://media/external/audio/media/271. The app can later use this content URI to locate the associated audio file and play the song.
The final section of the createSongFromCursor method handles the song’s album artwork. First, it generates a File object for a JPEG image file in the app’s internal storage that corresponds to the song’s album ID. Next, an if expression checks whether the JPEG file referenced in the File object exists. If the file exists, then this means artwork for the album has already been saved and no further action is required. On the other hand, if a corresponding image file cannot be found, then the above code attempts to extract artwork from the audio file’s metadata using the ContentResolver class’s loadThumbnail method. The loadThumbnail method will attempt to extract a Bitmap representation of the audio file’s album artwork. The Bitmap will be resized to 640 x 640 pixels, as specified in the Size object that is supplied as a parameter to the loadThumbnail method. The resultant Bitmap image will be saved as a JPEG file to the app’s internal storage using the saveImage method.
Once the above tasks are complete, a Song object is constructed using the processed metadata and returned by the createSongFromCursor method. To handle the remaining library maintenance tasks, return to the refreshMusicLibrary method and replace the TODO comment with the following code:
val songsToBeDeleted = musicViewModel.allSongs.value?.filterNot {
   songIds.contains(it.songId)
}
songsToBeDeleted?.let { songs ->
   for (song in songs) {
       musicViewModel.deleteSong(song)
       findSongIdInPlayQueueToRemove(song.songId)
   }
}
The above code identifies any songs that should be deleted from the music library. It does this by filtering the MusicViewModel view model’s allSongs variable for any Song objects with IDs that were not returned by the Cursor. If a given ID is not found in the Cursor then that means the song no longer exists on the device. All filtered Song objects are then deleted from the database using the music view model’s deleteSong method. If a song is deleted from the music library, we must also remove any instances of that song from the play queue. To do this, add the following code below the createSongFromCursor method:
private fun findSongIdInPlayQueueToRemove(songId: Long) = lifecycleScope.launch(Dispatchers.Default) {
   val queueItemsToRemove = playQueue.filter { it.description.mediaId == songId.toString() }
   for (item in queueItemsToRemove) removeQueueItemById(item.queueId)
}
The findSongIdInPlayQueueToRemove method defined above filters the play queue for any queue items containing a media ID equal to the ID of the song that has been removed from the music library. Any matching queue items are then removed from the play queue via the removeQueueItemById method we defined earlier.
Requesting permission to access music on the user’s device
The user’s music library will be refreshed each time the user launches the app to determine whether any new audio files have been added or old files have been deleted. To handle this, add the following code to the bottom of the onCreate method in the MainActivity.kt file (Project > app > java > name of the project):
if (ContextCompat.checkSelfPermission(this, Manifest.permission.READ_MEDIA_AUDIO) == PackageManager.PERMISSION_GRANTED) {
    refreshMusicLibrary()
} else ActivityCompat.requestPermissions(this, arrayOf(Manifest.permission.READ_MEDIA_AUDIO), 1)
Note you may need to add the following import statement to the top of the file:
import android.ManifestThe above code checks whether the user has granted the app permission to access the device’s audio files. If permission has been granted, then the refreshMusicLibrary method will update the user’s music library. Otherwise, the method will request permission from the user to access the device’s music.
To handle the result of the permissions request, add the following code below the onResume method:
override fun onRequestPermissionsResult(requestCode: Int, permissions: Array<out String>, grantResults: IntArray) {
   super.onRequestPermissionsResult(requestCode, permissions, grantResults)
   if (ContextCompat.checkSelfPermission(this, Manifest.permission.READ_MEDIA_AUDIO) == PackageManager.PERMISSION_GRANTED) {
       refreshMusicLibrary()
   } else {
       Toast.makeText(this, getString(R.string.permission_required), Toast.LENGTH_LONG).show()
       finish()
   }
}
The above code checks whether the user has granted the app permission to access the device’s music files. If permission has been granted, the refreshMusicLibrary method will update the user’s music library. Meanwhile, if permission has not been granted, then a Toast notification will inform the user that storage permissions are required for the app to run and a method called finish will close the activity and the app.
Detecting music library changes in real-time
In this section, we will configure the app to monitor when audio files are deleted or added and update the music library in real-time. For this purpose, we need to create a utility class that will act as a content observer and detect changes. Right-click the main project directory (Project > app > java > name of the project) and create a new Kotlin class called MediaStoreContentObserver. Next, edit the class as follows:
import android.os.Handler

class MediaStoreContentObserver(handler: Handler, private val activity: MainActivity): ContentObserver(handler) {

   override fun onChange(selfChange: Boolean, uri: Uri?) {
       super.onChange(selfChange, uri)

       uri?.let {
           activity.handleChangeToContentUri(uri)
       }
   }
}
The above code defines a class called MediaStoreContentObserver, which extends the ContentObserver class. As it extends the ContentObserver class, we can override some of its methods such as onChange, which handles notifications regarding changes to the content that the class is instructed to observe. The onChange method features a parameter called uri, which will contain the content URI of the item that has been created, modified or deleted. In this case, we send the content URI to a MainActivity method called handleChangeToContentUri, which will determine the appropriate action.
To define the handleChangeToContentUri method, return to the MainActivity class and add the following code below the findSongIdInPlayQueueToRemove method:
fun handleChangeToContentUri(uri: Uri) = lifecycleScope.launch(Dispatchers.IO) {
   val songIdString = uri.toString().removePrefix(
       MediaStore.Audio.Media.EXTERNAL_CONTENT_URI.toString() + "/")
   try {
       val selection = MediaStore.Audio.Media._ID + "=?"
       val selectionArgs = arrayOf(songIdString)
       val cursor = getMediaStoreCursor(selection, selectionArgs)

       val songId = songIdString.toLong()
       val existingSong = musicViewModel.getSongById(songId)

       when {
           existingSong == null && cursor?.count!! > 0 -> {
               cursor.apply {
                   this.moveToNext()
                   val createdSong = createSongFromCursor(this)
                   musicViewModel.insertSong(createdSong)
               }
           }
           cursor?.count == 0 -> {
               existingSong?.let {
                   musicViewModel.deleteSong(existingSong)
                   findSongIdInPlayQueueToRemove(songId)
               }
           }
       }
   } catch (_: NumberFormatException) { refreshMusicLibrary() }
}
The handleChangeToContentUri method is launched using a coroutine with an IO dispatcher because it will primarily be handling data input and output. It starts by extracting the ID of the affected media item by removing the audio media content URI prefix from the supplied content URI. For example, if the affected content URI is content://media/external/audio/media/710, then the value of the songIdString variable in the above code will be “710”. Next, the MusicViewModel view model’s getSongById method searches the app’s database for a song with an ID equal to the ID of the affected URI. If no match is found, then this means the URI belongs to a new song that must be added to the library. In this case, a Cursor containing the media store metadata for that song is generated and used to construct a Song object that can be added to the music library. Meanwhile, if the Cursor is empty, then this means no media store record was found for the supplied media ID and the audio file no longer exists on the device. In this case, the song is deleted from the music library and play queue.
The app can now respond to changes in the catalogue of audio files available on the device in real-time. The only remaining thing to do is to register the content observer when the MainActivity activity is launched and unregister it again when the activity is destroyed. For this purpose, first, add the following variable to the top of the class:
private var mediaStoreContentObserver: MediaStoreContentObserver? = nullNext, initialise and register the content observer by adding the following code to the onCreate method:
val handler = Handler(Looper.getMainLooper())
mediaStoreContentObserver = MediaStoreContentObserver(handler, this).also {
   this.contentResolver.registerContentObserver(MediaStore.Audio.Media.EXTERNAL_CONTENT_URI,
       true, it)
}
Note you may need to add the following import statement to the top of the file:
import android.os.HandlerFinally, add the following code to the onDestroy method to unregister the content observer when the activity is shut down:
mediaStoreContentObserver?.let {
   this.contentResolver.unregisterContentObserver(it)
}
Summary
Congratulations on completing the Music app! In creating the app, you have covered the following skills and topics:
- Utilise and query the data in a Room SQLite database.
- Use a MediaBrowserService to coordinate the playback of audio files and display a notification to the user.
- Apply an ItemTouchHelper instance to a RecyclerView widget to respond to user gestures.
- Implement a navigation drawer that allows the user to navigate to different areas of the app.
- Utilise multiple NavControllers to coordinate different navigation graphs and navigation pathways.
- Save, delete and retrieve files from the app’s internal files.
- Manually hide and reveal the soft input keyboard.
- Write coroutines that coordinate tasks behind the scenes.
- Display a popup menu to allow the user to interact with items in the play queue.
- Enter and exit full-screen immersive mode.
- Use a content observer to monitor changes to the files on the user’s device in real-time.