How to incorporate HATEOAS resource representation into a RESTful Spring Boot application
To be effective, a REST application must do more than simply process data. A quality REST application should steer the client to relevant resources and help the client get the most out of each interaction. To facilitate interactions with an application's resources, we can incorporate Spring HATEOAS (HATEOAS stands for Hypermedia as the Engine of Application State). Spring HATEOAS is an API library designed to make it easier for a client to interact with a REST application, even if the client has little knowledge of how the application is organised. Spring HATEOAS facilitates client interactions by supplementing application responses with hypermedia. For example, Spring HATEOAS allows hyperlinks to related application resources to be included with responses. The client can use the links to navigate around the application's resources and accomplish its needs, even without prior knowledge of the application's structure. Providing real-time links also eliminates the need to hard code information about the application's structure because the client can always access up-to-date information by querying the application. In this way, Spring HATEOAS minimises the disruption to the client if the structure of the application changes. Also, Spring HATEOAS improves the discoverability of the application because the client can learn how to interact with the application based on the links that are included in the responses.
The full code for the project covered in this tutorial can be found on our Github.
Configure Spring HATEOAS
To configure a Spring Boot application to support Spring HATEOAS, either include the Spring HATEOAS dependency when preparing the project using the Spring Initializr console or add the dependency manually to an existing project. Dependencies can be added manually to an existing project by opening the project's pom.xml file, which can be found in the project's root directory.
The pom.xml file coordinates the dependencies for the projects that are built using Maven. Locate the dependencies element and add the Spring HATEOAS dependency as shown below:
<dependencies>
<!-- Any existing dependencies -->
<dependency>
<groupId>org.springframework.boot</groupId>
<artifactId>spring-boot-starter-hateoas</artifactId>
</dependency>
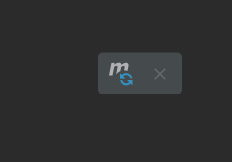
</dependencies>Whenever you modify the pom.xml file, you should press the M icon that appears in the IntelliJ window to rebuild the project and incorporate any changes.
Packaging application resources and links using Spring HATEOAS
In the previous tutorial, we covered how to create RESTful endpoints for interacting with items in an online store's inventory. Each item was mapped by a Java class called InventoryItem. To incorporate HATEOAS principles into the application, we could supplement the InventoryItem object with links. For example, if the client sends a request to a POST-based endpoint to create a new item, the application could return the resultant InventoryItem object and links to request the full list of items and the newly created item.
To package the links with the InventoryItem object, we can create a dedicated assembler class. Right-click the project's model directory (Project > src > main > java > name of the project) and select New > Java Class.
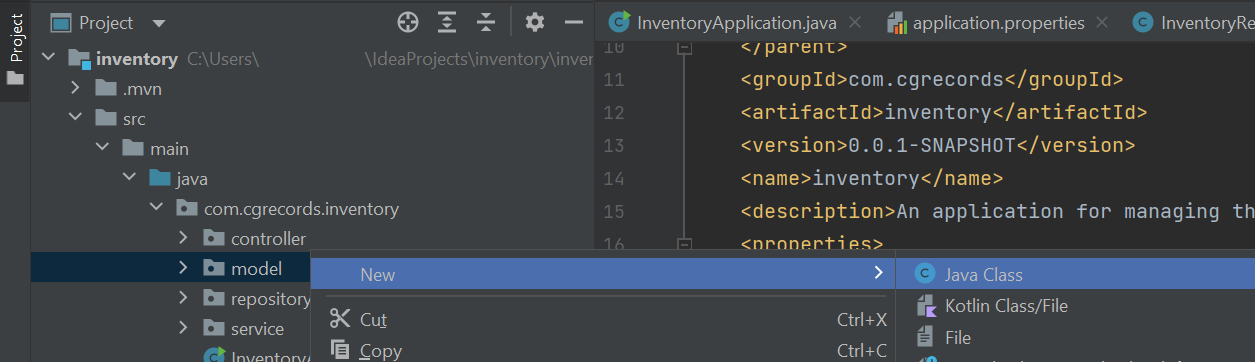
Name the file InventoryItemAssembler and select Class from the list of options. Once the InventoryItemAssembler.java file opens in the editor, modify the class's code so it reads as follows:
import static org.springframework.hateoas.server.mvc.WebMvcLinkBuilder.linkTo;
import static org.springframework.hateoas.server.mvc.WebMvcLinkBuilder.methodOn;

@Component
public class InventoryItemAssembler implements RepresentationModelAssembler<InventoryItem, EntityModel<InventoryItem>> {
    @Override
    public EntityModel<InventoryItem> toModel(InventoryItem item) {

        return EntityModel.of(item,
                linkTo(methodOn(InventoryRestController.class).getInventoryItemByID(item.getInventory_item_id())).withSelfRel(),
                linkTo(methodOn(InventoryRestController.class).getInventory()).withRel("items"));
    }

	@Override
    public CollectionModel<EntityModel<InventoryItem>> toCollectionModel(Iterable<? extends InventoryItem> items) {
        List<EntityModel<InventoryItem>> entityModelItems = StreamSupport.stream(items.spliterator(), false)
                .map(this::toModel).toList();

        return CollectionModel.of(entityModelItems,
                linkTo(methodOn(InventoryRestController.class).getInventory()).withSelfRel()
        );
    }
}
In the above code, the InventoryItemAssembler class is labelled with the @Component annotation, which instructs Spring to automatically compile and create the assembler when the application starts. The InventoryItemAssembler class extends the RepresentationModelAssembler interface, which provides tools for converting an application class such as InventoryItem into a RepresentationModel. A RepresentationModel serves as a container for links. In this case, we will use a type of RepresentationModel called EntityModel. An EntityModel packages a single object and a collection of related links. In other words, the EntityModel produced by the InventoryItemAssembler class will contain an InventoryItem object and links leading to the InventoryItem object and all other InventoryItem objects held by the application.
The packaging of the InventoryItem object in an EntityModel is handled by a method called toModel, which is inheritted from the RepresentationModelAssembler interface. In the above code, we instruct the toModel method to package two links inside the EntityModel:
linkTo(methodOn(InventoryRestController.class).getInventoryItemByID(item.getInventory_item_id())).withSelfRel()The above code will create a link to the InventoryItem object that is included in the EntityModel. For this reason, the link is classified as a 'self link' because the resource essentially leads to itself. To retrieve a single InventoryItem object, we can use the InventoryRestController class's getInventoryItemByID method. The link will contain the appropriate URL endpoint configuration to lead to that method. For example, if the InventoryItem object has an ID value of 2, then the resultant link will be http://localhost:8081/api/inventory/items/2
linkTo(methodOn(InventoryRestController.class).getInventory()).withRel("items"))The second link will run the InventoryRestController class's getInventory method and retrieve all the items in the application's inventory. As such, the link will be structured http://localhost:8081/api/inventory/items and labelled with the tag 'items', as directed by the withRel method in the above code.
The InventoryItemAssembler class also contains a method called toCollectionModel. The toCollectionModel method will handle requests to generate links for multiple InventoryItem objects. In Spring HATEOAS, multiple objects with links can be packaged using a CollectionModel. The above code achieves this by creating a Stream of InventoryItem objects that are supplied to the toCollectionModel method as an iterable. Iterables include lists and array lists. The toCollectionModel method uses the iterable to create a Stream, which allows the method to interact with each element in the iterable. In this case, each element is converted to an EntityModel using the toModel method and appended to a list. Finally, the list of EntityModel objects is converted to a CollectionModel. A 'self' link leading to the InventoryRestController class's getInventory method is included with the CollectionModel because the client can use the link to retrieve the full list of InventoryItem objects again if they wish.
Altogether, the above code packages individual InventoryItem objects in EntityModel objects. Each EntityModel object will include links that run the relevant InventoryRestController methods for retrieving the supplied InventoryItem object, or all the InventoryItem objects in the application's inventory. Also, the above code bundles multiple EntityModel objects inside a CollectionModel, which allows multiple elements to be returned simultaneously. In the next section, we will modify the application to return the EntityModel objects to the client in response to HTTP requests.
Responding to HTTP REST requests using HATEOAS
Once the InventoryItemAssembler class is set up, we can configure the InventoryRestController to incorporate the assembler and include links in the response to HTTP calls. If you would like a reminder on how the InventoryRestController class was set up, then see our previous tutorial.
First, we must configure the InventoryRestController class to support the InventoryItemAssembler. To do this, replace the InventoryRestController class's primary constructor with the following code:
InventoryItemAssembler inventoryItemAssembler;

public InventoryRestController(InventoryService inventoryService, InventoryItemAssembler inventoryItemAssembler) {
    this.inventoryService = inventoryService;
    this.inventoryItemAssembler = inventoryItemAssembler;
}
Now, when the InventoryRestController is created, it will automatically initialise the InventoryItemAssembler assembler.
The first methods we will modify will be those that handle GET-based HTTP requests. GET-based requests are used to fetch information from the application. Locate the getInventory method and replace it with the following code:
@GetMapping("/items")
public ResponseEntity<CollectionModel<EntityModel<InventoryItem>>> getInventory() {
    List<InventoryItem> items = inventoryService.getAllInventoryItems();
    CollectionModel<EntityModel<InventoryItem>> collectionModel = inventoryItemAssembler.toCollectionModel(items);

    return ResponseEntity.ok()
            .body(collectionModel);
}
The above code uses the InventoryService service's getAllInventoryItems method to retrieve the full list of InventoryItem objects held by the application. Next, the list is converted to a CollectionModel using the InventoryItemAssembler assembler. Finally, the CollectionModel and a status code of 200 (OK) are returned to the client as a ResponseEntity.
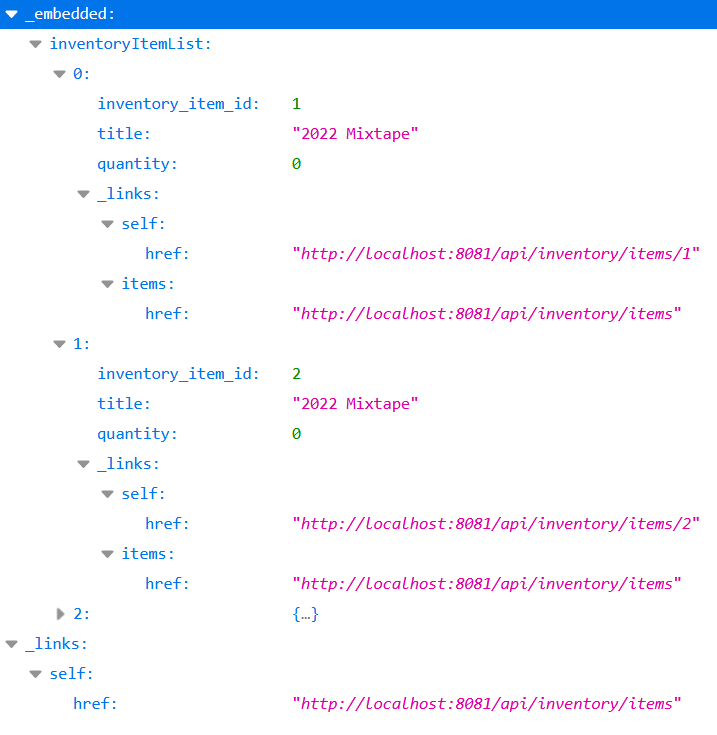
In the last tutorial on creating a REST controller, we described how to use cURL commands to send HTTP requests to the application. If you test the cURL request for retrieving all the InventoryItem objects again now, you should see the collection itself and each constituent item contain links, as shown below:
curl --request GET http://localhost:8081/api/inventory/items

{"_embedded":{"inventoryItemList":[{"inventory_item_id":1,"title":"2022 Mixtape","quantity":0,"_links":{"self":{"href":"http://localhost:8081/api/inventory/items/1"},
"items":{"href":"http://localhost:8081/api/inventory/items"}}},{"inventory_item_id":2,"title":"2022 Mixtape","quantity":0,"_links":{"self":{"href":"http://localhost:8081/api/inventory/items/2"},
"items":{"href":"http://localhost:8081/api/inventory/items"}}},{"inventory_item_id":3,"title":"2022 Mixtape","quantity":0,"_links":{"self":{"href":"http://localhost:8081/api/inventory/items/3"},
"items":{"href":"http://localhost:8081/api/inventory/items"}}}]},"_links":{"self":{"href":"http://localhost:8081/api/inventory/items"}}}
The links returned by Spring HATEOAS are formatted using JSON Hypertext Application Language (HAL). Each link includes a URI, which is the web address that the link leads to, and a rel, which describes the relationship of the link relative to other resources and the application. For example, the above links include a "self" rel, for links that lead back to the resource, and an "items" rel, for links that can be used to request all the items held by the application. For custom rels such as "items" you should aim to be descriptive, so the client can understand what the link is used for. Using descriptive rels also helps eliminate the need for complex documentation or prior understanding of how the application works. Clients that don't speak HAL can always ignore the links and simply refer to the other data included in the response.
The getInventoryItemByID method, which is used to retrieve individual InventoryItem objects based on their ID, can also be modified to return InventoryItem objects wrapped in an EntityModel. The getInventoryItemByID will only ever return a maximum of one item, so we should use the InventoryItemAssembler assembler's toModel method rather than toCollectionModel:
@GetMapping(value = "/items/{id}")
public ResponseEntity<EntityModel<InventoryItem>> getInventoryItemByID(@PathVariable Long id) {
    InventoryItem item = inventoryService.getInventoryItemByID(id);
    if (item == null) {
        return ResponseEntity.notFound().build();
    } else {
        EntityModel<InventoryItem> entityModel = inventoryItemAssembler.toModel(item);
        return ResponseEntity.ok()
                .body(entityModel);
    }
}
Likewise, the POST, PUT and PATCH methods described in the tutorial on creating a REST controller can also be modified to an EntityModel rather than a regular InventoryItem object. The code to do this is included below:
@PostMapping("/items")
ResponseEntity<EntityModel<InventoryItem>> addItemToInventory(@RequestBody InventoryItem item) {
    InventoryItem createdItem = inventoryService.saveInventoryItem(item);

    if (createdItem == null) {
        return ResponseEntity.notFound().build();
    } else {
        EntityModel<InventoryItem> entityModel = inventoryItemAssembler.toModel(createdItem);
        return ResponseEntity
                .created(entityModel.getRequiredLink(IanaLinkRelations.SELF).toUri())
                .body(entityModel);
    }
}

@PutMapping(value = "/items/{id}", consumes = "application/json")
ResponseEntity<EntityModel<InventoryItem>> updateInventoryItem(
        @RequestBody InventoryItem item, @PathVariable("id") Long id) {
    InventoryItem createdItem = inventoryService.getInventoryItemByID(id);
    if (createdItem == null) {
        return ResponseEntity.notFound().build();
    } else {
        item.setInventory_item_id(id);
        inventoryService.saveInventoryItem(item);
        EntityModel<InventoryItem> entityModel = inventoryItemAssembler.toModel(item);
        return ResponseEntity.ok()
                .body(entityModel);
    }
}

@PatchMapping("/items/{id}")
public ResponseEntity<EntityModel<InventoryItem>> updateItemQuantity(
        @RequestBody Map<String, Object> payload, @PathVariable("id") Long id) {
    InventoryItem item = inventoryService.getInventoryItemByID(id);
    if (item == null) {
        return ResponseEntity.notFound().build();
    } else {
        Object newQuantity = payload.get("quantity");
        if (newQuantity instanceof Integer) {
            item.setQuantity((int) newQuantity);
            inventoryService.saveInventoryItem(item);
            EntityModel<InventoryItem> entityModel = inventoryItemAssembler.toModel(item);
            return ResponseEntity.ok()
                    .body(entityModel);
        } else {
            return ResponseEntity.badRequest().build();
        }
    }
}
The InventoryRestController class is now equipped to return relevant links whenever InventoryItem objects are created, retrieved or updated. As your application develops, you could experiment by including other useful links in the response. For example, it could be useful for the client to know where to submit PUT requests for updating the item, even if the link is the same as for the GET request.
Maintaining a reliable REST application is essential to providing a good experience for your users. If you ever need to update the schema for a link, it is important to keep the rels the same to ensure the client can continue to interact with the application uninhibited. For example, currently, each InventoryItem includes a link that runs the InventoryRestController class's getInventory method. The link is stored under the rel "items". If you need to change the structure of the link, you should continue to use the same rel. Otherwise, the client may be unaware that the link required to access the getInventory method has changed, and this could disrupt future interactions with the application.