How to create a reactive application using Spring WebFlux and an R2DBC database
In this tutorial, we will explore how to use Spring WebFlux to build a reactive Spring Boot application. Reactive applications use asynchronous programming techniques to handle network requests efficiently without blocking other application processes. To handle the application's data, we will use an R2DBC database, which incorporates non-blocking drivers to allow you to effectively handle data asynchronously in a reactive application.
Creating the WebFlux application template
In the previous tutorials, we built an inventory management application that contributed to a microservices-based system for an imaginary record label. We will take this a step further and start work on the next microservice, which will handle the record label's orders. To do this, we must first create a Spring Boot project template using the Spring Initializr console as described previously.
In the Spring Initializr console, provide the relevant technical specifications and metadata for the application (e.g. Maven build and Java 17). Also, add dependencies for H2 Database, Spring Data R2DBC, Spring Reactive Web, Spring Data JPA and Lombok. The Spring Reactive Web dependency provides the tools required to use Spring WebFlux and a web server called Netty, which specialises in reactive applications. Meanwhile, the other dependencies will allow us to store and handle application data using a reactive R2DBC-enabled H2 database.
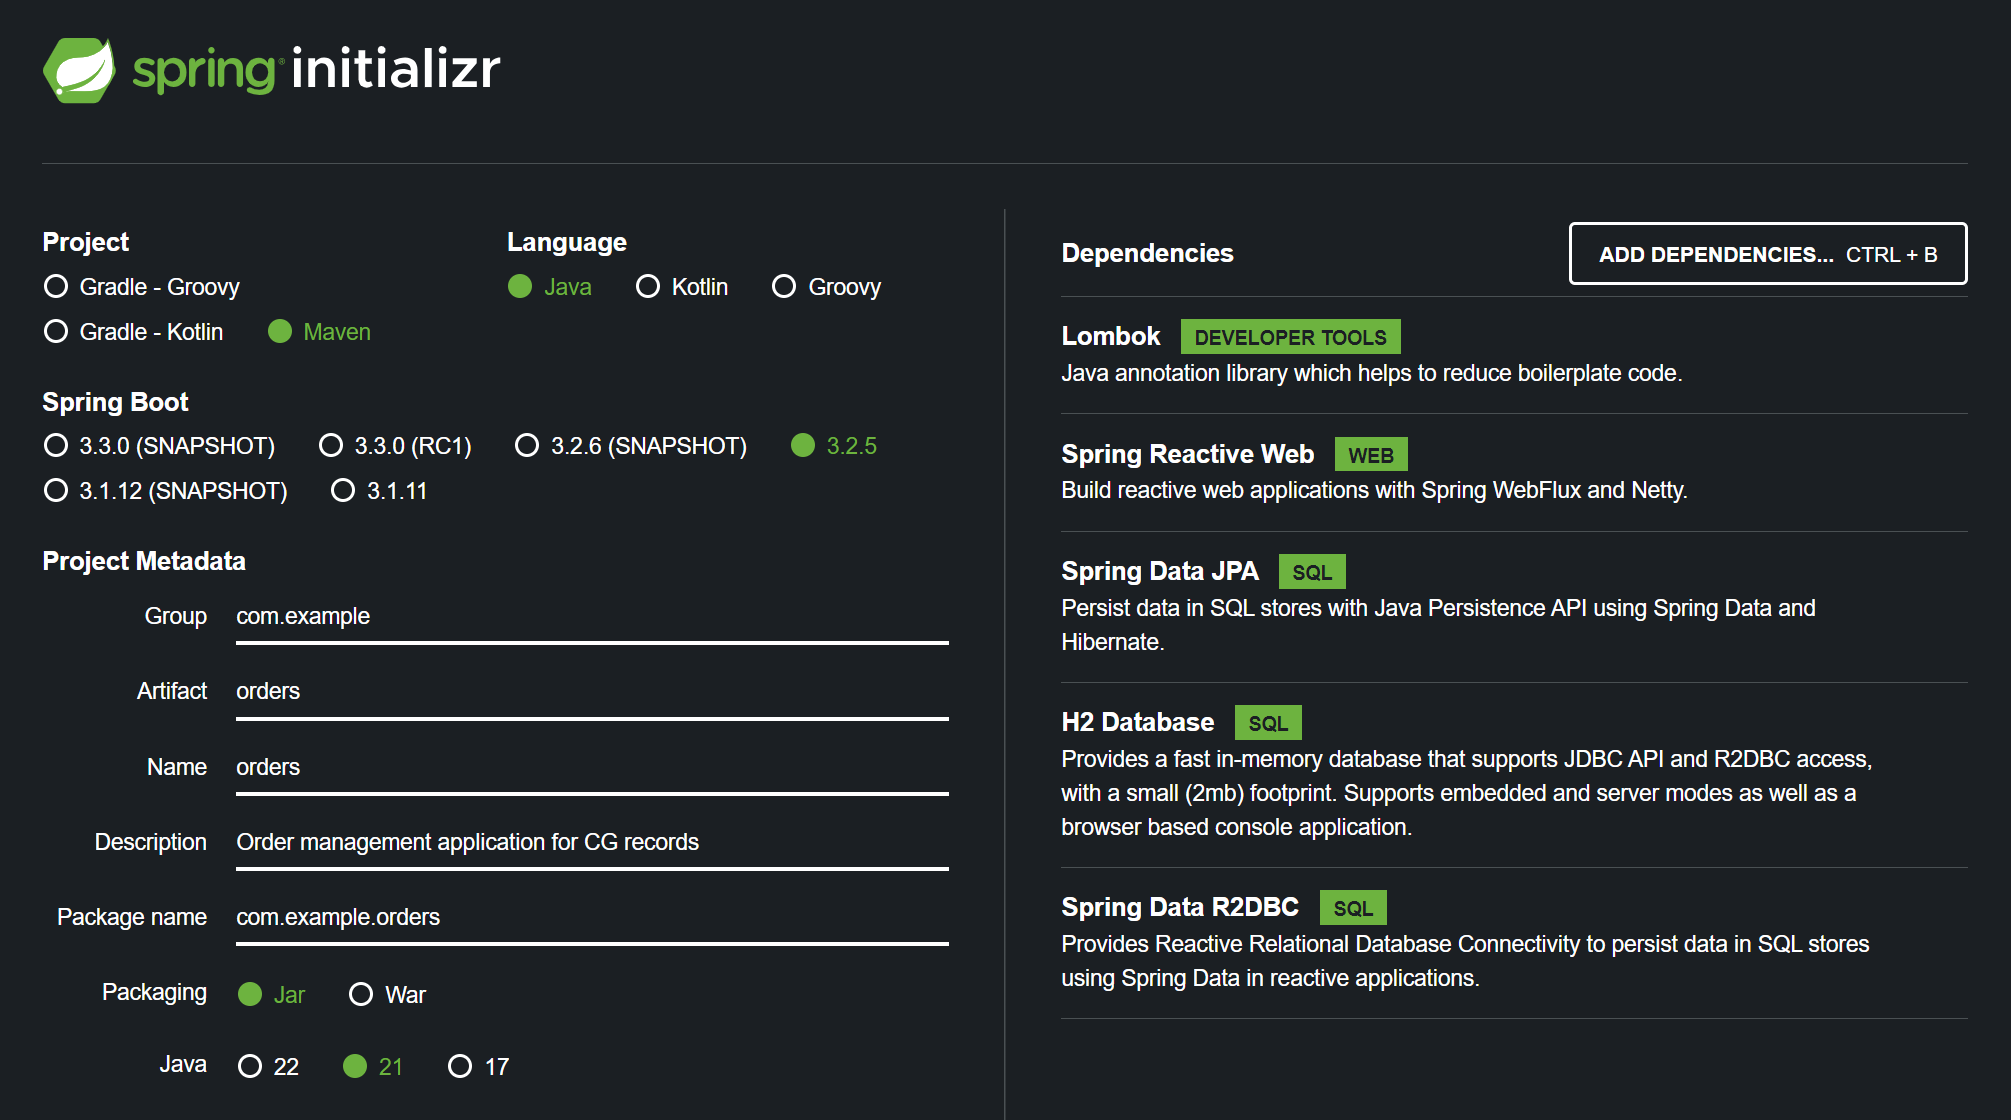
Once you have completed the project template, press the Generate button in the Spring Initializr console to download the template in a ZIP folder. Extract the ZIP folder to the location on your computer where you would like to store the project. Next, open the project in IntelliJ as described previously.
It would be a good idea to direct the orders application to use a different port to the inventory application because then we can later run both applications simultaneously if we wish. To assign the orders application a port, navigate through Project > src > main > resources and open the file called application.properties.
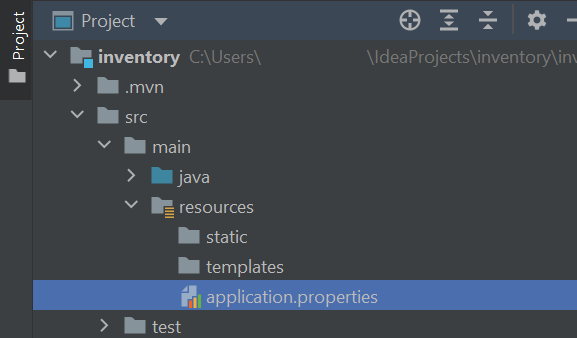
The inventory application used port 8081, so you could direct the orders application to use port 8082 by adding the following code to the application.properties file:
server.port=8082Once the project has been imported and assigned a vacant server port, we can begin to construct our WebFlux application and R2DBC database.
Preparing the application to use WebFlux and R2DBC
For the first step, we will provide the application with the tools required to handle reactive processes using Spring WebFlux and store data using R2DBC. To arrange this, open the main application class file (this may be called OrdersApplication.java) by navigating through Project > src > main > java > name of the project. The class should already be labelled with the @SpringBootApplication annotation. To enable the application to use Spring WebFlux and R2DBC relational databases, label the class with @EnableR2dbcRepositories and @EnableWebFlux annotations also.
@EnableWebFlux
@EnableR2dbcRepositories
@SpringBootApplication
public class OrdersApplication {

    public static void main(String[] args) {
        SpringApplication.run(OrdersApplication.class, args);
    }
}
Next, we'll set up the database. The orders application will use a Java class to map the database table, similar to the InventoryItem class we created in a previous tutorial. As described previously, create a new package called model. Inside the model package, create a Java class called CustomerOrder. Next, edit the CustomerOrder class's code so it reads as follows:
import lombok.AllArgsConstructor;
import lombok.Data;
import lombok.NoArgsConstructor;
import org.springframework.data.annotation.Id;

import javax.persistence.GeneratedValue;
import javax.persistence.GenerationType;
import java.time.LocalDate;

@NoArgsConstructor
@AllArgsConstructor
@Data
public class CustomerOrder {
    @Id
    @GeneratedValue(strategy = GenerationType.SEQUENCE)
    private Long order_id;
    private LocalDate order_created;
    private LocalDate order_refunded;
}
The above code defines a class called CustomerOrder and labels the class with several Lombok annotations. The @NoArgsConstructor allows an instance of the class to be created without supplying data for any of its fields, while the @AllArgsConstructor allows an instance of the class to be created with values assigned to all fields. The @Data annotation provides the class with several features including readymade getter and setter methods for each field and toString, hashcode and equals methods for the class. Inside the class, you will find fields for the order's ID, the date the order was created, and the date the order was refunded (if applicable).
When creating a database table using R2DBC, you must manually write the SQL code that maps the Java class to the database table. To do this, navigate through Project > src > main and right-click the resources directory. Next, select New > File.
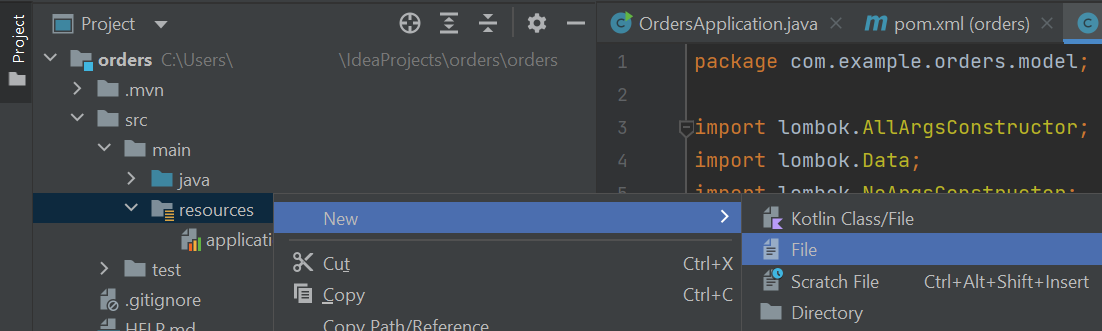
Name the file schema.sql and add the following code:
CREATE TABLE CUSTOMER_ORDER
(
    order_id Long PRIMARY KEY AUTO_INCREMENT,
    order_created DATE,
    order_refunded DATE
);
The above SQL code defines a database table that stores all the information defined in the CustomerOrder class. Spring Boot will automatically initialise the database table when the application is launched.
To facilitate interactions with the database table, we need to create a repository. Create a new package called repository and add a new Java interface to the repository package called OrdersDAO (see this tutorial for a reminder on how to create an interface). Next, construct the OrdersDAO interface using the following code:
public interface OrdersDAO extends R2dbcRepository<CustomerOrder, Long> { }The above code creates an interface called OrdersDAO that implements another repository called R2dbcRepository. The R2dbcRepository interface contains tools and instructions for interacting with database tables using R2DBC. In this case, we apply the repository to the CustomerOrder entity and specify that the entity's primary key is in Long format.
Creating a WebFlux router
Once the R2DBC database is set up, we can use WebFlux to create a router that can asynchronously query the database in response to network requests. The router will interact with the database via a handler class. To prepare the handler class, first, create a new package called handler. Next, in the handler package, create a new Java class called OrdersHandler and modify its code so it reads as follows:
import com.example.orders.model.CustomerOrder;
import com.example.orders.repository.OrdersDAO;
import org.springframework.http.HttpStatus;
import org.springframework.stereotype.Component;
import org.springframework.web.reactive.function.server.ServerRequest;
import org.springframework.web.reactive.function.server.ServerResponse;
import reactor.core.publisher.Flux;
import reactor.core.publisher.Mono;

import java.net.URI;
import java.net.URISyntaxException;

import static org.springframework.http.MediaType.APPLICATION_JSON;
import static org.springframework.web.reactive.function.BodyInserters.fromValue;
import static org.springframework.web.reactive.function.server.ServerResponse.*;

@Component
public class OrdersHandler {

    OrdersDAO ordersDAO;

    public OrdersHandler(OrdersDAO ordersDAO) {
        this.ordersDAO = ordersDAO;
    }

    public Mono<ServerResponse> getOrderById(ServerRequest request) {
        Long orderID = Long.valueOf(request.pathVariable("id"));
        return ordersDAO.findById(orderID)
                .flatMap(order -> ok().contentType(APPLICATION_JSON).body(fromValue(order)))
                .switchIfEmpty(ServerResponse.notFound().build());
    }

    public Mono<ServerResponse> getAllOrders(ServerRequest request) {
        Flux<CustomerOrder> orders = ordersDAO.findAll();
        return ok().contentType(APPLICATION_JSON).body(orders, CustomerOrder.class);
    }

    public Mono<ServerResponse> saveOrder(ServerRequest request) {
        Mono<CustomerOrder> order = request.bodyToMono(CustomerOrder.class)
                .flatMap(o -> this.ordersDAO.save(o));
        return order.flatMap(o -> {
            Mono<ServerResponse> response = status(HttpStatus.INTERNAL_SERVER_ERROR).build();
            try {
                URI uri = new URI("http://localhost:8082/orders" + o.getOrder_id());
                created(uri).contentType(APPLICATION_JSON).body(fromValue(o));
            } catch (URISyntaxException ignore) { }
            return response;
        });
    }
}
The OrdersHandler class uses three methods to interact with the database via the OrdersDAO interface. The first method is called getOrderById. The getOrderById method retrieves an order ID which is supplied in the request URL and searches the database for a corresponding CustomerOrder entry. If a matching entry is found, then it is in a ServerResponse object along with a status code of 200 (OK). Meanwhile, if no corresponding customer order is found, then the returned ServerResponse object will have a status of 404 (Not Found). The ServerResponse object is returned in Mono format, which is a reactive data type that can contain 0 or 1 object(s).
The next method is called getAllOrders. The getAllOrders method uses the R2dbcRepository repository's findAll method to retrieve all the customer orders from the database. The collection of customer orders is retrieved in Flux format, which is a reactive data type used to hold collections of anywhere between 0 and an unlimited quantity of elements. The Flux collection of customer orders is packaged in a ServerResponse object along with a status code of 200 (OK).
Finally, the third method is called saveOrder. The saveOrder extracts the details of a CustomerOrder object that was supplied with the network request in JSON format. The extracted CustomerOrder object is then saved in the database using the R2dbcRepository repository's save method. If the order is saved successfully, then it is returned to the client in a ServerResponse object along with a URI that the client can use to locate the order in the database and a status code of 200 (OK). Meanwhile, if an error occurs while formatting the URI, then a server response status of 500 (Internal Server Error) will be returned instead.
Moving on, let's now create the WebFlux router that will coordinate incoming network requests. Create a new package called config and add a new class to the config package called OrdersRouter. Next, edit the OrdersRouter class's code so it reads as follows:
import com.example.orders.handler.OrdersHandler;
import org.springframework.beans.factory.annotation.Autowired;
import org.springframework.context.annotation.Bean;
import org.springframework.context.annotation.Configuration;
import org.springframework.web.reactive.function.server.RouterFunction;
import org.springframework.web.reactive.function.server.ServerResponse;

import static org.springframework.http.MediaType.APPLICATION_JSON;
import static org.springframework.web.reactive.function.server.RequestPredicates.*;
import static org.springframework.web.reactive.function.server.RouterFunctions.route;

@Configuration(proxyBeanMethods = false)
public class OrdersRouter {

    @Autowired
    OrdersHandler ordersHandler;

    @Bean
    public RouterFunction<ServerResponse> ordersRoute() {

        return route(GET("/orders/{id}").and(accept(APPLICATION_JSON)), ordersHandler::getOrderById)
                .andRoute(GET("/orders").and(accept(APPLICATION_JSON)), ordersHandler::getAllOrders)
                .andRoute(POST("/orders"), ordersHandler::saveOrder);
    }
}
The OrdersRouter class contains a method called ordersRouter that will coordinate network requests. For example, requests directed at the URL endpoint "/orders/{id}" will be directed to the OrdersHandler class's getOrderById method. The results will be returned to the client in JSON format. Other routes are also established for retrieving all the orders in the database via a GET-based HTTP request to the "/orders" endpoint and creating new orders by submitting a POST-based HTTP request to the same endpoint.
For example, you could register a new order that was created on April 26th 2022 using the following cURL command:
curl -H "Content-Type: application/json" -X POST http://localhost:8082/orders -d "{\"order_created\":\"2022-04-26\"}"You could then retrieve all the orders in the database using the following cURL command:
curl --request GET http://localhost:8082/ordersAnd with that, you should now have a working Spring Boot application that allows you to save and retrieve data asynchronously using WebFlux and an R2DBC database.