How to add RESTful endpoints to a Spring Boot application
An application will rarely exist in isolation. Often, an application will be required to communicate with other applications, such as in a microservices-based system, and handle direct interactions with clients. To facilitate interactions with other applications and clients, we can incorporate RESTful principles into our application design. In programming terms, REpresentational State Transfer (REST) applications allow other applications to view and interact with their information via predefined resources. A RESTful application will often contain endpoints, which are interfaces that can be accessed over a computer network. Each endpoint is associated with an action. For example, GET-based endpoints provide information, POST-based endpoints create information, and PUT-based endpoints update information.
If you've been following along with the previous tutorials in this Spring Boot series, then you will be aware of our example project to create a microservices-based system for an imaginary record label. For this example project, we are creating a Spring Boot-based application for managing the record label's inventory. In this tutorial, we will further develop the inventory management application by creating GET-based endpoints for requests to retrieve products in the inventory, a POST-based endpoint to add new products to the inventory, and a PUT-based endpoint to update the details of an existing product.
The full code for the project covered in this tutorial can be found on our Github.
Creating a REST controller
In the last tutorial, we discussed how to facilitate interactions with a database using a service. We will use the service to query the application's database and respond to client interactions with the application's REST endpoints. To coordinate the REST endpoints, we must create a controller. The controller will define each available endpoint and process client requests to retrieve, create, update, or delete application data.
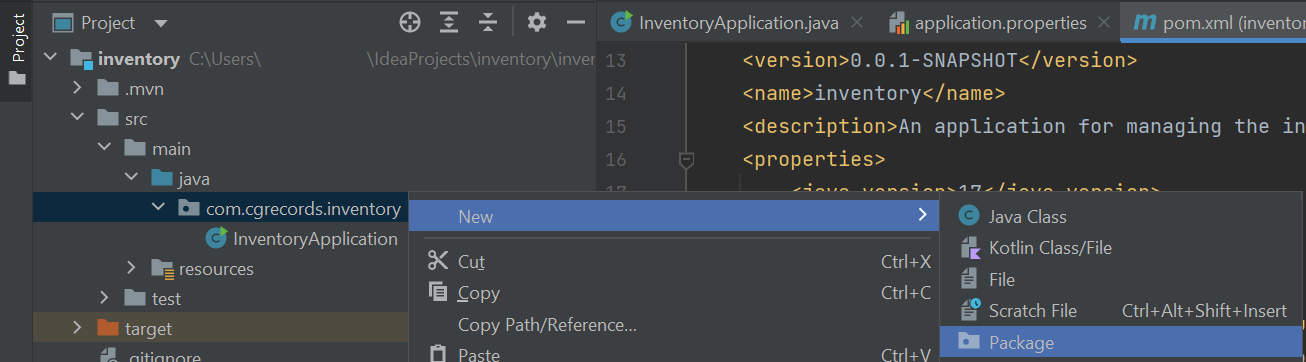
To prepare the application to handle RESTful requests, first, create a new package called controller. A new package can be created by right-clicking the directory with the name of the project (Project > src > main > java) and selecting New > Package.
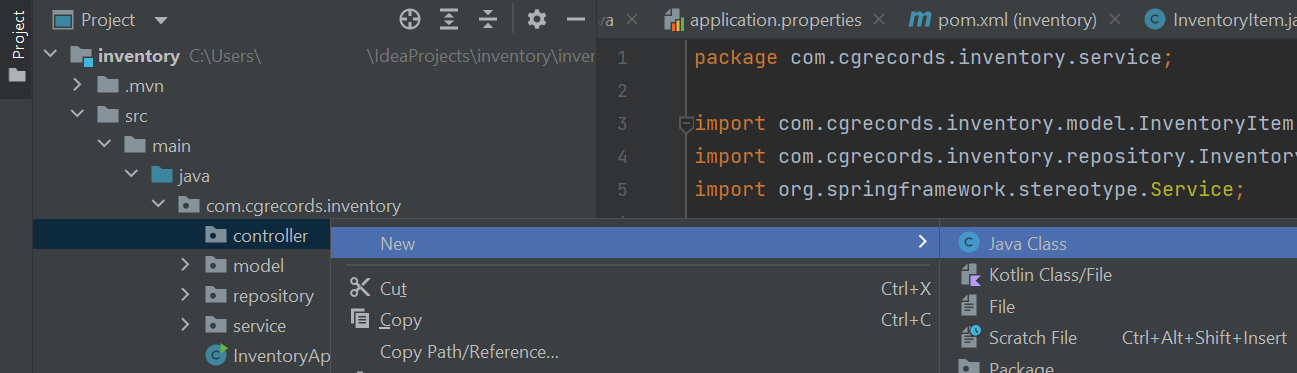
Once that is done, create a new Java class in the controller package called InventoryRestController by right-clicking the controller directory and selecting New > Java Class.
Once the InventoryRestController.java file opens in the editor, modify the class’s code so it reads as follows:
@RestController
@RequestMapping("/api/inventory")
public class InventoryRestController {
    InventoryService inventoryService;

    public InventoryRestController(InventoryService inventoryService) {
        this.inventoryService = inventoryService;
    }

  // TODO: Define REST endpoint methods here
}
In the above code, the InventoryRestController class is labelled with an @RestController annotation. The @RestController annotation incorporates the @ResponseBody and @Controller annotations. The @ResponseBody annotation provides every request handling method in the controller with the ability to serialise data into a HttpResponse object. HttpResponse objects are used to communicate data back to the client following a network call. Meanwhile, the @Controller annotation labels the class as an application component that should be automatically detected and implemented through the classpath scanning. In this way, the @Controller annotation ensures the controller is available to receive network calls when the application is running.
The InventoryRestController class also features the @RequestMapping annotation. The @RequestMapping annotation directs a given network path to the controller. In this case, the path is /api/inventory. Network requests can reach the controller by appending the request path to the application’s root domain. In a previous tutorial, we directed the application to occupy port 8081 on the local machine, which means the root domain URL will be http://localhost:8081. To access the InventoryRestController, therefore, network requests should target http://localhost:8081/api/inventory
Inside the InventoryRestController class, an instance of the InventoryService service is initialised in the class’s constructor. Once initialised, the controller can use the service to perform the actions required to respond to API calls.
Defining REST endpoint methods
In the InventoryRestController class code provided in the previous section, you may notice a comment indicating where the REST endpoint methods should go. For the inventory management application, we will create REST endpoints for several functions including retrieving items, creating a new item, and updating an existing item.
@GetMapping
RESTful requests to retrieve data should be mapped using GET-based network requests. To facilitate the response to GET-based HTTP methods, REST controllers can use an annotation called @GetMapping. For example, a GET-based method that retrieves all the inventory items in the application database could be defined using the following code:
@GetMapping(value = "/items", produces = "application/json")
public List<InventoryItem> getInventory() {
    return inventoryService.getAllInventoryItems();
}
The above code defines a method called getInventory, which uses the InventoryService class's getAllInventoryItems method to fetch all the inventory items from the database (see the previous tutorial for a reminder on how the InventoryService class was defined). The @GetMapping annotation that labels the method has a produces field set to 'application/json', which means the output list of InventoryItem objects will be serialised as a string of JSON text. The client can parse the JSON string to extract the information it needs.
The @GetMapping annotation also includes a value attribute set to "/items", which means all HTTP requests must target the REST controller's /items endpoint. The REST controller already requires "/api/inventory" to be included in the request URL, so the complete URL would be: http://localhost:8081/api/inventory/items. If the application is running, then you could visit the URL in your web browser to view the output of the GET request. Alternatively, you could submit an HTTP request using a cURL command via your system's command-line tool:
curl --request GET http://localhost:8081/api/inventory/itemsIn addition to retrieving every item in the database, you can also use the @GetMapping annotation to retrieve selected items that fulfil a given criteria. For example, the below code defines a @GetMapping-labelled method called getInventoryItemByID that attempts to retrieve a single InventoryItem object based on its ID.
@GetMapping(value = "/items/{id}", produces = "application/json")
public ResponseEntity<InventoryItem> getInventoryItemByID(@PathVariable Long id) {
    InventoryItem item = inventoryService.getInventoryItemByID(id);
    if (item == null) {
        return ResponseEntity.notFound().build();
    } else {
        return ResponseEntity.ok()
                .body(item);
    }
}
In the above code, the @GetMapping annotation has a value property set to "/items/{id}". When the HTTP request is submitted, the {id} section of the URL will be replaced with the ID of the target inventory item. For example, the URL for a request to retrieve an item with an ID of 23 should be formatted like this: http://localhost:8081/api/inventory/items/23
Likewise, a cURL request to retrieve an inventory item based on its ID is provided below:
curl --request GET http://localhost:8081/api/inventory/items/23In the signature of the getInventoryItemByID method, you should notice an argument called id. The value of the id argument will be extracted from the request URL, as directed by the @PathVariable annotation. In the body of the method, the InventoryService service’s getInventoryItemByID method searches the application's database for the corresponding InventoryItem object. If a matching item is found, then it is returned to the client in the body of a ResponseEntity object. The ResponseEntity object also features other HTTP response data including the status code and headers. If a matching inventory item is found, then the status code will be 200 (OK). Meanwhile, if no inventory item is found for the ID then the status code will equal 404 (Not Found). The client can refer to the status code to assess the outcome of the HTTP request.
@PostMapping
Methods labelled with the @PostMapping annotation will process POST-based HTTP requests, which seek to create new records in the application database. To accomodate requests to register a new inventory item, add the following code to the InventoryRestController class:
@PostMapping(value = "/items", consumes = "application/json")
ResponseEntity<InventoryItem> addItemToInventory(@RequestBody InventoryItem item) {
    InventoryItem createdItem = inventoryService.saveInventoryItem(item);
    if (createdItem == null) {
        return ResponseEntity.internalServerError().build();
    } else {
        URI uri = ServletUriComponentsBuilder.fromCurrentRequest()
                .path("/items/{id}")
                .buildAndExpand(createdItem.getInventory_item_id())
                .toUri();

        return ResponseEntity.created(uri)
                .body(createdItem);
    }
}
The above code handles POST-based HTTP requests to http://localhost:8081/api/inventory/items. The HTTP request body should have a JSON version of the inventory item that the client wishes to create, as specified by the @RequestBody annotation in the method's signature. A reminder of how the InventoryItem class is defined is provided below:
@Data
@Entity
public class InventoryItem {
    @Id
    @GeneratedValue
    Long inventory_item_id;
    String title;
    int quantity = 0;
}
Fields of the InventoryItem class can be left out of the POST request; however, additional fields not specified in the InventoryItem class are not permitted. For example, you could create a new inventory item with the name "2022 Mixtape" using the below cURL command:
curl -H "Content-Type: application/json" -X POST http://localhost:8081/api/inventory/items -d "{\"title\":\"2022 Mixtape\"}"Spring will automatically assign a unique ID value to the InventoryItem object, as directed in the @GenerateValue annotation. Also, the InventoryItem class sets the value of the quantity field to 0 unless directed otherwise. Hence, the above cURL command might create a new InventoryItem with the following configuration:
{"inventory_item_id":1,"title":"2022 Mixtape","quantity":0}The inserted InventoryItem object (with ID) will be returned to the client in a ResponseEntity with a status code of 201 (Created). If no InventoryItem object is created, then then a ResponseEntity with a status code of 500 (Internal server error) will be returned instead because something has gone wrong with the application.
@DeleteMapping
Requests to delete application resources should be handled by methods labelled with the @DeleteMapping annotation. For example, a method that handles requests to delete InventoryItem objects based on their ID could be defined using the following code:
@DeleteMapping("/items/{id}")
public ResponseEntity<Object> deleteInventoryItem(@PathVariable("id") Long id) {
    InventoryItem item = inventoryService.getInventoryItemByID(id);
    if (item == null) {
        return ResponseEntity.notFound().build();
    } else {
        inventoryService.deleteInventoryItemByID(id);
        return ResponseEntity.ok().build();
    }
}
The above method will return a status code of 200 (OK) if the InventoryItem object is deleted or 404 (Not Found) if no corresponding InventoryItem object can be found. To initiate the delete-based HTTP request, you could use the below cURL command. Remember to append the ID of the item that you wish to remove to the request URL.
curl -X DELETE http://localhost:8081/api/inventory/items/2@PutMapping
The @PutMapping annotation helps you update an entire InventoryItem object. If you only want to update a certain field, then you may like to consider the @PatchMapping annotation instead. To define a method for handling PUT-based HTTP requests, you could use the following code:
@PutMapping(value = "/items/{id}", consumes = "application/json")
ResponseEntity<InventoryItem> updateInventoryItem(
    @RequestBody InventoryItem item, @PathVariable("id") Long id) {
    InventoryItem createdItem = inventoryService.getInventoryItemByID(id);
    if (createdItem == null) {
        return ResponseEntity.notFound().build();
    } else {
        item.setInventory_item_id(id);
		inventoryService.saveInventoryItem(item);
        return ResponseEntity.ok()
                .body(item);
    }
}
The above code specifies that the ID of the target InventoryItem object should be included in the request URL, and the details of the InventoryItem should be mapped using JSON, similar to a POST-based HTTP request. If an InventoryItem object matching the ID supplied in the request URL is found, then the corresponding database entry will be updated using the details supplied in the request body. The updated InventoryItem object along with a status code of 200 (OK) will be returned to the client. Meanwhile, if no InventoryItem object is found for the supplied ID, then a status code of 404 (Not Found) will be returned and no further action will occur.
To initiate a PUT-based HTTP request that targets an InventoryItem object with an ID value of 2, you could use the following cURL command:
curl -H "Content-Type: application/json" -X PUT http://localhost:8081/api/inventory/items/2 -d "{\"title\":\"CG Records Greatest Hits\",\"quantity\":234}"@PatchMapping
Methods labelled with the @PatchMapping annotation partially update an existing object. For example, in our inventory management application, we might want a method that updates the quantity of an item whenever an order is placed or new inventory arrives. To define the @PatchMapping method, you could use the following code:
@PatchMapping("/items/{id}")
public ResponseEntity<InventoryItem> updateItemQuantity(
        @RequestBody Map<String, Object> payload, @PathVariable("id") Long id) {
    InventoryItem item = inventoryService.getInventoryItemByID(id);
    if (item == null) {
        return ResponseEntity.notFound().build();
    } else {
        Object newQuantity = payload.get("quantity");
        if (newQuantity instanceof Integer) {
            item.setQuantity((int) newQuantity);
            inventoryService.saveInventoryItem(item);
            return ResponseEntity.ok()
                    .body(item);
        } else {
            return ResponseEntity.badRequest().build();
        }
    }
}
The above code defines a method called updateItemQuantity that will update the quantity value for a given inventory item. The ID of the item should be supplied in the request URL, while the new quantity should be supplied in JSON format under a key called "quantity". For example, a cURL request that sets the quantity to 330 for the inventory item with an ID of 4 would read as follows:
curl -H "Content-Type: application/json" -X PATCH http://localhost:8081/api/inventory/items/4 -d "{\"quantity\":330}"If the item is updated successfully, then the new InventoryItem object and a status code of 200 (OK) will be returned. Meanwhile, if no InventoryItem object is found for the supplied ID then a response status of 404 (Not Found) will be returned. Finally, if the JSON body is not appropriately formatted or no value for the quantity key can be found, then a response status of 400 (Bad Request) will be returned.